Billing Patients
This section explains how to bill claims to patients in AcuityLogic Billing.
If a claim is rejected with a note similar to “patient not eligible for benefits,” bill the claim to the patient.
When billing patients, you always bill manually. AcuityLogic does not automatically send bills to patients.
Topics include the following:
Printing Patient Bills Individually
- Open the Claim Detail window for a claim you want to bill to a patient. See To open the claim detail window.
- Perform one of the following actions:
- To mark all line items on the claim as Ready to Bill Patient, click Ready to Bill Patient.
- To mark one line item as Ready to Bill Patient, select Ready to Bill Patient from the Action drop-down list of that line item.
- From the Rejection Reason drop-down list, select a rejection reason. This reason appears on the billing statement.
- In the Please enter a reason below field, enter more information about the rejection. This information appears on the billing statement.
- Click Save.
- Click Generate Statement.
- (Optional) In the Edit Comments window, edit, replace, or delete the default comment:
This comment appears above the detachable coupon at the bottom of the billing statement. It can contain up to 350 characters.
The comment applies to a single generation of the statement. Each time you regenerate the statement, you must re-edit a customized comment.
- Click Generate Statement.
The claim status changes to Billed to Patient, and the patient’s billing statement is downloaded as a PDF in a new window.
- Print the billing statement, and send it to the patient.
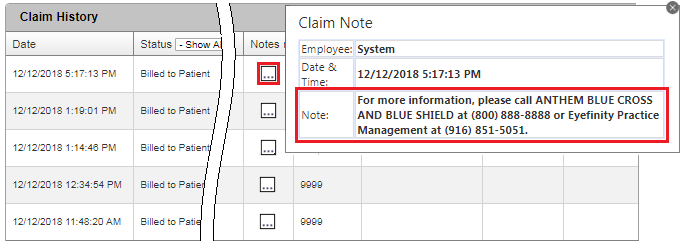
- To view the comments added to each patient billing statement in the Claim Detail window, click the ellipsis in the Notes column of the window’s Claim History section:

Printing Batches of Patient Bills and Past Due Notifications
This section explains how to print batches of bills and past due notifications for patients.
- Click Billing Claim, and select Patient Letter.
The Billing Claims > Patient Letter window opens.
- To search for claims from a specific carrier, select the carrier from the Carrier drop-down list.
- To search for claims from a specific date range, select a start date from the Service Date From drop-down list and an end date from the Service Date To drop-down list.
- Click Search.
All claims that meet your search criteria and have the status Ready to Bill Patient are displayed.
To view all claims with the status Ready to Bill Patient, leave all the search criteria fields blank, and click Search. - Select the check boxes for the claims that you want to bill to patients.
- To print bills for patients that you already billed, select the Generate new notification for patient past dues check box.
- If you select this check box, the patients with past due claims do not appear in the list, but the bills print as part of the PDF.
- After generating the bills for past due claims, AcuityLogic automatically changes the status of these claims from Billed to Patient to On Hold, Ready to Bill Patient, and then Billed to Patient.
- Click Generate Form.
- The claim status changes to Billed to Patient, and the patient bills are downloaded in a single PDF file in a new window.
- Print the patient bills, and send them to the patients.