Creating Eyeglass Orders in AcuityLogic POS
You can create eyeglass orders for patients with an eyeglass prescription recorded. See Managing Patient Prescriptions.
To create eyeglass orders
- Open a patient profile. See Opening Patient Profiles.
- Select the Orders tab.
- Click New Eyeglass Order.The Eyeglass Order tab opens.
- If you are copying a previous order, select the order number and date from the Copy Order drop-down list; otherwise select No.
- Select the order type from the Eyeglass Order Type drop-down list.
- If using a Lens Package, select from the drop-down list.AcuityLogic adds the components in the lens package to the order.
- Select the Eyewear Consultant from the drop-down list.AcuityLogic associates the productivity and commission information for the order with the selected consultant.
- Select the Lab from the drop-down list. The system filters the frame and lens options based on your lab selection.
- Select the shipping location and address from the Ship To and At Address drop-down lists.If you select Mail to Patient in the Ship To drop-down list, AcuityLogic prompts you to add a shipping fee to the order in the Pricing window.
- Click Next.The Lenses tab opens.
- Compete the Lenses tab. If a lab is selected, the system filters these options based on the lab.
- Select the lens type from the Type drop-down list.
- Select the lens material from the Material drop-down list.
- Select the style from the Style drop-down list.
- Select the color from the Color drop-down list.
- Select the coating from the Coating drop-down list.
- Apply the lens to the appropriate eye(s) by clicking Both, Right, or Left.
- Click the link for the prescription that you want to apply to the order in the Exam# column.
- Select the Uncut check box if the order is for uncut lenses.
- Select the Convert to Reading Rx check box if you want to convert the selected prescription to a reading prescription.
- Record the pupillary distance measurements for each eye in the Far PD fields. The measurements in the Near PD fields are automatically calculated based on your entries in the Far PD fields.
- Record any additional measurements, if needed.
- Click Next.
The Frame tab opens.
- Complete the Frame tab. If a lab is selected, the system filters these options based on the lab.
- Search for the frame using one of the following methods:
- Enter or scan the UPC bar code and/or Item Number for a frame in the UPC and/or Item Number fields and click Search.
The details for the frame populate the fields in the Selected Frame section.
- Select the collection or enter the collection name in the Collection drop-down list, select the frame model from the Model drop-down list, enter or select the frame category in the Category drop-down list, and click Search. Select the frame in the search results list that displays.
The details for the selected frame populate the fields in the Selected Frame section.
- Select the status from the Frame Status/Source drop-down list.
- Select the distribution center or lab from the DC/Lab Num drop-down list, if needed.
- Select the frame shape from the Frame Shape drop-down list, if needed.
- Select the frame edge type from the Frame Edge Type drop-down list, if needed.
- Select the Safety Frame check box, if needed.
- AcuityLogic automatically selects the Safety Frame check box if you selected a frame set up as a safety frame in AcuityLogic Admin.
- You can select the Safety Frame check box only if the order is a lenses-only order and you selected Customer Own in the Frame Status/Source drop-down list.
- Click Next.
The Extras tab opens.
- In the Extras tab, select any necessary tints, edging, coatings, and miscellaneous items from the available drop-down lists.
- Click Next.
The Summary tab opens.
- Complete the Summary tab.
- Enter any additional lab instructions in the Lab Instructions field, if needed.
- Select the necessary Lab to Make check boxes to indicate the items the lab is making.
- Select the dispensing status from the Dispensing Status drop-down list.
- Enter any additional dispensing notes in the Dispensing Notes field. if needed.
- Complete the order using one of the following methods:
- Click Complete Order to set the order status to hold and return to the Orders tab.
- Click Complete Order to Pricing to open the order in the Order Pricing window.
Override Lab Validation
- AcuityLogic validates the lab selection when you complete the order. If the lens/frame options are not consistent with the selected lab, you receive the following message:
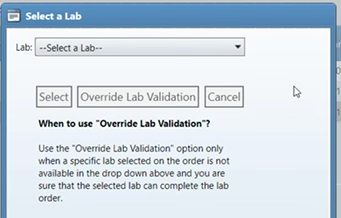
- You can select another lab, override the lab validation and continue with the selected lab or cancel the order.
- Only use Override Lab Validation when you are sure you have selected the correct lab; otherwise, the order may be processed incorrectly or the claim may be rejected. If you use Override Lab Validation, follow up with your administrator to ensure the lab is set up correctly.