Recording Physical Counts for a Central Inventory Session in AcuityLogic POS
If your company is set up to use central inventory, you can freeze and record physical counts for your location at the date and time scheduled for the central inventory session. After you finish recording physical counts, you can close the session to let users in AcuityLogic DC know the session is complete.
To record physical counts for a central inventory session
- Open the Physical window. See Opening the Physical Window in AcuityLogic POS.
- Locate the central inventory session you want to add information to by Physical ID in the Physical window.
- Click the Freeze link for the session to freeze inventory.The Freeze link is available at the date and time entered for the central inventory session.
The Freeze link may be unavailable if your inventory was frozen in AcuityLogic DC. If your inventory was frozen in AcuityLogic DC, the status of the session will be Freeze and the Scan link will be available for you to begin recording physical counts. - Click the Scan link to begin recording inventory counts.
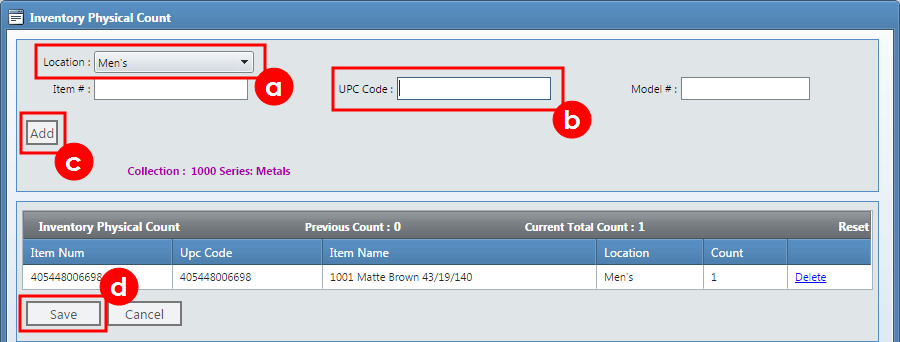
The Inventory Physical Count window opens.
- Follow the process below to record the count for an item:

- Select an inventory location in the Location drop-down list. See Managing Inventory Locations in AcuityLogic POS.
- Click inside the UPC Code field and scan the bar code for an item you have in stock using a bar code scanner.
AcuityLogic populates the details for the scanned item.
- Click Add.
- Click Save to close the Inventory Physical Count window.
- In the Action section, click the Finished link to close the session and to indicate in AcuityLogic DC that you finished recording physical counts.The Post link to post inventory is unavailable when your company is set up to use central inventory.
Click the Finish link if you need to reopen a session. The Unfinish link is available until inventory is posted in AcuityLogic DC.