What's New in AcuityLogic 7.10 for On-Premises Users
Eyefinity announces the newest version of AcuityLogic. In addition to resolving known issues in previous versions of AcuityLogic, this updated version offers new features and expanded functionality.
Topics include the following:
For more information on AcuityLogic features, training, and integrations, contact your account representative, or call Eyefinity at
Admin Enhancements
Admin includes enhancements in the following areas:
Customizing Patient Billing Statements
You can now customize your company's patient billing statement in the Company Information window's Patient Billing Statements and Invoice Customization menu as follows:
- Show or hide the order number.
- Change the header background and text colors.
- Enter customized payment text for your company.
- Customize the caption for your company:
- Specify whether the caption includes the insurance carrier's default phone number, no number, or a custom number.
- Specify whether the caption includes your company phone number or the phone number of the office generating the statement. The default company and office numbers are specified in the Company Information window and the Office Information window respectively.
By default, this caption appears on all patient billing statements. If necessary, you can edit the caption for an individual statement in AcuityLogic Billing. - Specify whether the caption includes the insurance carrier's default phone number, no number, or a custom number.
- After uploading a logo to appear on patient billing statements, adjust its height and width with the sizing handles, and adjust its position by dragging it.
- Click Preview to view and save your changes.

Improving Performance in the Insurance Billing Rules Window
Assigning a Home Doctor to an Office
You can now assign a home doctor to your offices to populate the following boxes in the CMS 1500 form and electronic claim submissions when an employee doctor is not associated with an order:
- Box 24j — Home doctor National Provider Identifier (NPI)
- Box 31 — Home doctor name
Typically, home doctors are used when an order includes an outside prescription.
-
Any active doctor in your company can be a home doctor.
- Each office can have only one home doctor, but the same doctor can be the home doctor for multiple offices.
- In each office, the same home doctor is used as the rendering doctor for all insurance plans (medical, vision, or both). Therefore, all home doctors should be configured to support most, if not all, insurance plans.
- If you do not specify a home doctor, AcuityLogic selects a rendering doctor based on existing logic involving doctors on the Scheduler for the day or the Company Doctor specified in Admin.
- If a home doctor leaves your company, the system administrator must manually update the Home Doctor field in Admin.
To specify a home doctor for an office
- In Admin, click Company, and select Company Setup.
- In the row of the appropriate company, click the Offices link.
- In the Company Offices table, click the office number link in the Office # column.
- In the Office Information window, click Billing Information.
- In the Billing Information window, select a home doctor from the Home Doctor drop-down list:

- Save your change.
Exporting Partner Codes for Eyeglass Lenses
When you export eyeglass lens information for an office to Excel, you can now include partner codes that are mapped to that information.
To export partner codes for eyeglass lenses
- In Admin, click Product, select Eyeglass Lens, and then select Eyeglass Lens.
- In the Eye Glass Lens window, select the office whose information you want to export.
- Select the Export Partner Mapping check box.
If this check box is not selected, the exported Excel spreadsheet includes the partner code columns but not the codes.
- From the Partner Mapping drop-down list, select the partner whose codes you want to export.
The list contains the same partners that appear in the Product Partner Mapping window.

- Click Export.
The exported Excel spreadsheet includes the selected partner's codes mapped to the specified office's eyeglass lenses.
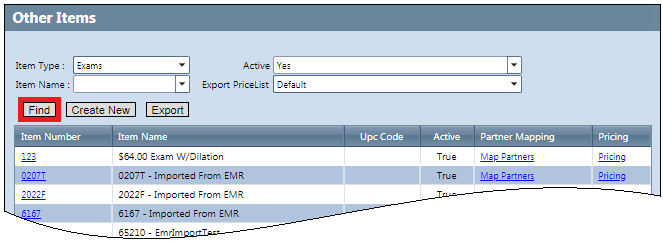
Viewing Filtered Exam Information for Exports
When exporting a company's filtered exam information, you can now use the new Find button to view the results in the table before you export.
To view filtered exam information for exports
- In Admin, click Product, and then select Other Items.
- In the Other Items window, select Exams from the Item Type drop-down list.
- From the Item Name drop-down list, select an exam name to limit the items returned by the search.
To export all exams configured for the company, leave the field empty.
- From the Active drop-down list, select Yes or No.
To export both active and inactive exams, leave the field empty.
- From the Export PriceList drop-down list, select the price list to apply to the exported exams.
Pricing based on the selected price list appears in the Price column of the exported Excel spreadsheet.
- Click Find.
The table in the Other Items window is updated to reflect your search criteria.
- Click Export.
The items in the table are exported to an Excel spreadsheet.
The spreadsheet contains a new Included column, which specifies whether an exam is/is not (Yes/No) mapped to your company.
Taxing Accessories at the Lens Base Rate
If you use the Tax Calculator, you can now configure accessories to be taxed at the ophthalmic (lens base) tax rate instead of the rate set up for the accessory. To configure an accessory to be taxed at the lens base rate, select the Tax at Ophthalmic Rate check box in the Accessories window.

Billing Enhancements
Billing includes enhancements in the following areas:
Exporting Reports in CSV Format
You can now export the following Billing reports in comma-separated values (CSV) format:
- Billing Payment by Transaction Date Report (GB130)
- Claim Collection Report (GB128)
- Claim Transaction Journal Report (GB109)
- Doctor Exam Sales Report (GB122)
- EDI Billed Claim Statistics (GB123)
- Patient Refund Report (GB111)
To export a report in CSV format:
- Open the report in Billing.
- In the report window, enter the appropriate values.
- Click Generate.
- Click Export to CSV.
For example:

The report is exported in CSV format to your default download folder.
For example:
EmployeeName,CarrierName,TotalClaims,FileName
Test Employee,AETNA,8,20180702100105_RSN_hitecT1_Steve222_AETNA.txt
Test Employee,Davis Vision,1,20180702100114_RSN_hitecT1_12345_DSV.txt
Test Employee,AETNA,1,20180703191336_RSN_hitecT1_Steve111_AETNA.txt
Test Employee,Davis Vision,7,20180703191342_RSN_hitecT1_12345_DSV.txt
Test Employee,Davis Vision,4,20180705075639_RSN_hitecT1_12345_DSV.txt
Test Employee,Davis Vision,1,20180705100130_RSN_hitecT1_12345_DSV.txt
Test Employee,AETNA,2,20180705120111_RSN_hitecT1_Steve111_AETNA.txt
Test Employee,Davis Vision,1,20180705120122_RSN_hitecT1_12345_DSV.txt
Test Employee,Davis Vision,6,20180705140122_RSN_hitecT1_12345_DSV.txt
Test Employee,AETNA,3,20180706100120_RSN_hitecT1_Steve222_AETNA.txt
Test Employee,Davis Vision,5,20180706100140_RSN_hitecT1_12345_DSV.txt
Test Employee,AETNA,1,20180706120129_RSN_hitecT1_Steve111_AETNA.txt
...
Enhancing the IDPA Reports
The Illinois Department of Public Aide (IDPA) reports have been enhanced as follows:
Illinois Department of Public Aide Lab Order (GB126)
- You can now print a ship-to address other than the corporate office on an optical prescription order:
- In Admin, click Company, and select Company Setup.
- In the Company Information window, click the Add. Carrier Att. link in your company's row.
- In the Company Carrier window, click the Provider Mgmt link in the row of the carrier whose ship-to address you want to update.
- In the Provider Number Management window, select the appropriate address from the new Billing Preference field.
Your selection also determines which address is entered in box 33 on the CMS 1500 form (it takes precedence over the Company > Office Information > Billing Information > CMS Box 33 value). By default, the order is shipped to the corporate office.

- You can now autopopulate the Date field at the bottom of the optical prescription order with the date the order is printed. To do so, select the new Auto Populate Signature Date with Print Date check box when you generate the order. Previously, the date had to be entered manually.

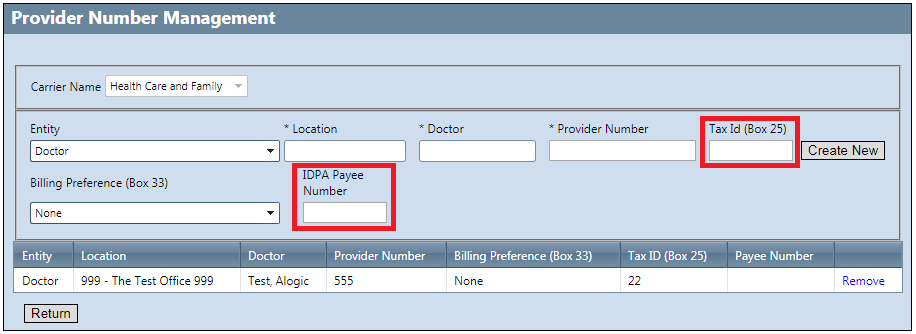
Illinois Department of Public Aide Provider Invoice (GB127)
You can now assign a payee number and a tax ID to a specific doctor in a specific office. To do so, use the following new fields in Admin's Provider Number Management window:
- IDPA Payee Number: Enter only a single numeric digit. Previously, the payee number was hard-coded to print 1 for all entities.
- Tax Id (Box 25): Enter up to 9 digits. Do not enter alphanumeric or special characters.
Populating Box 33b in the CMS 1500 Form
In the Billing Provider Information section of the Edit Claim window, you can now use the new Other ID field to enter the following numbers into Box 33b of the CMS 1500 form:
- State license
- Unique physician identifier (UPIN)
- Provider commercial
- Provider taxonomy
The Other ID field can contain up to 15 characters of alphanumeric free text.
You specify the number type by selecting a value from the Other ID Qualifier drop-down list:

In the CMS 1500 form, the qualifier is prepended to the ID in box 33b (for example, ZZ321654987321654).
POS Enhancements
POS includes an enhancement in the following area:
Adding Balance Lens Information to DVI Files
Fixed Issues
AcuityLogic 7.10 fixes issues in the following areas:
BackOffice
Billing
- The Billing Adjustments Report (GB116) now includes all adjustment transactions that occur during the report's time period, including auto-adjustments (refunds and remakes) and post-billing adjustments, which can be verified against the Billing Transaction Report (GB117).
POS
-
- The Summary tab for a contact lens order now shows the correct ship-to address. Previously, the tab showed whichever office the user was logged in to.
- When you adjust the sales price of an order before a patient makes a payment, the adjustment is now displayed in the new Adjustment Amt. column on the final patient invoice and subtracted from the balance due. Previously, although the adjustment was factored into the balance due, it was not displayed on the invoice.
- When you calculate insurance benefits for a VSP order, you no longer receive an unknown error if the exam's Exam Type field is empty.
- When a pricing option is included on an order, the pricing option is also included for any refund or remake associated with the order. Previously, pricing options were not included for refunds and remakes, which made it difficult to match them to their corresponding sale for reconciliation. Similarly, pricing options are now included for refunds and remakes in the BackOffice Pricing Options Detail Report (AC156).
- If you create a hard contact lens prescription for one eye and then print it, the printout now contains information for only that eye. Previously, the printout also contained erroneous power, color, and quantity information for the other eye.