Customizing Patient History Questions in the Kiosk
You can customize which past medical, surgical, and social history questions are presented to patients within the portal and kiosk. You can hide sections of the social history that are not applicable to your scope of practice. Customizations made to the patient Clipboard apply to all clinical staff and patients within your practice.
The conditions and surgeries you chose to display to clinical staff are also displayed to patients within the patient portal. However, you can choose from a selection of colloquial terms, so that patients are not presented with unfamiliar medical terminology.
For any conditions or surgeries you choose to display to clinical staff and patients, you can choose whether new and/or established patients are presented with these questions in the kiosk.
 To navigate to the custom Clipboard settings
- Log in to the Eyefinity EHR web application as an administrator.
- Click the Clipboard/Kiosk/Portal Settings tab.
OR
Locate and expand the Patient Clipboard, Kiosk, and Portal Settings section and click the Manage Sections button.
To manage past medical history questions
- Log into the Eyefinity EHR web application as an administrator and click the Clipboard/Kiosk/Portal Settings tab.
- Click the Past Medical History tab on the left side of the page.
- For each medical condition or surgery, select the Clipboard and Portal check box to display the condition to clinical staff and patients. Deselect the check box to hide the condition or surgery from everyone.
- For each medical condition and surgery you've enabled, select the New and Existing check boxes to display the condition or surgery to new and established patients within the kiosk.
- For each medical condition and surgery you've enabled, click the Patient Term Description drop-down menu select the description that patients see within the portal and kiosk.
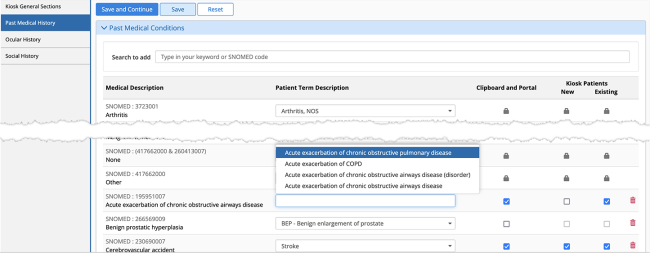
When you deselect the Clipboard and Portal check box, the condition or surgery is hidden from the patient Clipboard, the patient portal, and the kiosk. However, clinical staff can search for and add conditions and surgeries to an individual patient's Clipboard as needed to complete the patient's history.
Conditions and surgeries that display a lock icon rather than a check box are required for legal or regulatory reasons and cannot be hidden.
To add a condition or surgery that doesn't appear in this list, search for it in the Search to Add field at the top of the list.
To hide a condition or surgery from this list in administration, click the Delete icon in the right column. To display a condition or surgery that you've hidden, search for it in the Search to Add field at the top of the list.
- Click Save to apply your changes.
 To manage past ocular history questions
- Log into the Eyefinity EHR web application as an administrator and click the Clipboard/Kiosk/Portal Settings tab.
- Click the Ocular History tab on the left side of the page.
- For each ocular condition or surgery, select the Clipboard and Portal check box to display the condition to clinical staff and patients. Deselect the check box to hide the condition or surgery from everyone.
- For each ocular condition and surgery you've enabled, select the New and Existing check boxes to display the condition or surgery to new and established patients within the kiosk.
- For each ocular condition and surgery you've enabled, click the Patient Term Description drop-down menu select the description that patients see within the portal and kiosk.
When you deselect the Clipboard and Portal check box, the condition or surgery is hidden from the patient Clipboard, the patient portal, and the kiosk. However, clinical staff can search for and add conditions and surgeries to an individual patient's Clipboard as needed to complete the patient's history.
Conditions and surgeries that display a lock icon rather than a check box are required for legal or regulatory reasons and cannot be hidden.
To add a condition or surgery that doesn't appear in this list, search for it in the Search to Add field at the top of the list.
To hide a condition or surgery from this list in administration, click the Delete icon in the right column. To display a condition or surgery that you've hidden, search for it in the Search to Add field at the top of the list.
- Click Save to apply your changes.
To manage past social history questions
- Log into the Eyefinity EHR web application as an administrator and click the Clipboard/Kiosk/Portal Settings tab.
- Click the Social History tab on the left side of the page.
- For each social history category, select the Clipboard and Portal check box to display the section to clinical staff and patients. Deselect the check box to hide the section from everyone.
- For each social history section you've enabled, select the New and Existing check boxes to display the section to new and established patients within the kiosk.
You can show or hide social history by section. You cannot show or hide individual social history questions.
When you deselect the Clipboard and Portal check box, the social history section is hidden from the patient Clipboard, the patient portal, and the kiosk. Unlike other areas of the Clipboard, clinical staff cannot search for and add hidden social history sections..
Social history sections that display a lock icon rather than a check box are required for legal or regulatory reasons and cannot be hidden.
- Click Save to apply your changes.