What's New in Encompass 5.24
Released April 23, 2021
Eyefinity announces the newest version of Eyefinity EHR! In addition to resolving known issues in previous versions, this updated version improves upon its robust attributes and offers useful new features and expanded functionality. For additional information on Eyefinity EHR features, training, and integration with practice management systems, visit www.eyefinity.com or call 800.942.5353.
To see the new features action, watch the recorded webinar.
This section includes:
- Clinical Summary Dashboard
- Eyewear Prescriber Electronic Handwritten Signature
- Vision Therapist User Role
- Search Plans by CPT
- Medication Prescriptions
- 21st Century Cures Act
Clinical Summary Dashboard
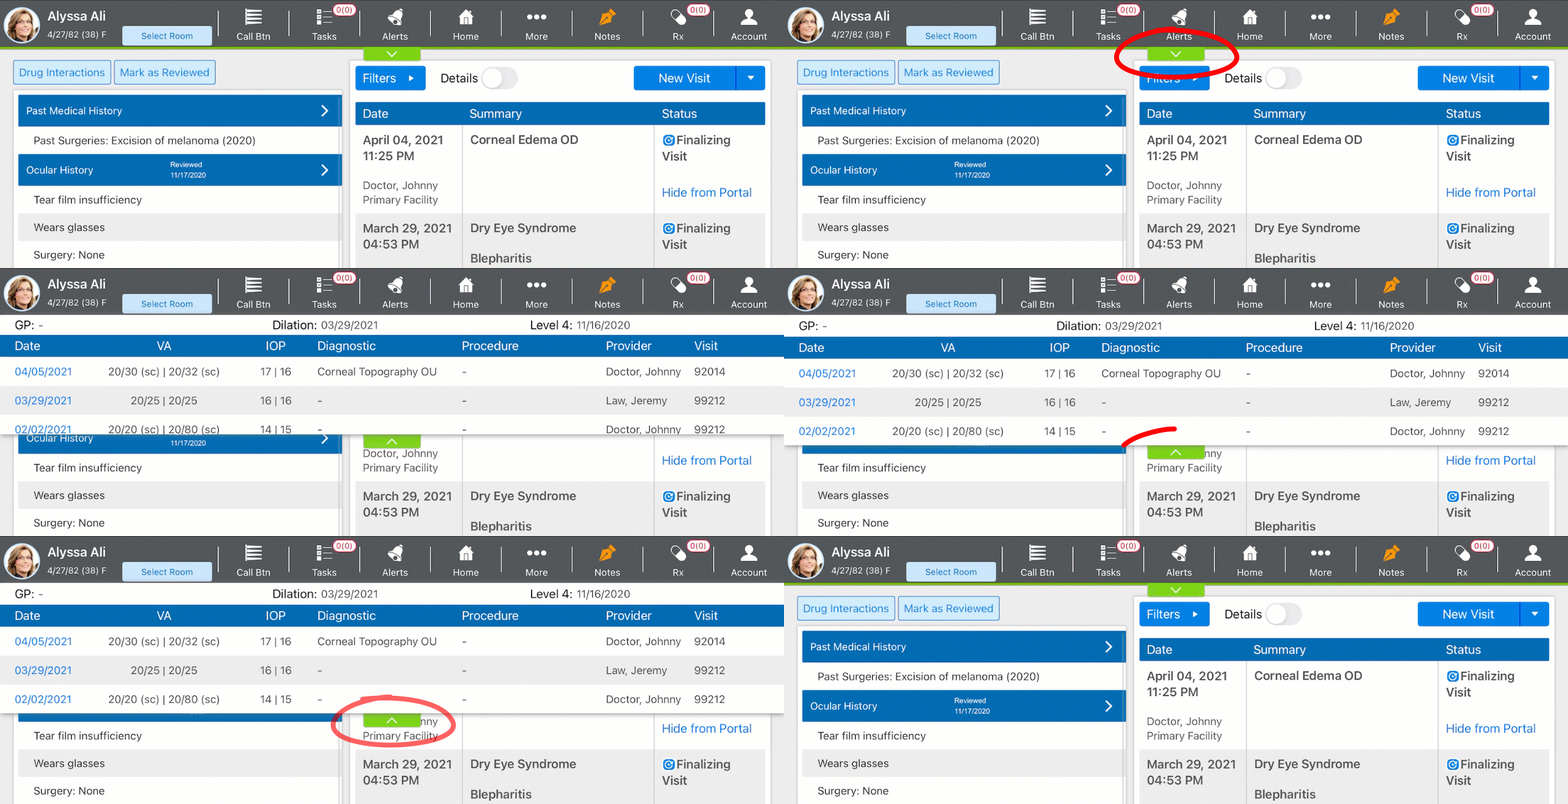
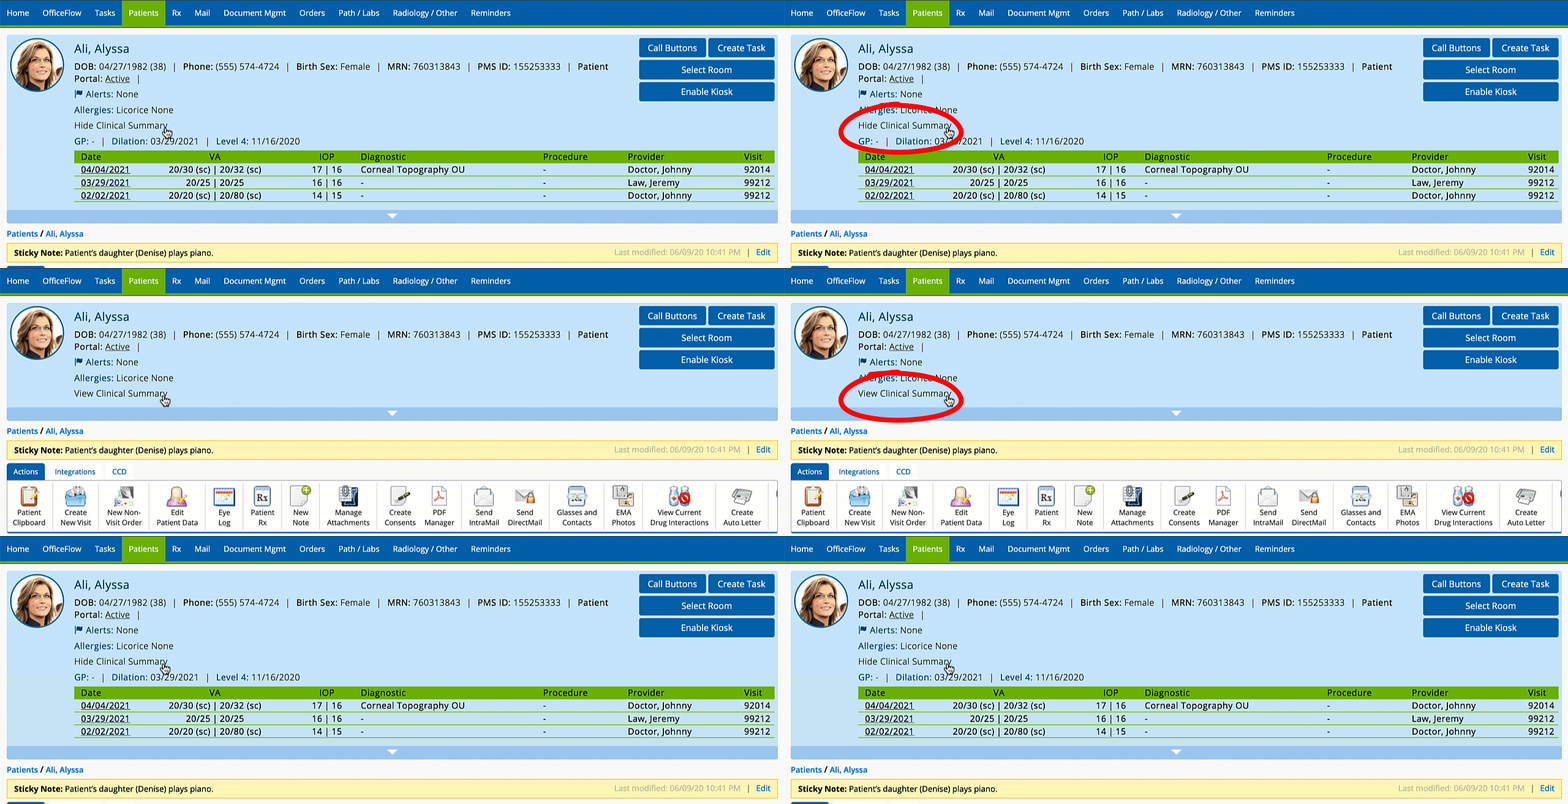
You can now quickly view information from a patient's last three visits on a new clinical summary dashboard. The dashboard lists diagnostic tests, procedures, most recent dilation date, VAs, IOPs, and more. You can access the clinical summary dashboard from the Patient Chart, Visit Overview, CC/HPI, Vision Exam, and Ocular Exam. The dashboard appears as a drop-down on both the iPad app and the web.
You can open any of the three preliminary or finalized exams from the clinical summary dashboard by selecting the date hyperlink.
iPad App
The dashboard is hidden by default in the iPad app. Here's how to view and hide the clinical summary within the iPad app:
- Tap the drop-down tab to show the dashboard.
- Tap the tab again to hide the dashboard.
Browser Application
The dashboard is visible by default in the browser application. Here's how to hide and show the clinical summary within the browser application:
- Click the Hide Clinical Summary link to hide the dashboard.
- Click the View Clinical Summary link to show the dashboard again.
Eyewear Prescriber Electronic Handwritten Signature
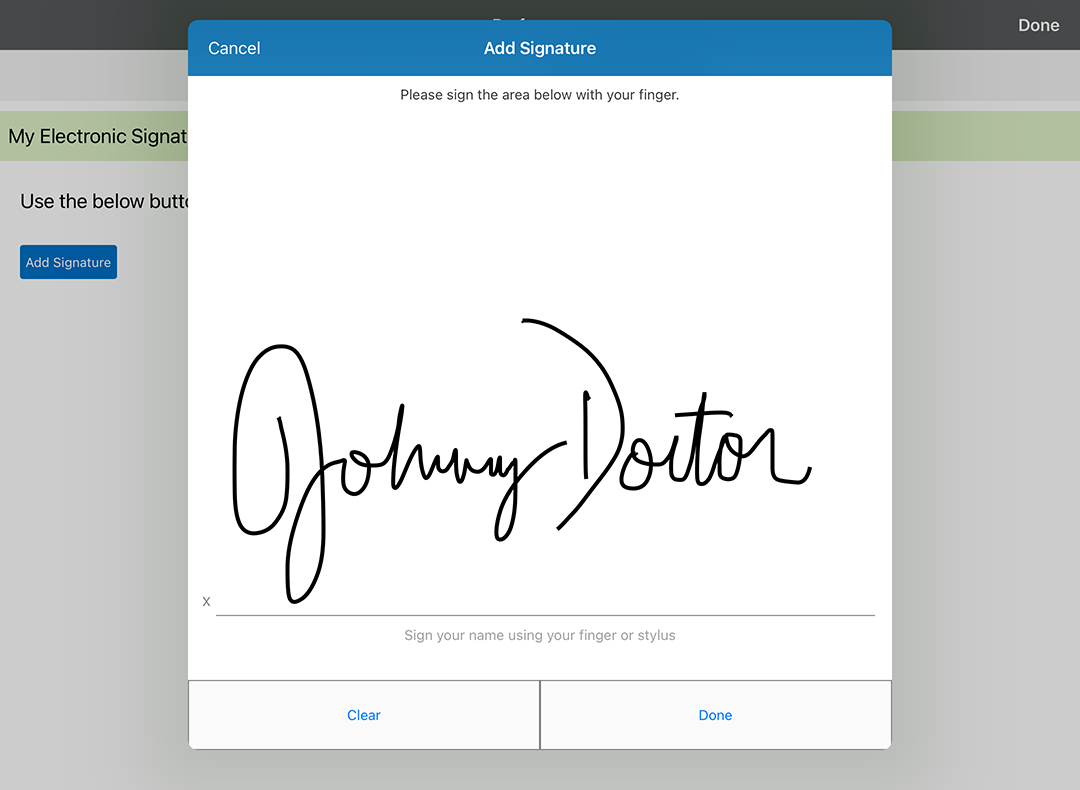
Now, you can create an electronic handwritten signature to print on glasses and contact lens prescriptions. You can restrict your signature so only you can print your prescriptions with your signature visible, or you can allow practice staff to print your prescriptions with your signature. You can write your signature directly in the iPad app, or you can import a digitized scan of your signature into the browser application. Once your signature has been added to the iPad app or the browser, it's available to print on prescriptions on both platforms.
iPad
Here's how to create an electronic signature within the iPad app:
- Tap the Account action bar icon and select Preferences.
- Tap the My Electronic Signatures tab.
- Tap Add Signature.
- Sign your name on the screen using your finger or a stylus and tap Done.
- Toggle the Signature Permission Settings off as needed and tap Done.
Browser Application
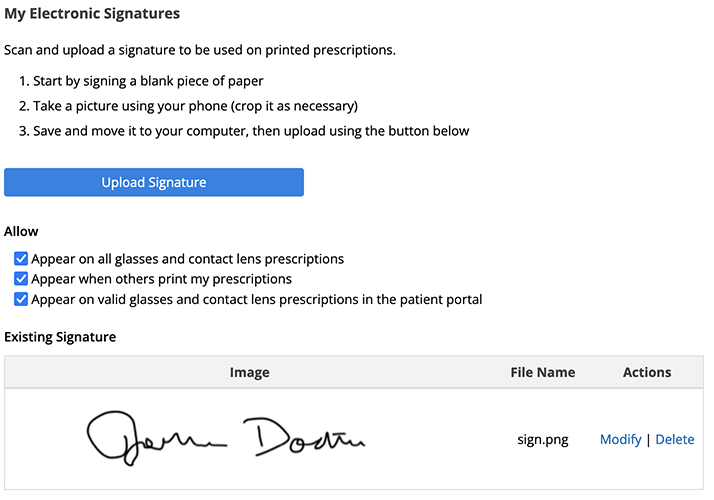
To add your electronic signature within the browser application, you'll first need to digitize your signature by scanning it. Once you have an image file (JPG, GIF, TIF, BMP) of your signature, add it to Encompass:
- Within Eyefinity EHR, click Preferences.
- Click the Upload Signature button.
- Locate the signature image file on your computer.
- Deselect the signature permission check boxes as needed, and click Save.
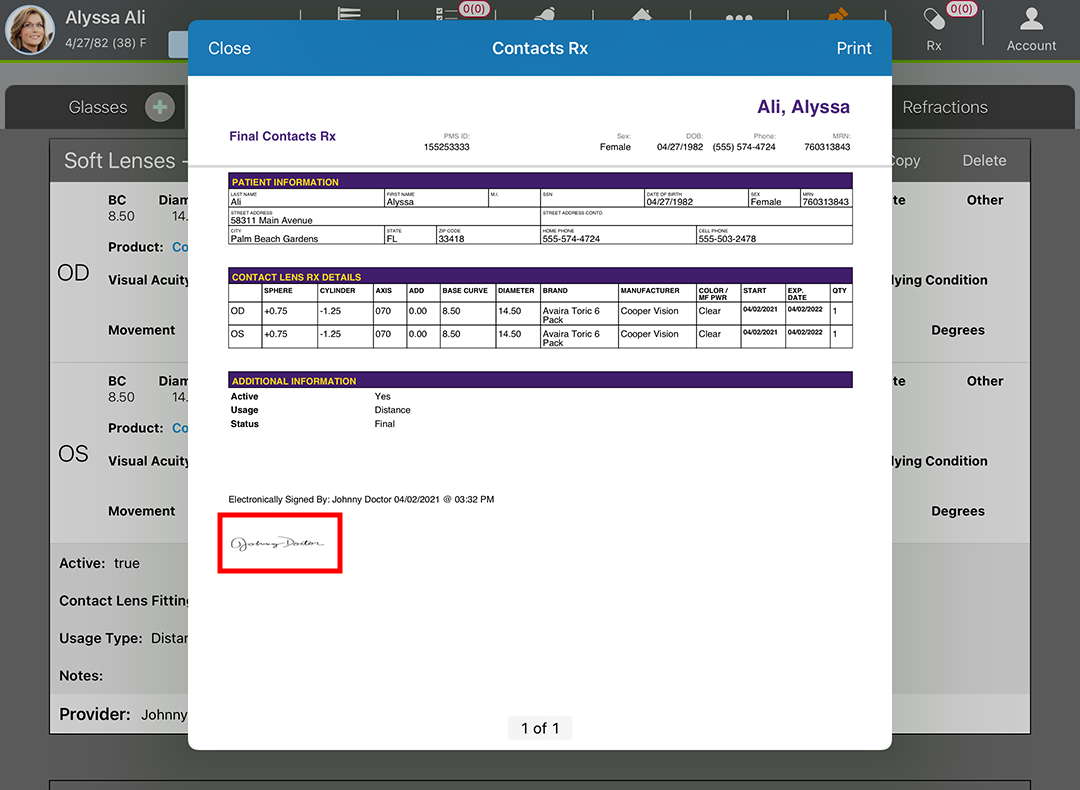
Once your signature has been saved in Eyefinity EHR, it will appear at the bottom of your glasses and contact lens prescriptions according to your preferences.
The electronic signature in Eyefinity EHR is not connected to any signatures you may have saved in your practice management system. Those signatures and preferences are managed independently.
Vision Therapist User Role
We added a new user role called "vision therapist." Vision therapist is a Tier 2 user, To learn more about user tiers, go to Understanding User Roles.
Here's how to assign the role of vision therapist to a user:
- Log in to the Encompass web application as an administrator.
- Click Create Account to add a new user, or select a username from the from the list of existing users to change a user's role.
- Click the Role drop-down menu and select Vision Therapist.
- Change other user settings as needed.
- Click Save.
Search Plans by CPT
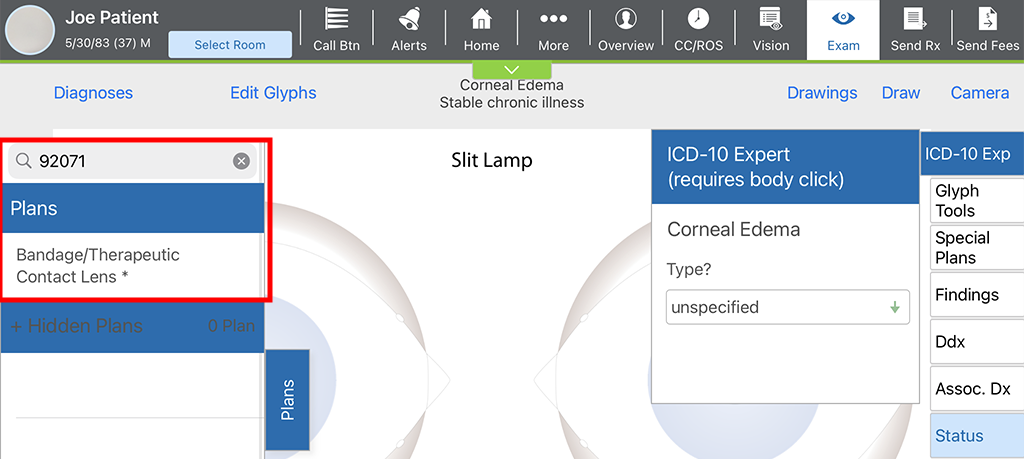
In the Ocular Exam, you can now search for plans by name or by code. Here's how
- Open the Ocular Exam and select an exam type.
- Select a Diagnosis.
- In the Search field, enter the plan name or the CPT code and select Complete Plan/Code Search.
- Select the desired plan from the results.
Medication Prescriptions
We made minor improvements to medication prescriptions:
- Create medication prescriptions with a quantity based on the amount in the selected packaging size.
- We updated medication prescription units to current NCPDP standards.
21st Century Cures Act
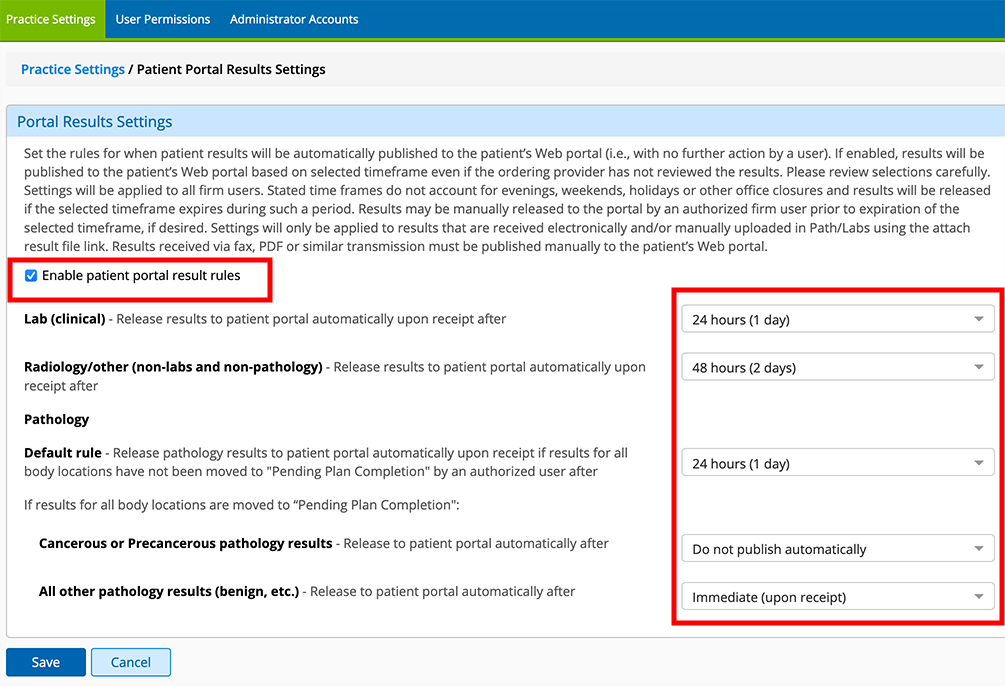
To support your compliance with the information blocking rules that went into effect on April 5, we added a preference whereby Eyefinity EHR may automatically publish lab results to the patient portal. If enabled, you can tell Eyefinity EHR how long to hold the lab results prior to publishing them to the patient portal (up to four days) in order to give your providers time to review the results before the patient sees them. This is a global setting that applies to the whole practice. To enable lab results to be automatically published to the patient portal, perform the following steps:
- Log in to the Encompass web application as an administrator.
- Locate the Results Workflow Management group and click the Patient Portal Results Settings button.
- Select the Enable Patient Portal Result Rules check box.
- For each of the types of results, select a release schedule between zero to four days, or select to exclude it from automatic release.
- Click Save when you're finished.
This feature was released on March 26, prior to the Eyefinity EHR 5.24 update. To learn more about information blocking rules, visit our regulatory help site.
