Setting Up Company Tax Authorities
This topic tells you how to set up tax authorities for your company and includes:
Setting Up Tax Authority Levels
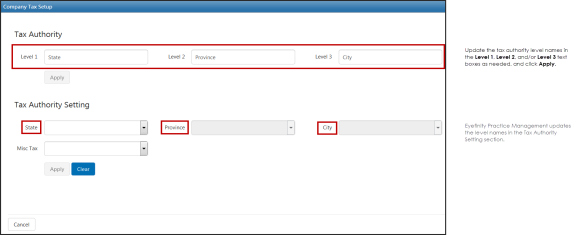
Encompass includes three default tax authority levels: state, county, and city. You can change the tax authority level names or set up only the tax authority levels required for your company.
- The following process is required only if you want to update the default tax authority levels.
- Set up only the tax authority levels you need for your company. For example, you do not have to set up a City tax authority level if city taxes are not applicable to any of your offices.
- Set up the tax authority levels in order. If your company requires only two tax authority levels, you must set up the Level 1 and Level 2 tax authorities. You cannot set up the Level 1 and Level 3 tax authorities.
- On the Encompass home screen, click Administration.
The Company: Setup screen opens.
- On the top menu bar, click Company Mgt. and select Company Information.
The Company Information screen opens.
- Under Tax Information, click the Review link.
The Company Tax Setup window opens.
- Type the new tax authority level names in the Level 1, Level 2, and/or Level 3 text boxes as needed in the Tax Authority section and click Apply.
Encompass updates the tax authority level names in the Tax Authority Setting section.
Setting Up Tax Authorities
For each tax authority level, you can add the tax authorities needed for your company. You can also add miscellaneous tax authorities required for your company. You can update the default state, county, and city tax authority levels if needed. For more information on updating tax authority levels, go to Setting Up Tax Authority Levels.
- On the Encompass home screen, click Administration.
The Company: Setup screen opens.
- On the top menu bar, click Company Mgt. and select Company Information.
The Company Information screen opens.
- Under Tax Information, click the Review link.
- Select Edit Entries in the drop-down list for the first tax authority level.
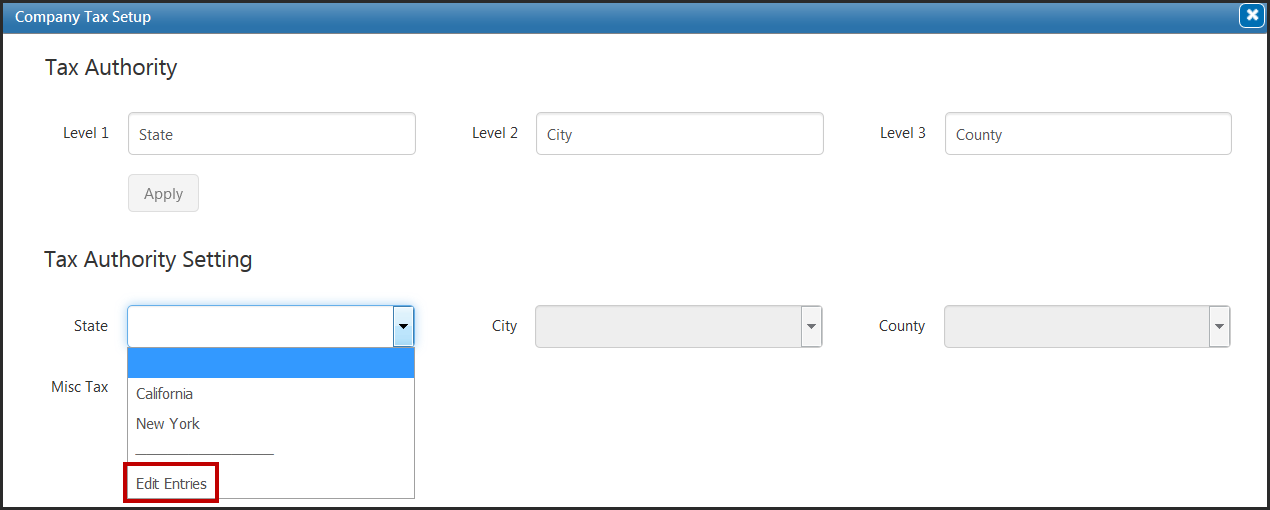
The Edit Entries window for the Level 1 tax authority opens.
- Type the name of the Level 1 tax authority in the text box and click the plus icon.
- Repeat step 4 for each Level 1 tax authority you want to add.
- Click Save.
- Repeat steps 3 through 6 to add tax authorities for the second and third tax authority levels, if needed.
- Set up only the tax authorities for the tax authority levels you need for your company.
- Add tax authorities for the three tax authority levels in order. For the default state, county, and city tax authority levels, add state tax authorities before you add county tax authorities for the state and add county tax authorities before you add city tax authorities for the county.
- Select Edit Entries in the Misc Tax drop-down list if you want to add miscellaneous tax authorities.
-
- You cannot access the Misc Tax drop-down list if you have tax authorities selected in the other tax authority level drop-down menus.
- The Misc Tax drop-down menu already contains some tax authorities. Eyefinity set up these tax authorities with tax rates you entered for your offices previously.
The Edit Misc Tax Entries window opens.
- Type the name of the miscellaneous tax authority in the text box and click the plus icon.
- Repeat step 9 for each miscellaneous tax authority you want to add.
- Click Save.