Setting Up the SATO CG408TT Label Printer (Discontinued)
The SATO CG408TT printer has been discontinued by the manufacturer, but is still supported by Encompass. You can set up and use the l printer on an Apple Mac computer and a Windows PC.
- Setting Up the SATO CG408TT Label Printer with a Mac
- Setting Up the SATO CG408TT Label Printer on a Windows PC
-
Eyefinity recommends that you purchase frame labels and ribbon from Think Smart for all barcode printing in Encompass. Order these labels directly from Think Smart at 800.941.4913, option 2.
-
Labels not printing correctly? See Troubleshooting Label Printer Problems.
Setting Up the SATO CG408TT Label Printer with a Mac
Before you can print labels on the SATO CG408TT label printer on an Apple Mac computer, complete the following procedures:
- Installing the SATO CUPS Driver
- Connecting the Label Printer
- Setting Up Labels to Print from Encompass Front Office
Installing the SATO CUPS Driver
- Open your web browser and go to the SATO CUPS Driver page.
- Click the SATO CUPS Driver for macOS link to download the installation package.
- Locate the downloaded installation package ZIP file or folder.
Downloads are usually saved in the Downloads folder, but the actual location depends on your browser’s settings.
If the download is a ZIP file, double-click the ZIP file to decompress the folder. The folder is decompressed and saved in the same location as the ZIP file. Locate the decompressed folder and double-click it.
- Double-click satodriver.pkg.
- If an “unidentified developer” security warning displays, complete the following:
- Click OK to close the warning window.
- Open System Preferences.
- Click the Security & Privacy control panel.
- Click the Open Anyway button.
- If prompted, enter your administrator User Name and Password and click Modify Settings.
- Close the Security & Privacy window.
The Install SATO Driver wizard opens in the background. You may need to close the System Preferences window to see it.
- Click Continue to begin the installation.
- Proceed through the installation wizard without changing any of the default settings.
- When the driver is installed successfully, click Close.
You may now connect the printer.
Connecting the Printer
- Connect the SATO CG408TT label printer to the Mac computer using a USB 2.0-compatible cable.
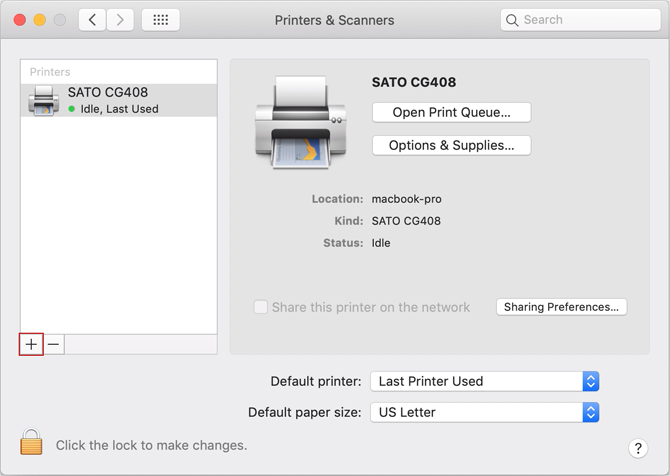
- Open System Preferences.
- Click Print & Scan.
- macOS automatically detects and adds the printer.
- If SATO CG408 does not appear in the list of available printers, click the plus sign (+) to search for and add the SATO label printer.
If the printer does not automatically display in the list of available printers and you can’t find it in the Add Printer window, ensure the printer is set to use the USB port:
- Disconnect the USB cable from the back of the printer.
- Press and hold the Feed/Line button.
- Press and release the Power button. Continue to hold the Feed/Line button.
The power light flashes green and the printer beeps three times.
- Release the Feed/Line button after the third beep.
- Press and release the Feed/Line button four times.
- Press the Feed/Line button a fifth time and hold.
The printer beeps once.
- After the beep, release the Feed/Line button.
The printer beeps three times.
- Press the Power button to turn off the printer.
- Press the Power button again to turn on the printer.
- Reconnect the USB cable to the back of the printer.
- Reopen the System Preferences on the Mac.
The printer should now be detected.
For printer programming and troubleshooting instructions refer to the CG4 Series Operator Manual available on the SATO website.
Setting Up Labels to Print from Encompass Front Office
- Select a label to print in Encompass Front Office.
- Click the Print icon in the PDF viewer.
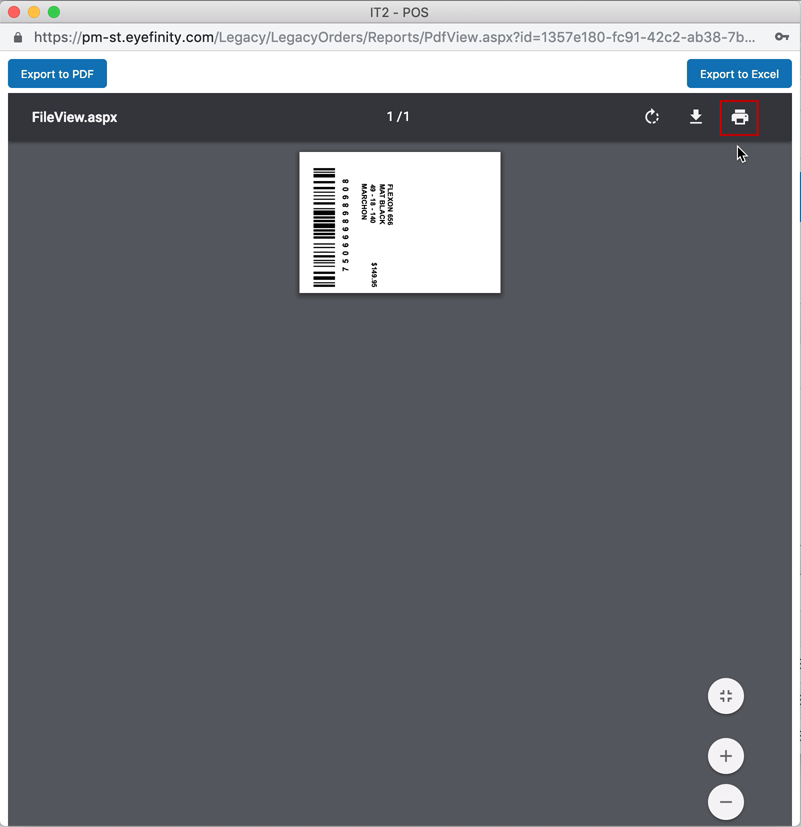
- Chrome users, click the Print Using System Dialog link located near the bottom of the print options.
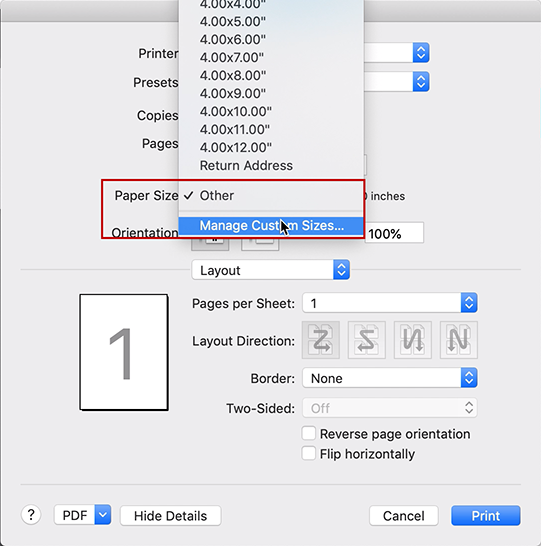
- Click the Paper Size drop-down menu and select Manage Custom Sizes.
- Click the plus sign (+) to add a new paper size.
Any paper size values are cleared and Untitled is added to the list on the left.
- Double-click Untitled and enter a name for your paper size (e.g., SATO Frame Labels).
- Enter the following Paper Size values:
- Width: 2.1 in
- Height: 1.47 in
- Non-Printible Area: User Defined, 0 in on all sides
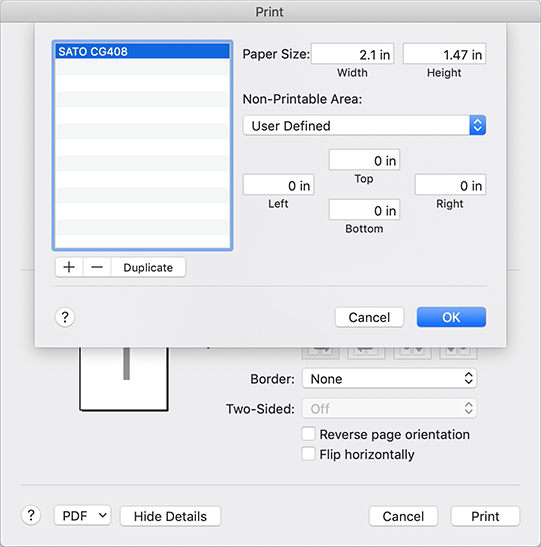
- Click OK.
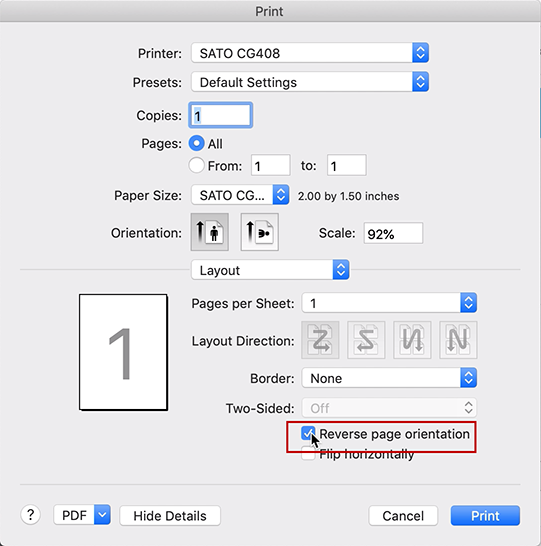
- From the Orientation setting, select Portrait.
- For Scale, enter 92.
- Select the Reverse Page Orientation check box.
- Optionally, save these settings as a preset to restore the settings if anyone tries to change them:
- Click the Presets drop-down menu and select Save Current Settings as Preset.
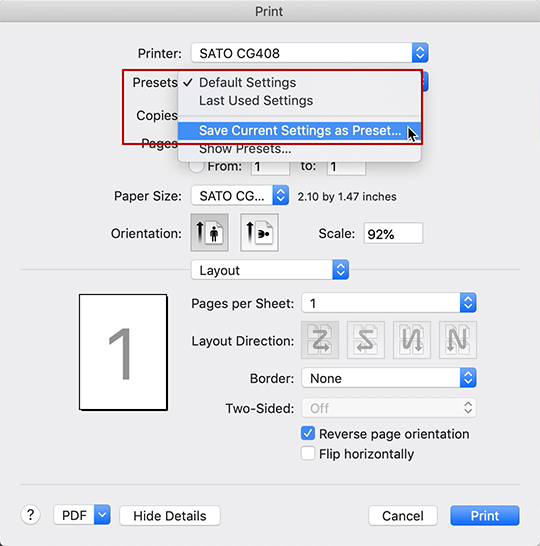
- Type a Preset Name (e.g., SATO Frame Label Settings).
- Select the Only this Printer radio button.
- Click OK.
- Click the Presets drop-down menu and select Save Current Settings as Preset.
- Click Print.
You may need to scroll down to locate the Print Using System Dialog link.
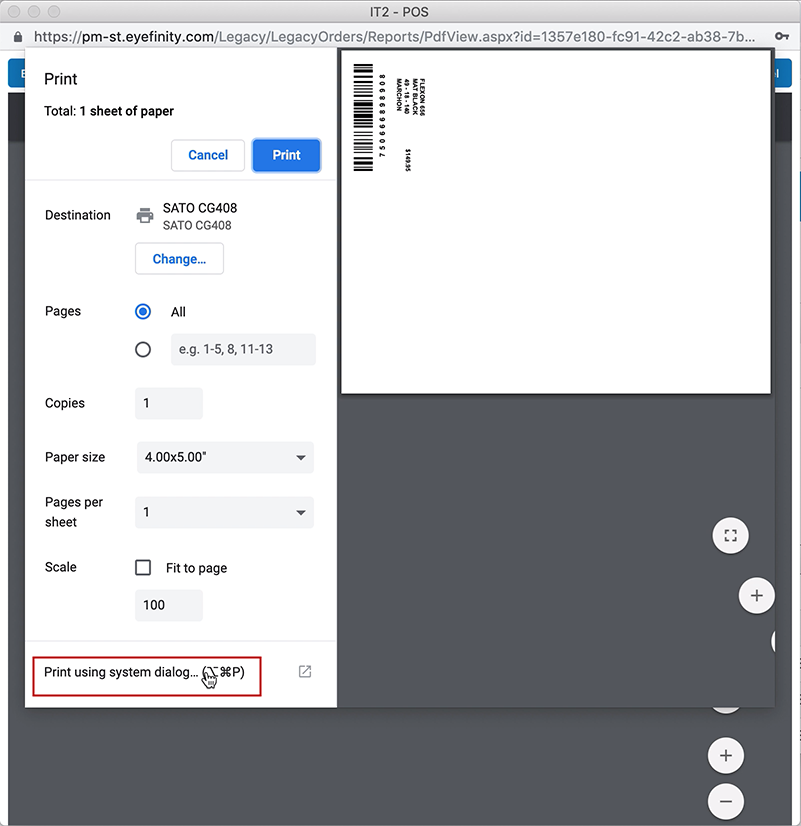
The Print dialog opens.
If Manage Custom Sizes is not selectable, try uninstalling and reinstalling the printer.
Setting Up the SATO CG408TT Label Printer on a Windows PC
- Download and install the SATO Windows Printer Drivers from the SATO website.
- Open the Control Panel.
- Click Printers and Faxes.
- Right-click SATO CG408 and select Printing Preferences.
The SATO CG408 Printing Preferences window opens.
- Click the Printer Settings tab.
- Click Page Setup, and select the following settings:
- Stock: Custom
- Copies: 1
- Width: 1.902
- Height: 1.504
- Media type: Labels with gaps
- Media from: Roll
- Rotation: 180 - Portrait
- Click Print Options, and select the following settings:
- Speed: 2.0”/s
- Darkness: 2
- Top Offset: -0.15”
- Left Offset: 0.1”
- Format number: 1
- You may need to make small adjustments(+/- 0.01) to the Top Offset and Left Offset to ensure the correct position.
- Click Print Mode and select the following settings:
- Operation mode: Continuous
- Pitch offset: 0”
- Type: Off
- Click OK to save your settings.
- Open the Control Panel again.
- Open Printers and Faxes.
- Right-click SATO CG408 and select Printing Properties.
The SATO CG408 Properties window opens.
- Click the Driver settings tab.
- Click Driver Settings and select the following settings:
- Always use driver settings
- Backward compatible font names
- Click Configure Printer and select the following settings:
- Label width: 2.1”
- Label height: 1.7”
- Media type: Continuous labels
- Top offset: -0.15”
- Left offset: 0.1”
- Speed: 2.0”/s
- Darkness: 2
- Darkness range: A
- Print method: Thermal transfer
- Paper end detection: Roll
- Print operation mode: Tear off
- Tear off offset: 0”
- You may need to make small adjustments(+/- 0.01) to the Top Offset and Left Offset to ensure the correct position.
- Click OK to save your settings.