
Setting Up and Using EncompassEligibility
This topic applies only to practices using EncompassEligibility. For information on how to get started with EncompassEligibility, contact Eyefinity Customer Care.
EncompassEligibility enables you to search participating insurance carriers for a patient’s coverage and import the resulting insurance and eligibility information into Encompass. This feature enables you to locate and record insurance information quickly for walk-in patients or same-day appointments.
Insurance carriers you can search using EncompassEligibility:
-
Davis Vision
-
Eyemed
-
iCare Health Solutions
-
Premier Eye Care
-
SuperiorVision
-
Spectera
EncompassEligibility also includes a batch eligibility process that runs every day at 4:00 a.m. The process automatically checks patients with appointments scheduled within the next 7 days to see which of them are are enrolled in plans with the supported carriers. If coverage is found, each patient's plan and eligibility information is automatically pulled into their record in Encompass. You can access the EncompassEligibility website to review the batches and confirm the results.
Setting Up EncompassEligibility
Before you can use EncompassEligibility, it needs to be enabled first for your company, and then for all offices where you want to use it. Each office must be configured individually.
You also need credentials for the EncompassEligibility website. Additional carrier credentials or setup requirements may apply.
What do you want to do?
Before you can select which offices have EncompassEligibility available, you need to enable it for your company.
- On the Encompass home screen, click Administration.
The Company: Setup screen opens.
- On the top menu bar, click Company Management and select Integrations.
The Integrations screen opens.
- In the Real-time Eligibility section, click Edit.
A warning message displays, asking you to confirm that you understand that changing the integration information may break your integration.
- If you still want to edit the information, click I Understand the Risk.
- Do one of the following:
To enable EncompassEligibility, select the Enabled check box.
To disable EncompassEligibility, deselect the Enabled check box.
-
Click Save.
When EncompassEligibility is enabled for your company, you can select which offices will have the feature available.
-
In Administration, click Office Configuration on the top menu bar and select the office you want to set up.
The office setup screen opens.
- Click Integrations.
The Integrations screen opens.
- Click Edit.
A warning message displays, asking you to confirm that you understand that changing the integration information may break your integration.
- If you still want to edit the information, click I Understand the Risk.
- Do one of the following:
To enable EncompassEligibility, select the Enabled check box.
To disable EncompassEligibility, deselect the Enabled check box.
-
Click Save.
Repeat this process for each office where you want to use EncompassEligibility.
Using EncompassEligibility
When you’re logged into an office where EncompassEligibility is set up, you can use it to:
-
Check whether a patient is enrolled with a supported insurance carrier and add plans to their record from either the Insurance screen or while scheduling an appointment.
-
Retrieve a patient’s eligibility information for a plan already in their record and add it to their Eligibility/Authorization screen.
What do you want to do?
You can use EncompassEligibility to search for a patient's insurance plans and automatically pull them into Encompass.
- On the top menu bar in Encompass, click Patients and select Search/Add Patient.
- Search for the patient and select them from the results list.
- On the left side menu, click Insurance.
The Insurance screen opens.
- Click EncompassEligibility.

The EncompassEligibility login screen opens in a new browser tab. Don't close the Insurance screen in Encompass.
-
Complete the steps under Perform the check in the EncompassEligibility screen
-
Return to the Insurance screen in Encompass and click the Refresh link in the "Confirm the Apply Eligibility completion in EncompassEligibility, then refresh to see updates" message at the top of the screen.

The carrier list updates to display the patient’s newly added insurance plan(s).

-
On the top menu bar in Encompass, click Patients and select Search/Add Patient.
-
Search for the patient and select them from the results list.
-
On the left-side menu, click Eligibility/Authorization.
The Eligibility/Authorization screen opens.
-
Locate the insurance plan you want to find eligibilities for and click EncompassEligibility.
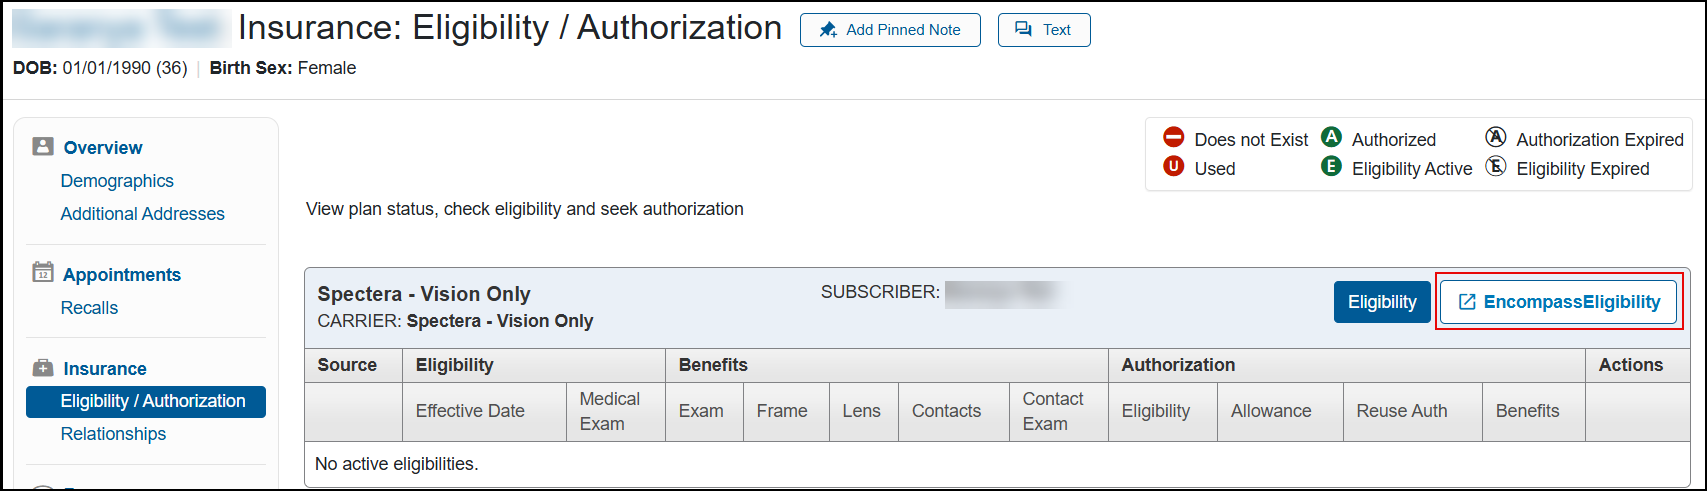
The EncompassEligibility login screen opens in a new browser tab. Don't close the Eligibility/Authorization screen in Encompass.
-
Complete the steps under Perform the check in the EncompassEligibility screen
-
Return to the Eligibility/Authorization screen in Encompass and click the Refresh link in the "Confirm the Apply Eligibility completion in EncompassEligibility, then refresh to see updates" message at the top of the screen.
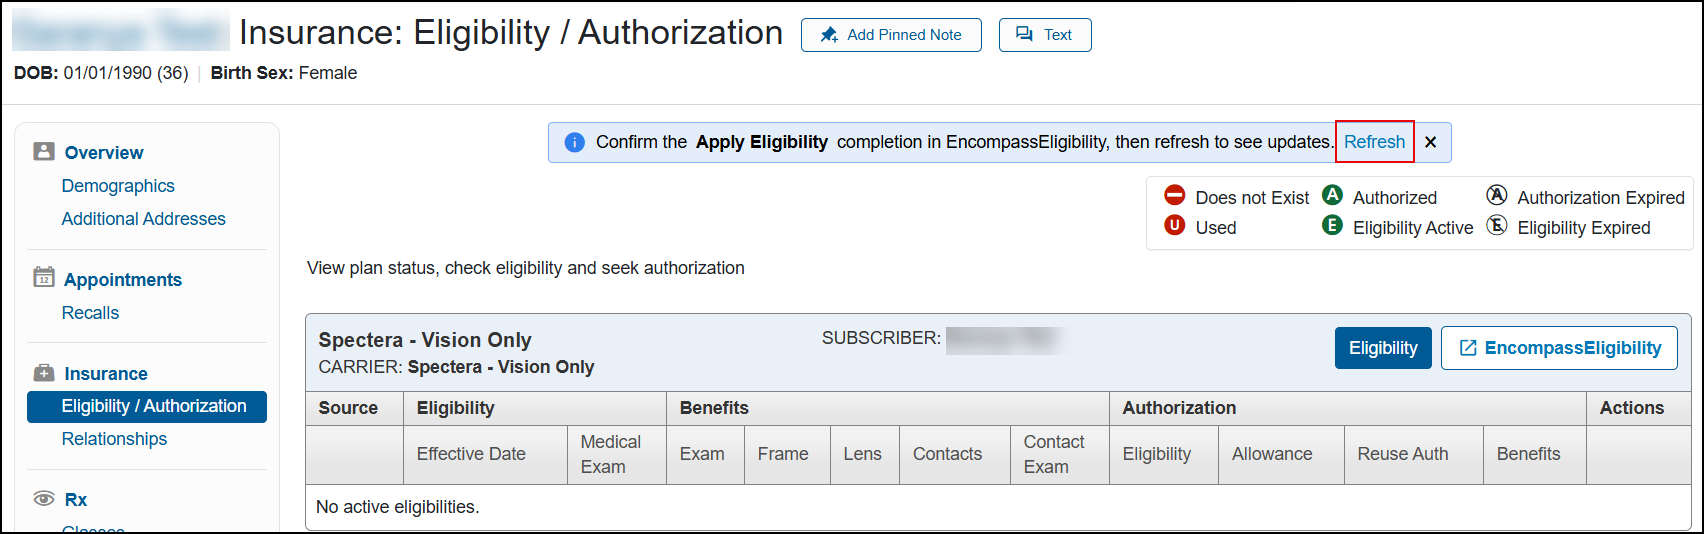
The eligibility list updates to display the patient’s newly added eligibilities.
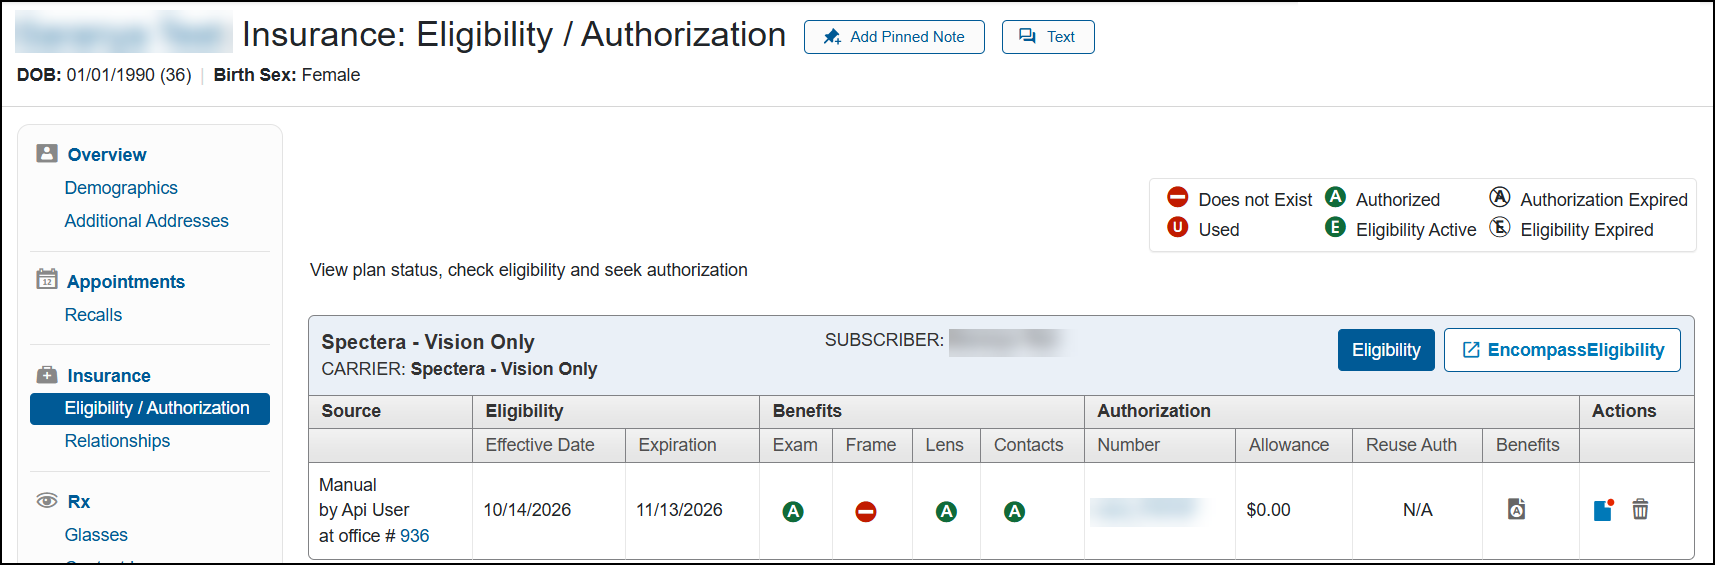
You can use EncompassEligibility to pull in new insurance plan and eligibility information while adding or editing a patient's appointment.
- On the top menu bar in Encompass, click Appointments and select Appointment Calendar.
The Appointment Calendar opens.
-
Add a new appointment or locate the patient's existing appointment and open it.
-
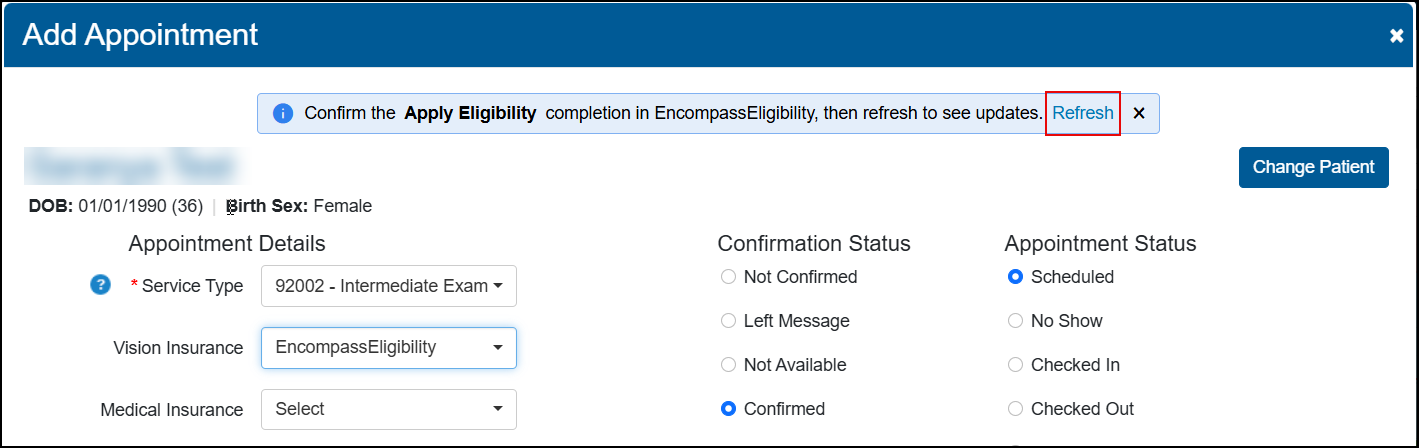
From the Vision Insurance drop-down list, select EncompassEligibility.
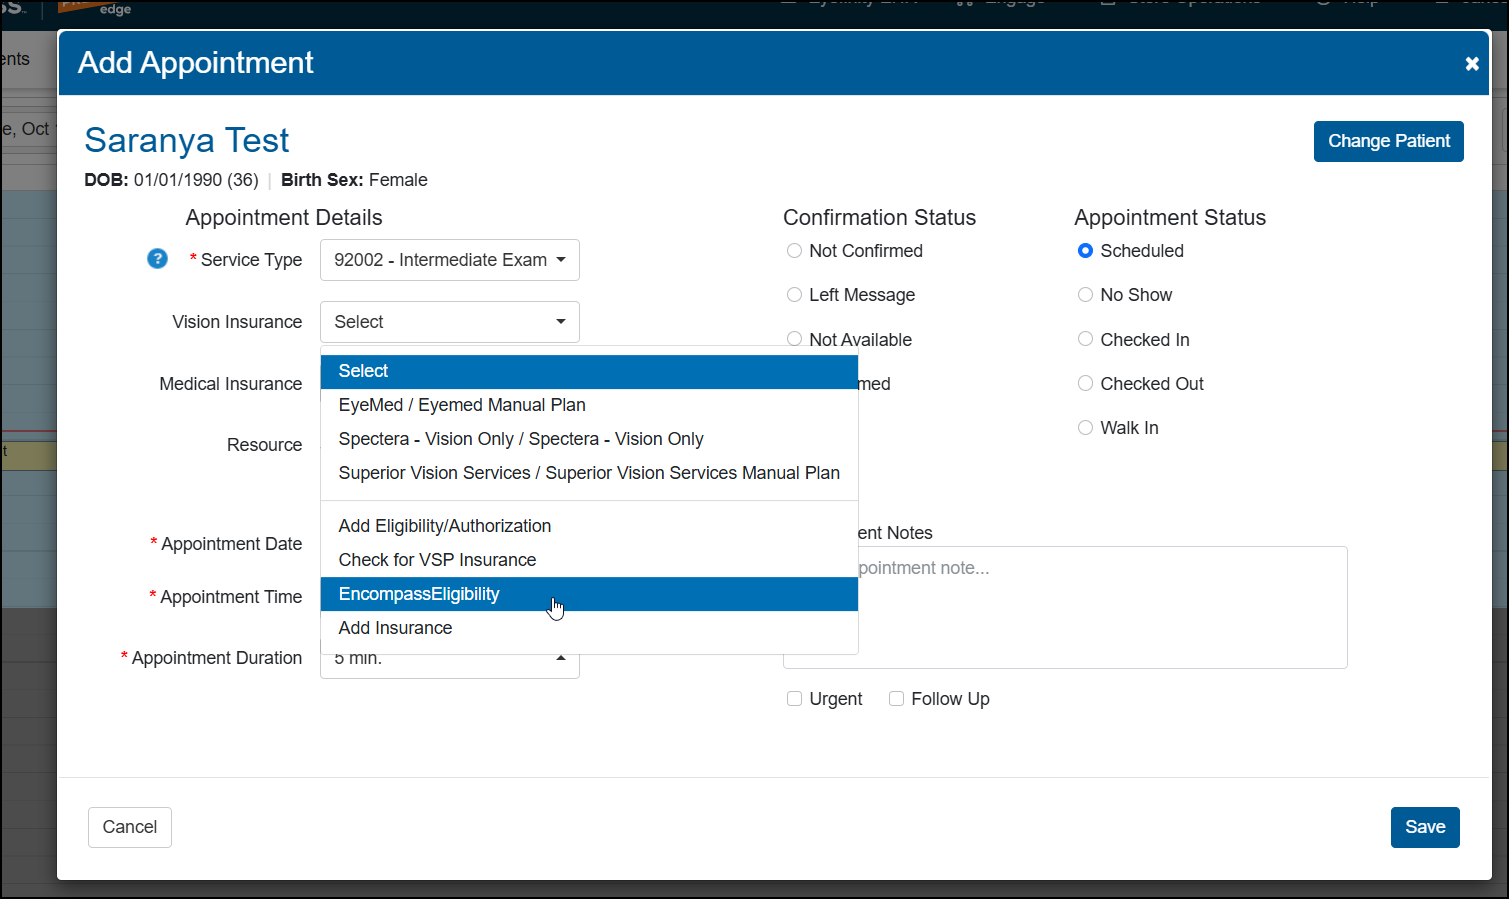
The EncompassEligibility login screen opens in a new browser tab. Don't close the Add Appointment or Edit Appointment window.
-
Complete the steps under Perform the check in the EncompassEligibility screen
-
Return to the Add Appointment or Edit Appointment window in Encompass and click the Refresh link in the "Confirm the Apply Eligibility completion in EncompassEligibility, then refresh to see updates" message at the top of the window.
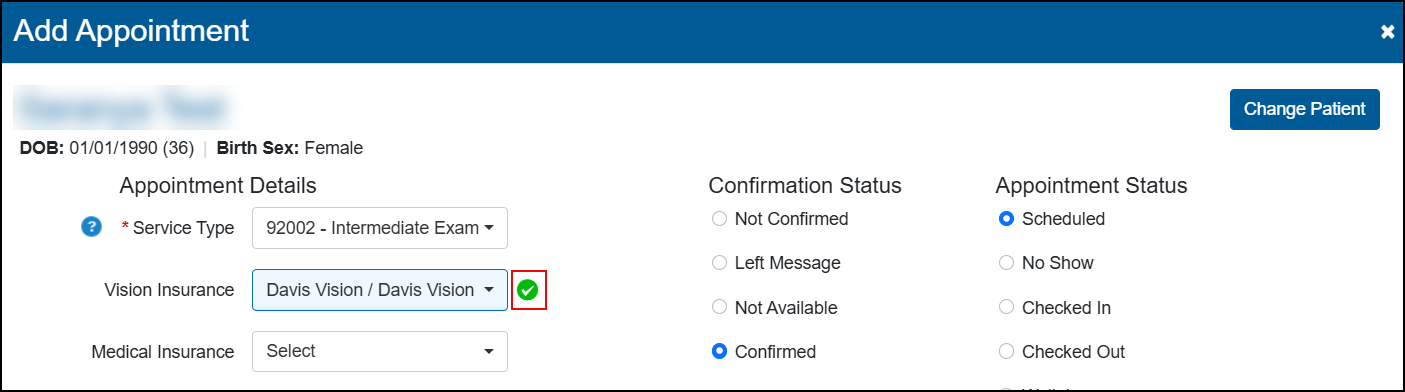
The patient’s newly added insurance displays in the Vision Insurance drop-down list. A green check mark indicates that eligibilities were successfully added.
-
Click Save.
-
Enter your username and password for EncompassEligibility and click Login.
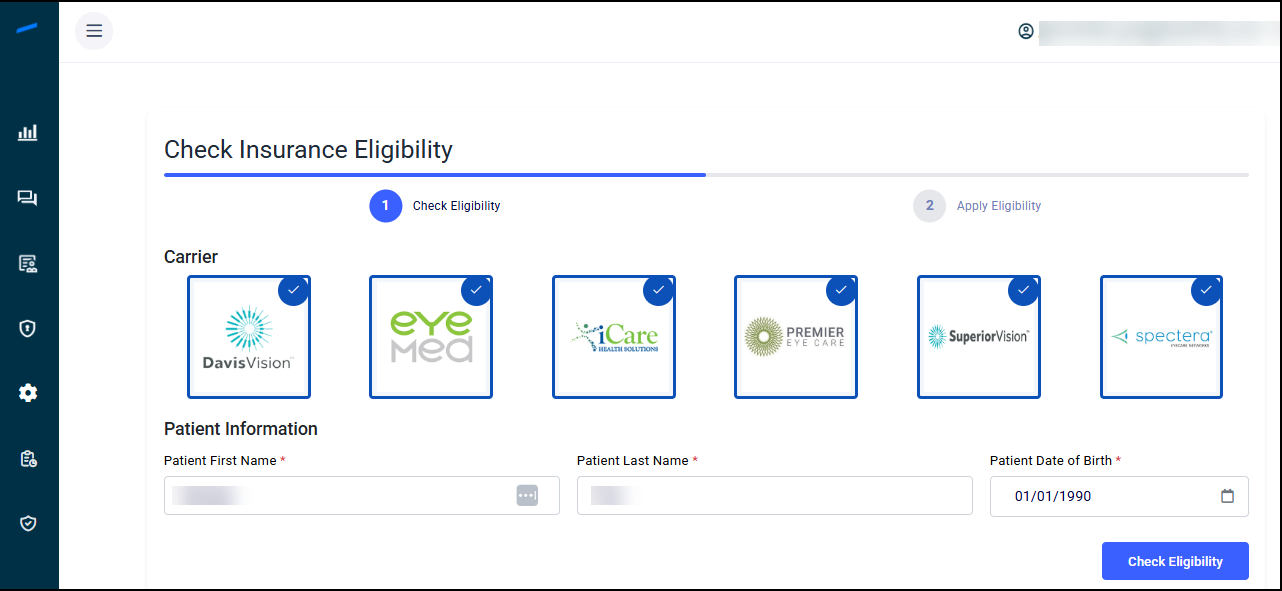
The Check Insurance Eligibility screen opens and displays the available carriers along with the patient’s first name, last name, and date of birth.
-
Review the selected insurance carriers. All available carriers are selected by default, indicated by a check mark. Click any carriers you do not want to include in the search to deselect them. If the search finds that the patient is enrolled in a plan with more than one selected carrier, all the carriers will be added to their record in Encompass.
If eligibilities are found for more than one carrier, they will all be added to the patient's record when you complete the verification process.
-
Click Check Eligibility.
The Eligibility Verification Progress window opens and shows an estimate of how long it will take to verify the patient's benefits. Click View Details to see each step of the verification process as it completes.
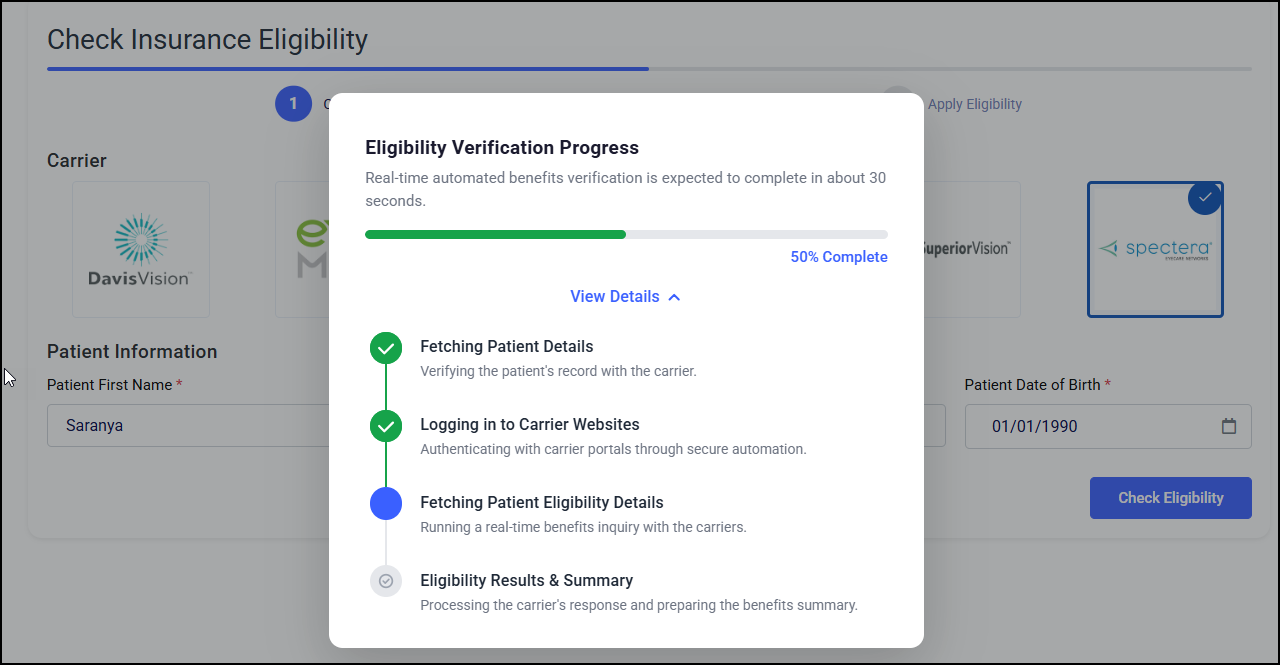
After verification is complete, the screen updates to show an eligibility panel for each carrier you selected. You may need to click the carrier name to open the panel and scroll to see the carrier-provided benefits summary.
-
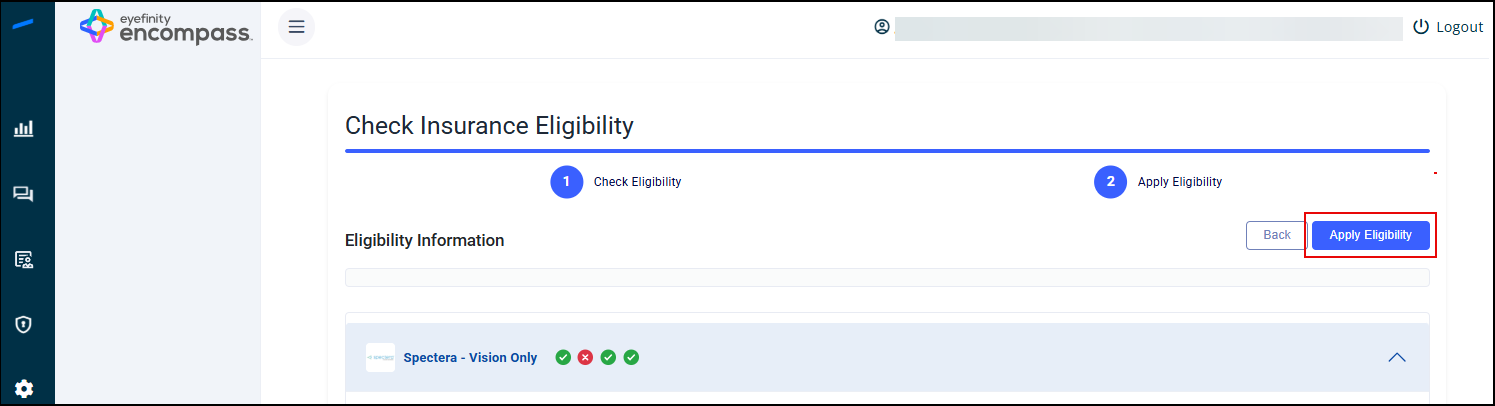
Click Apply Eligibility to upload the carrier and eligibility information into the patient's record in Encompass.
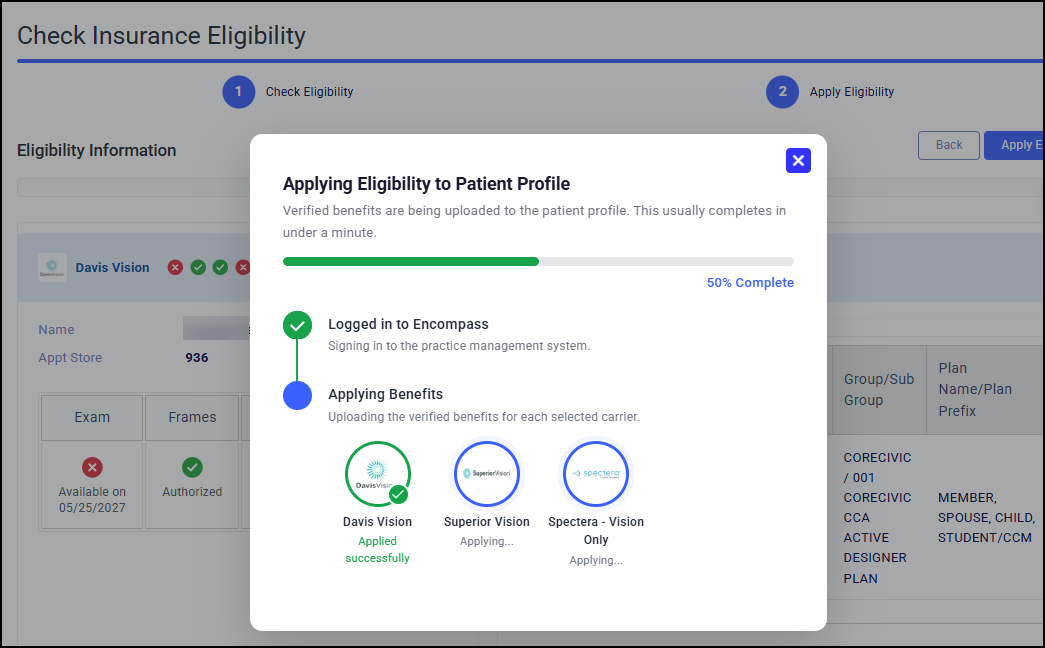
The Applying Eligibility to Patient Profile window opens and displays the upload progress for each carrier.
-
Do not refresh the Encompass screen until EncompassEligibility indicates that the apply process has finished.
-
The time required to complete this process can vary.
-
-
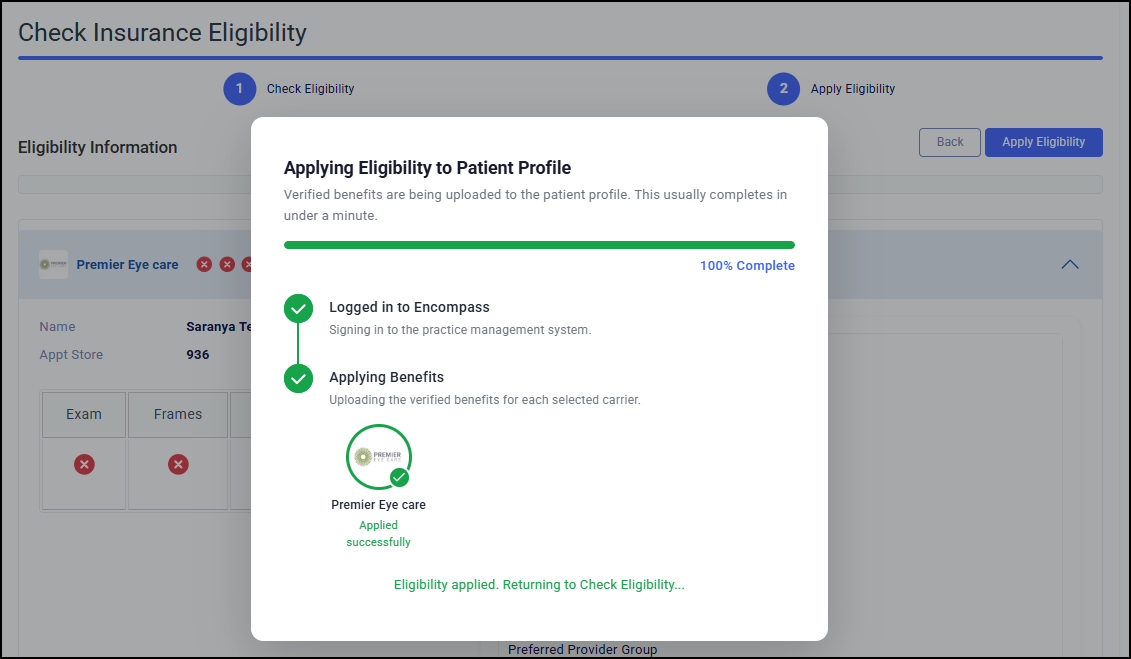
When the Applying Eligibility to Patient Profile window confirms that the eligibilities have been successfully uploaded, return to Encompass.
The EncompassEligibility batch eligibility process runs every day at 4:00 a.m., to check which patients with appointments scheduled within the next 7 days are enrolled in plans with the supported carriers. If coverage is found, each patient's plan and eligibility information is automatically pulled into their record in Encompass. Follow these steps to access the EncompassEligibility website and review the batches.
We recommend reviewing batches on a daily basis to identify patients for whom eligibilities could not be found, due to ineligibility or errors.
-
Log in to EncompassEligibility, located at https://pn-admin.eyefinity.com/.
-
On the left-side menu, click the Real Time Eligibility icon.
-
In the menu that opens, click Batch Eligibility.
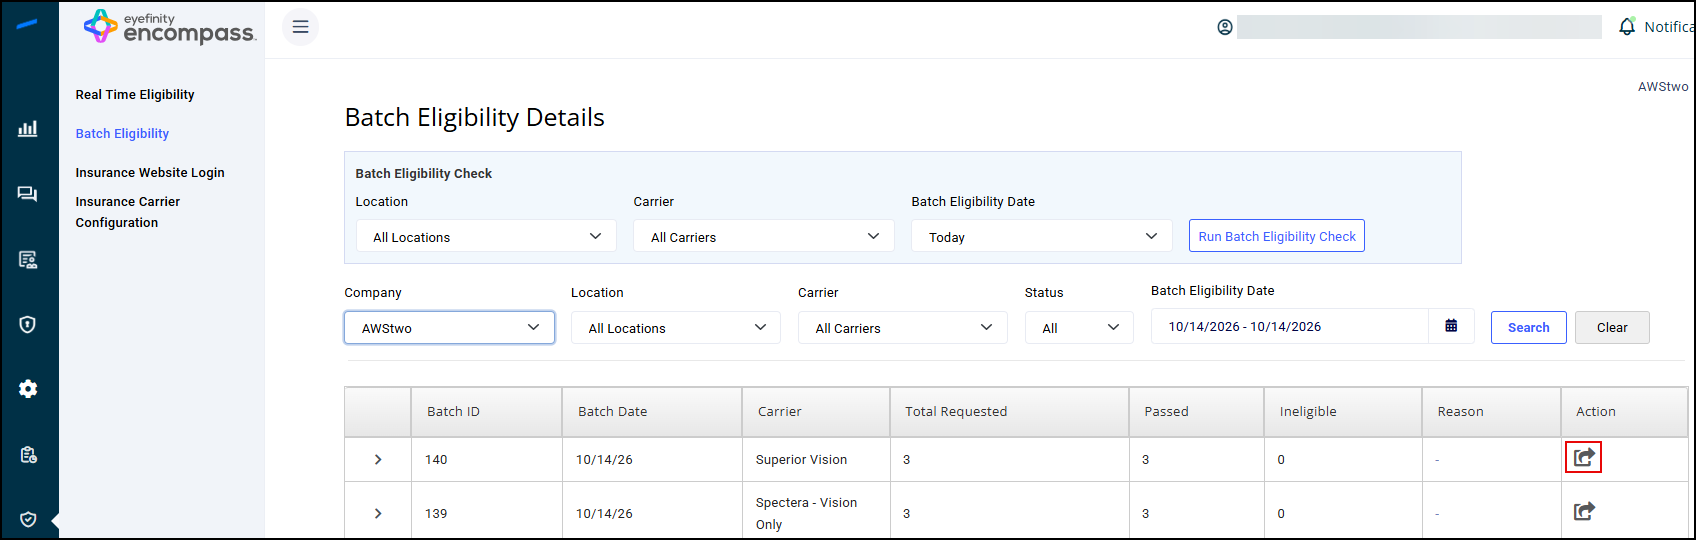
The Batch Eligibility Details screen opens and displays a list of batches, with the most recent batches at the top. Each batch is for one carrier only.
-
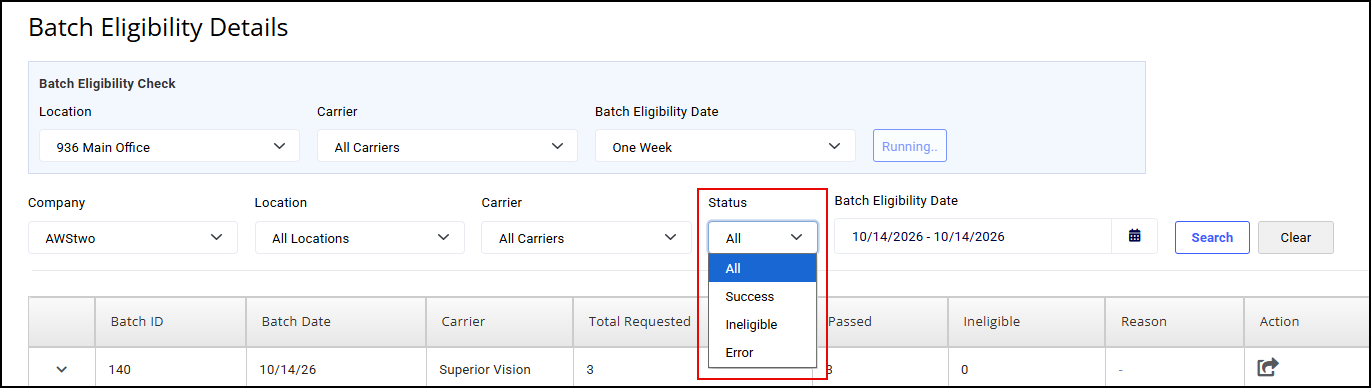
To filter the search results so you can review them, select the Company, Location, Carrier, Status and/or Batch Eligibility Date and click Search.
Batches that include ineligible results are indicated in the Ineligible column.
Use the Status filter to identify batches that include patients for whom eligibilities could not be found, due to ineligibility or errors.
-
To download batch information in CSV format, locate the batch in the list and click the icon in the Action column.
-
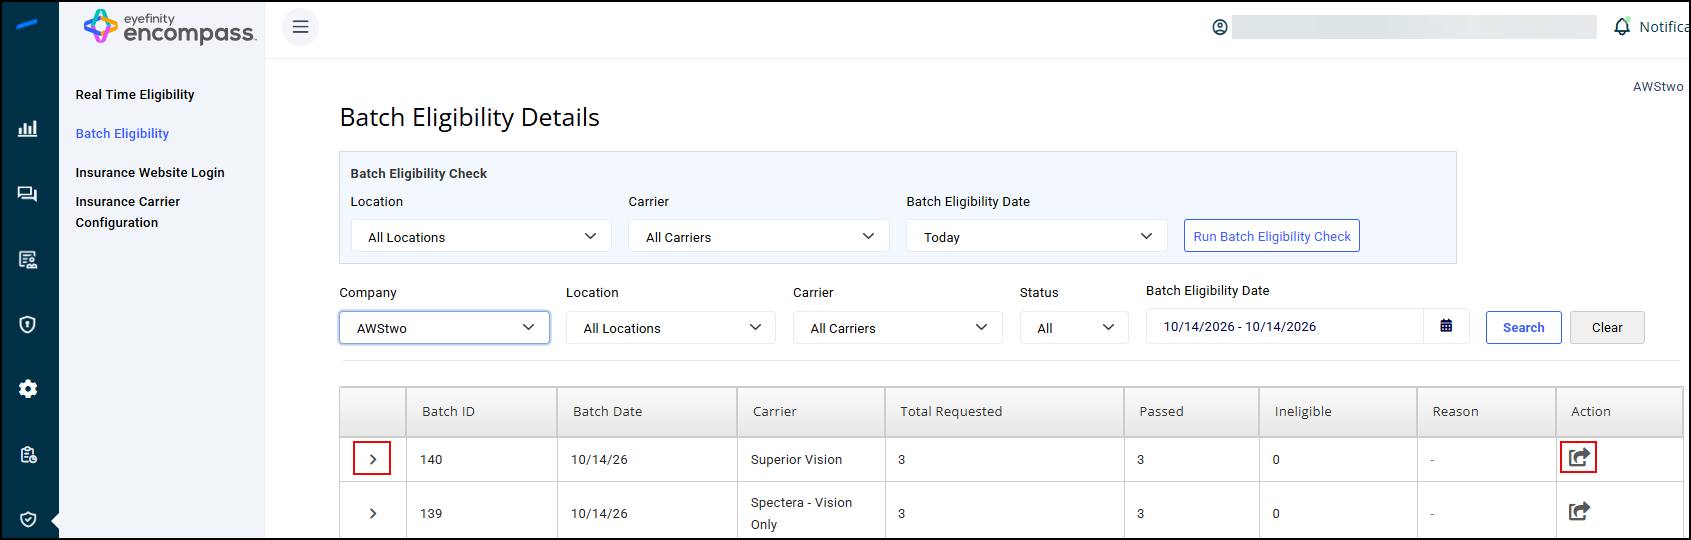
To view the patients included in a batch, along with the results returned, click the arrow on the left side next to the Batch ID.
-
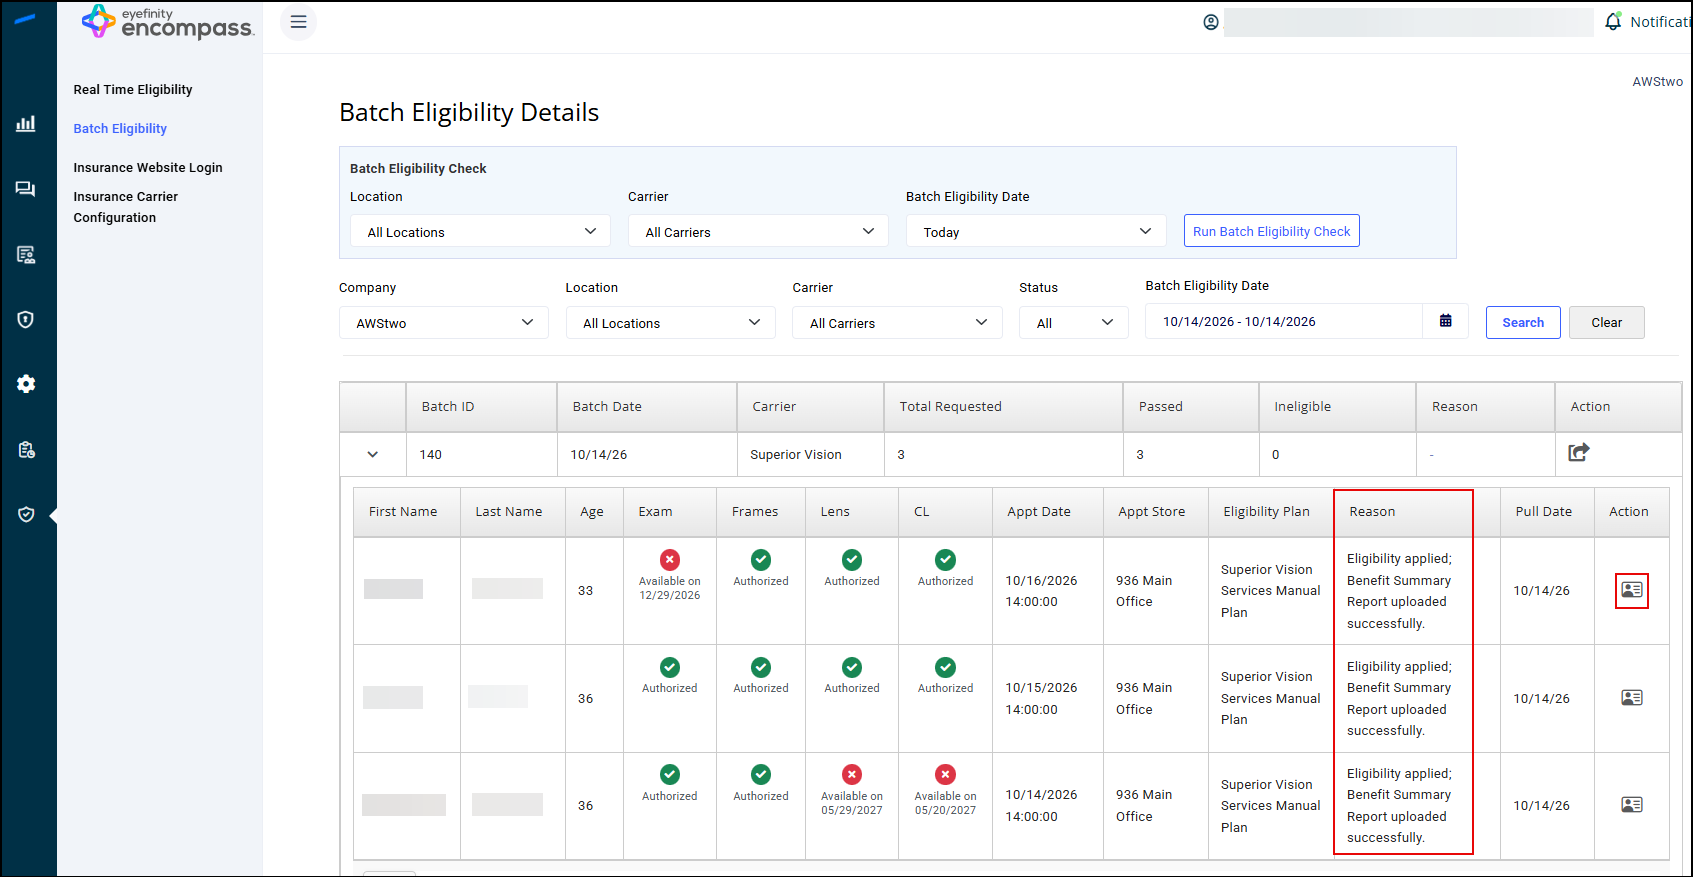
Review whether eligibilities were successfully added for each patient. The Reason column displays information on errors and missing eligibilities.
The "Eligibility applied; Benefit Summary Report uploaded successfully" message indicates that the patient's record in Encompass has been successfully updated with their insurance plan and eligibility information, and no further action is needed.
-
To open a patient's Benefit Summary Report, click the icon in the Action column.
-
Log in to EncompassEligibility, located at https://pn-admin.eyefinity.com/.
-
On the left-side menu, click the Real Time Eligibility icon.
-
In the menu that opens, click Batch Eligibility.
The Batch Eligibility Details screen opens.
-
Under Batch Eligibility Check, select the Location, Carrier, and Batch Eligibility Date you want to check.

-
Click Run Batch Eligibility Check. If prompted to confirm the verification, click OK.
The label on the Run Batch Eligibility Check button changes to Running...
The process can take up to 30 minutes to complete, depending on the locations, carriers, and dates you selected. If desired, you can leave the Batch Eligibility screen while the process is running, and return later to review the results.
When the process is complete, Encompass is updated with all of the eligibility information found during the check. The Batch list in the Batch Eligibility Details screen also updates to display the batch(es) of eligibilities. Batches that include ineligible results are indicated in the Ineligible column.
-
Review the batch(es) as explained in Use Batch Eligibility to review eligibilities for multiple patients.