Using Eyefinity PatientNavigator™ Admin
Gain insight into your patient use of Eyefinity PatientNavigator™ — including a calculation of the total cost avoidance for the past 30 days — manage Admin users, and manage your provider signatures with Eyefinity PatientNavigator™ Administration.
If you also have EncompassMessage, you will see additional dashboard options for Notifications and you will see the Communications icon in the left menu.
What do you want to do?
The Dashboard typically is the first screen to display when you access Admin. You can also select the graph icon from the left menu.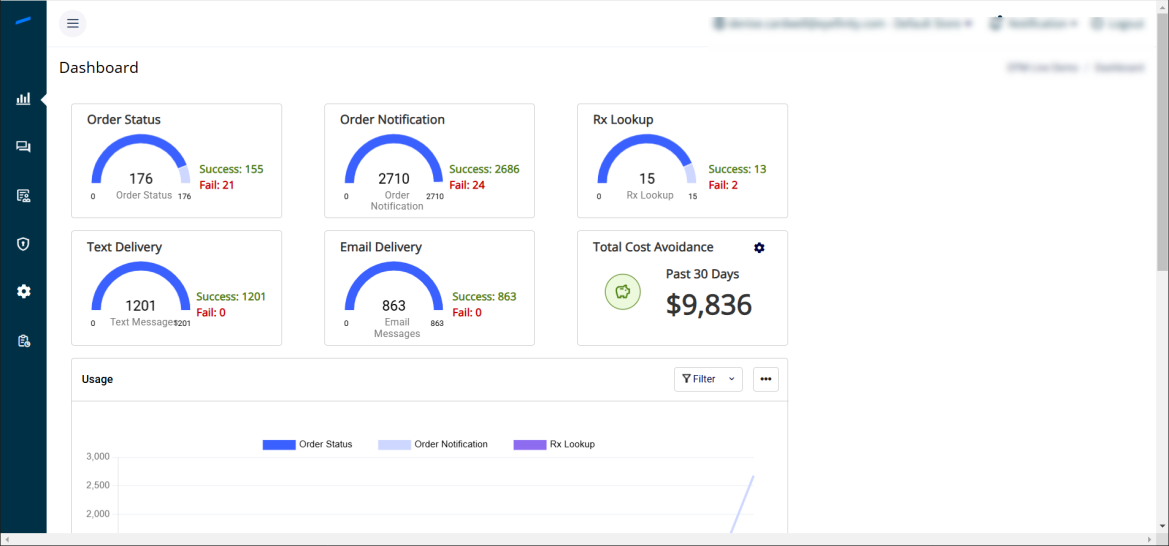
The top boxes on the Dashboard provide:
-
The total number of times a patient accessed their order status - both successful and failed attempts.
-
The total number of times a patient accessed their prescription online.
-
The total number of order notifications, text messages and email messages sent to a patient.
The system also calculates and displays your Total Cost Avoidance for the past 30 days. This amount is calculated based on the average number of minutes a staff member typically spends assisting the patient and the associated cost. The default is 6 minutes at a cost of $20.
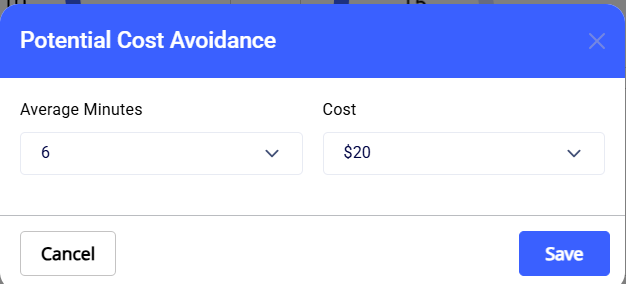
To edit the default numbers so the calculation reflects your costs:
-
Click the settings icon in the Total Cost Avoidance box. The Potential Cost Avoidance screen displays.
-
Select the Average Minutes; you can choose from 2, 4, 6, 8 and 10 minutes.
-
Select the Cost; you can choose from 10, 20, 30, 40 and 50 dollars.
-
Click Save. The calculation now uses these numbers to calculate cost avoidance on the dashboard.
Usage
The Usage section of the dashboard, shows the Order Status, Order Notification and Rx Lookup numbers for the year in a line graph.
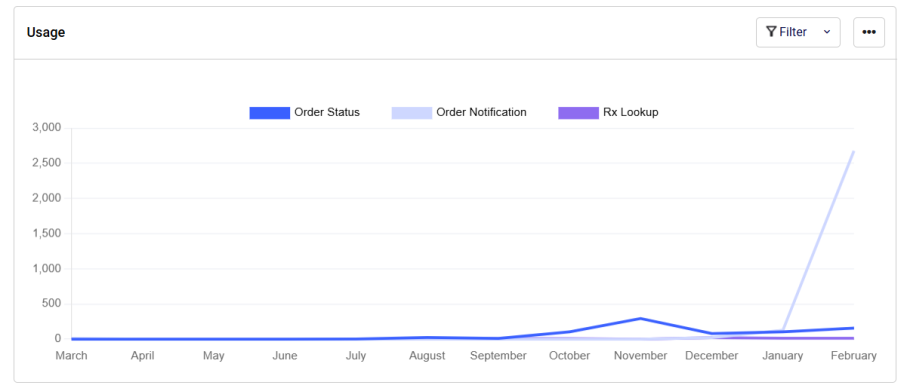
To narrow the data on the graph, click Filter. From the drop-down, clear the checkbox to remove an item or check the box to have the line for that item display. To export the graph, click the ... (ellipses) and choose from Export to PDF or Export to CSV.
Cost Avoidance
The Cost Avoidance section displays the cost avoidance per month for the year.
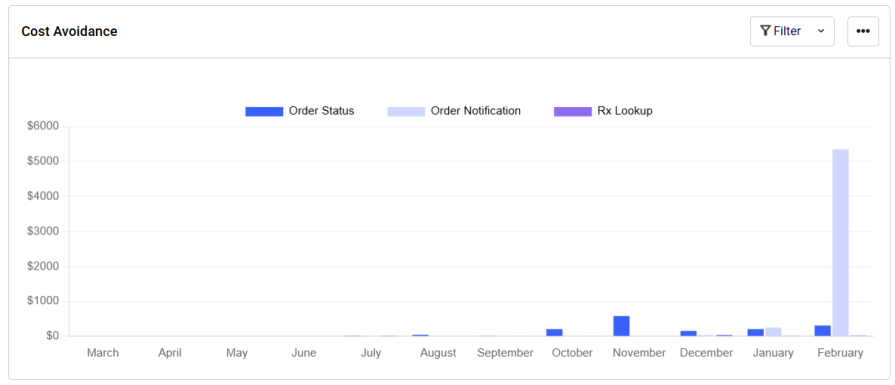
You can also filter and export this graph. This graph uses the Potential Cost Avoidance settings to calculate the yearly numbers.
-
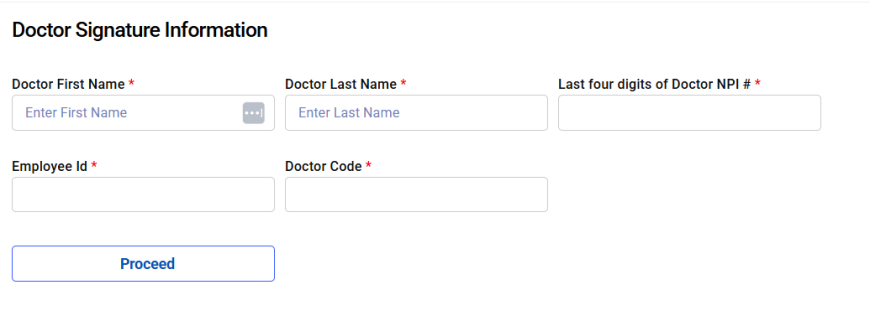
From the left navigation, select the Doctor Profile icon and then choose Upload Doctor Signature to add a new doctor signature. The Doctor Signature Information screen displays.
-
Enter the provider's First Name.
-
Enter the provider's Last Name.
-
Enter the Last four digits of the Doctor NPI #.
-
Enter the Employee Id.
-
Enter the Doctor Code.
-
Click Proceed. The Upload Signature screen displays.
-
Click Choose File and select the signature file.
-
Click Upload Signature.
-
From the left navigation, select the Doctor Profile icon and then choose Doctors List to edit a provider's signature. The Doctors Signature screen displays.

-
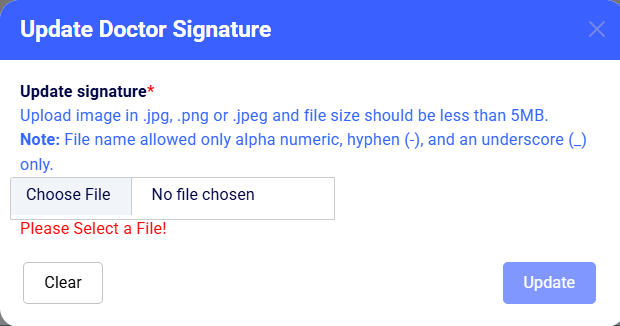
Use the search to locate the provider you want to edit and click the edit (pencil) icon. The Update Doctor Signature screen displays.
-
Click Choose File. The file selection screen displays.
-
Select the provider's signature file.
-
Click Update.
-
From the left navigation, select the Doctor Profile icon and then choose Doctors List to edit a provider's signature. The Doctors Signature screen displays.
-
Use the search to locate the provider you want to delete and click the trashcan icon. The Delete Doctor screen displays asking if you are sure you want to delete that doctor.
-
Click Confirm. The doctor is deleted and no longer displays in the list.
- Log in to the Admin portal and select the Administration icon on the left side of your screen.
- From the Administration drop-down, select Users.
- Click the Add User button. The Add User screen displays.
- Enter the user's First Name and Last name.
- Enter the user's Phone Number.
- Enter the user's Email.
- Enter a Password and then reenter to Confirm Password. We recommend providing the employee with this password to use for first log in and then having the employee change the password.
- Select your Company from the drop-down.
- Select the user's Status. Choose Active when the employee is a current hire.
- Select the user's Role from the drop-down. Choose from Admin or Employee.
- Select the user's Home Store. This sets the default queue for the employee and automatically provides access to the message queue for the selected store.
- If you selected employee for the role, the Store field displays. Select one or more stores from the drop-down. This gives the user access to the selected stores so the user can switch between locations. The Admin role automatically gives the user access to all stores.
- Select the Employee from the drop-down.
- Click Add to complete adding the user.
You can also edit (pencil icon), reset the password for (arrow icon) or delete (trashcan icon) a user via the icons in the Action column.