Programming Your Barcode Scanner
Think Smart tests barcode scanners before shipping them; therefore, you should not need to program your scanner. However, if your barcode scanner loses its programming after being disconnected for a long period of time, or if you purchase your scanner from another vendor, you will need to program it. This section tells you how to program your barcode scanner, including how
- To program your Gryphon GM4130 wireless handheld barcode scanner
- To program your Heron HD3130 wired handheld barcode scanner
To program your Gryphon GM4130 wireless handheld barcode scanner
Scan all eight (1–8) barcodes in this section to program your scanner.
- Scan the Enter Config barcode and then wait three seconds.
- Scan the USB Keyboard barcode and then wait three seconds.
- Scan the Disable All Symbology barcode and then wait three seconds.
- Scan the Enable 2/5, 4-14Digits barcode and then wait three seconds.

- Scan the Enable UPCA, UPCE, EAN 13barcode and then wait three seconds.

- Scan the Enable EAT-8, Code 128 barcode and then wait three seconds.
- Scan the Suffix = Tab + LF barcode and then wait three seconds.

- Scan the Exit Config barcode and then wait three seconds.
To program your Heron HD3130 wired handheld barcode scanner
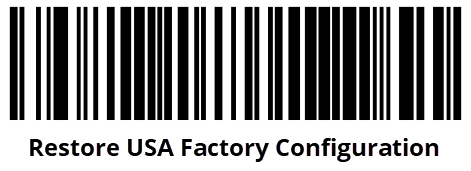
- Scan the Restore Custom Default Configuration barcode to enter the programming mode.
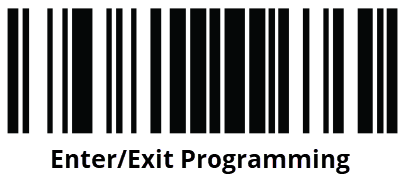
- Scan the Enter/Exit Programming Mode barcode.
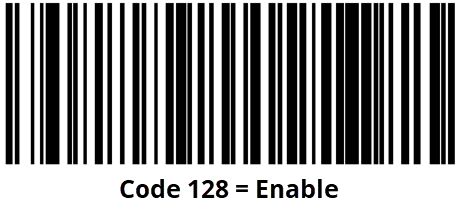
- Scan the Code 128 = Enable barcode.
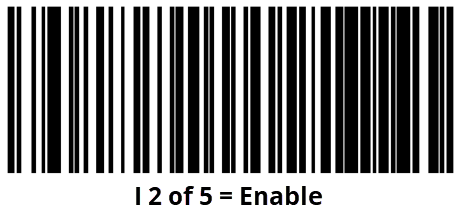
- Scan the I 2 of 5 = Enable barcode to enable symbologies.
- Scan the Set Global Suffixbarcode.

- Scan the 0 barcode.

- Scan the 9 barcode to configure the Tab key.

- Scan the 0 barcode.
- Scan the D barcode to configure the Enter key.

- Scan the Enter/Exit Programming Mode barcode to exit the programming mode.
- Scan the Enter/Exit Programming Mode barcode again to exit the configuration programming mode.