Setting Up the Konan Equipment
Before using the Konan equipment interface, follow these procedures to set up the Konan Specular Microscope equipment software for ExamWRITER:
Setting Up the Non-CellChek Software
If you do not use the CellChek software, follow these instructions:
- Open the Options window in the Konan software.
- Ensure that the following options are set:
- Replace Analysis Results – ON
- Print with Analysis Results – OFF
- Auto ID Input – ON
- Show Overlay – ON
- Search by ID – OFF
- Print size – Half size
- Printing format – Pattern 1
- ID input method – Electronic chart
- The data failed to record – Not save
- Click Setting file for filing system.
The Setting File for Filing System window opens.
- Ensure that the following options are set:
- Timing of writing a File for Filing System – After analyzing
- Auto delete function – OFF
- Types of File for Filing System – Create only a JPEG file
- Choice of the function – Create a File for Filing System
- In the Destination to save the file field, enter one of the following folders:
- C:\OfficeMate\DATA\Konan
- C:\OMATE32\DATA\Konan
- Click OK.
Setting Up the CellChek Software
If you use the CellChek software, follow these instructions:
- Double-click the Konan Analysis Software icon.
- Click CellChek.
The CellChek window opens.
- Click Set Up, and select Electronic Medical Record.
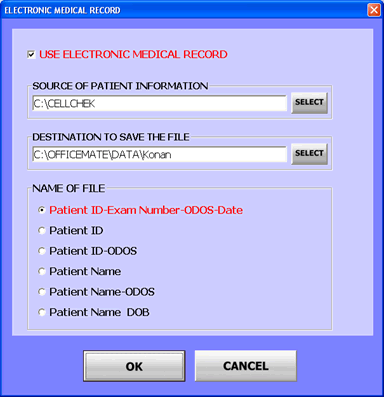
The Electronic Medical Record window opens.

- Set the Electronic Medical Record window options as shown in the preceding figure.
-
C:\OfficeMate\DATA\Konan
-
C:\OMATE32\DATA\Konan
The equipment data is stored in one of the following folders: