Using Quick Code
The Quick Code window enables you to visualize the level of medical code documentation based on the E/M coding guidelines proposed by the American Medical Association and adopted by the Centers for Medicare & Medicaid Services (CMS). The Quick Code functionality changes depending on the location of the exam:
- Quick Code functionality for in-office and telehealth exams is based on the 2021 E/M coding guidelines.
- Quick Code functionality for exams that take place in other facilities is based on the 1997 E/M coding guidelines.
The default location for exams is "office." To change the location of an exam, click the Reason for Visit category bar within the exam. For more information, go to Selecting the Visit Location.
Using Quick Code for In-office and Telehealth Exams
Use the Quick Code window to visualize the appropriate level of coding based on medical decision making or time associated with the exam.
- Click the QuickCode toolbar icon within the Patient Exam window.
The E&M Quick Code Check window opens.
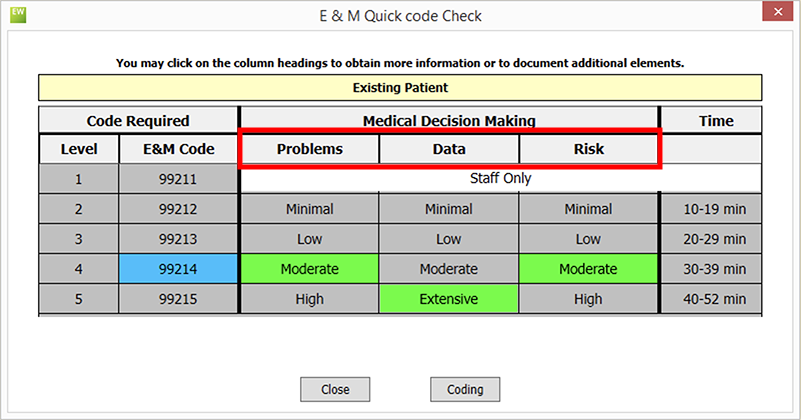
If you've selected a 99xxx code in the Coding window, that code appears highlighted in blue.
- To view coding based on medical decision making, select the type, quantity, and severity of problems, data, and risk associated with the exam:
- Click the Problems column heading.
- Select the radio buttons and check boxes that correspond to the elements you documented in the exam.
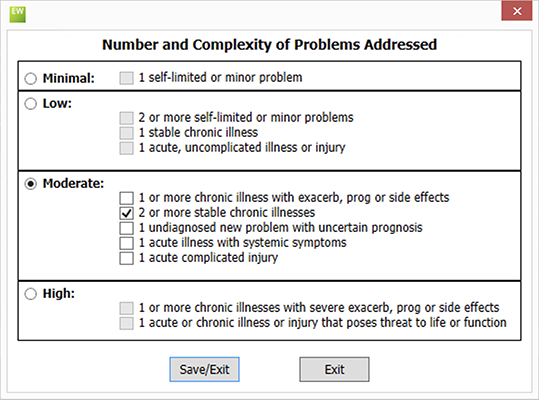
- Click Save/Exit.
The appropriate level of coding is highlighted green.
- Repeat steps a–c for the Data and Risk categories.
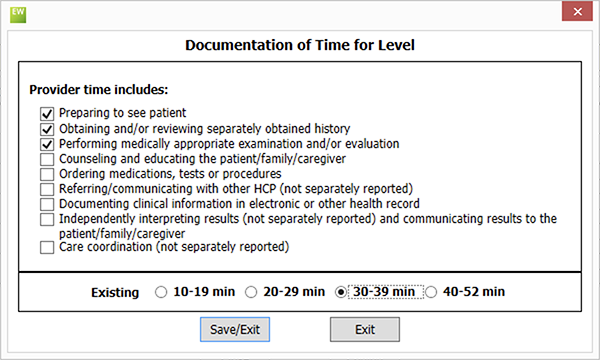
- To view coding based on time, click the Time column heading, select the activities you completed during the course of the exam, select a time range, and click Save/Exit.
-
Review the color coded levels to determine the appropriate level of E/M coding for the exam.
-
Click Coding to open the Coding window or click Close to exit the Quick Code window.
Using Quick Code for Exams in Other Settings
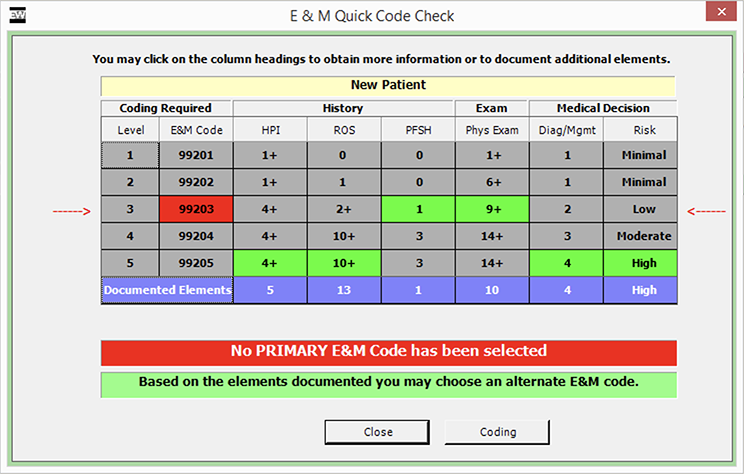
The check box selections that you record in a patient’s exam record that relate to 99xxx procedure codes are tallied and recorded in the Documented Elements row on the E&M Quick Code Check window.
- Click the QuickCode toolbar icon within the Patient Exam window.
The E&M Quick Code Check window opens.
- Note the appropriate code for billing purposes.
The lowest level of code that you have selected (as denoted by purple boxes) is what you can bill a patient. To meet CMS guidelines, you cannot bill a level 5 E&M code unless all of the boxes in the level 5 row are purple. For example, if there is a purple HPI box in the level 2 row and purple ROS, PFSH, Phys Exam, Diag/Mgmt, and Risk boxes in the level 5 row, you must bill the level 2 E&M code unless you document additional HPI elements to create a purple HPI box in the level 5 row.
Grey boxes denote elements that you have not documented or coding levels that you have not reached.
Green rows denote the coding level that you have already selected in the Diagnosis/Procedure Coding window (if applicable).
A red E&M Code box denotes an alternate E&M code that you can bill based on elements that you have already documented (if applicable).
Purple boxes denote coding levels that you have reached.
- If an insufficient number of elements were documented in the exam, click the heading of the insufficient aspect to go to the insufficient portion of the exam and add the necessary information. See Creating and Opening Exam Records for more information on adding exam information.
To meet CMS guidelines, you must document two out of three areas (History, Exam, and/or Medical Decision) for established patients. To meet CMS guidelines, you must document all three areas (History, Exam, and Medical Decision) for new patients; new patients are patients who have not been seen in your practice in at least three years.
If you click the HPI (History of Present Illness), PFSH (Past, Family, and/or Social History), or Diag/Mgmt headings, windows open for you to select and process exam information. See Creating and Opening Exam Records for more information on adding exam information.
If you click the ROS (Review of Systems) or Phys Exam headings, a Quick Code Review window opens. Click Process to select and process exam information. See Creating and Opening Exam Records for more information on adding exam information.
If you click the Risk heading, the Risk Factors window opens for you to select a risk factor.
Click Coding and open the Diagnosis/Procedure Coding window and record and modify coding information.
In addition to the procedure above, watch this video.