Viewing Exam History & Recording Patient Referrals to Other Providers
- Click the Patient Hx icon in the top left of the ExamWRITER chart window or select a patient in the ExamWRITER Control Center window and click the Patient Hx icon.
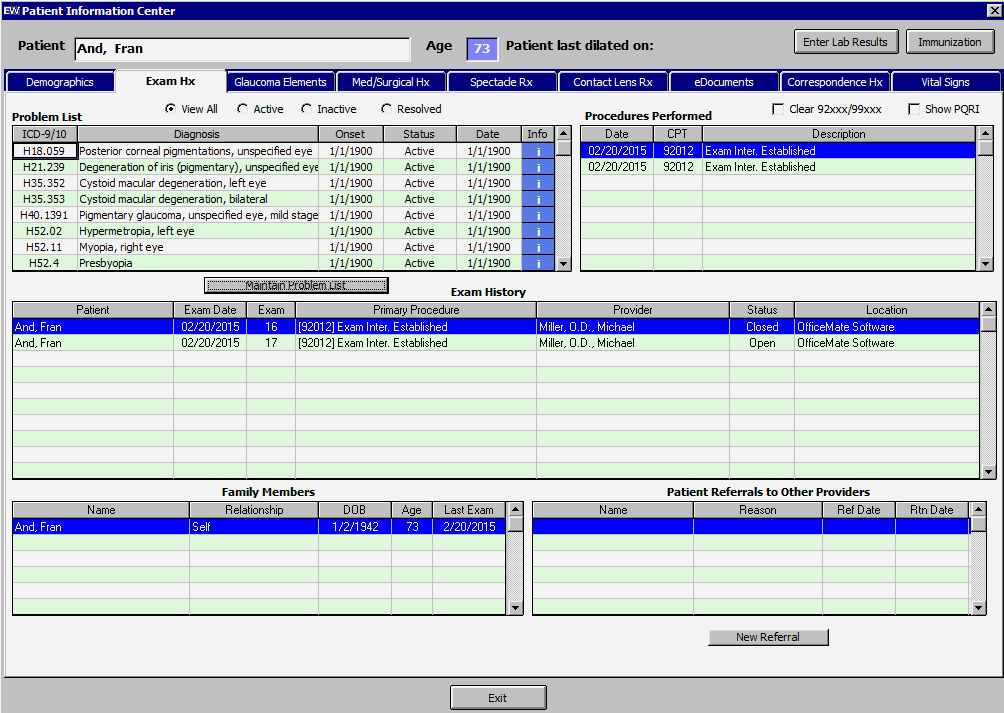
The Patient Information Center window opens.
- Click the Exam Hx tab to view the patient’s family members’ exam history and the patient’s exam history.

After recording referring provider information on the Exam Hx tab, you can create and print the Refer To Doctor Tracking report in OfficeMate that displays a list of patients to whom you have referred to other doctors, their referring provider, the doctor to whom you referred them, the date referred, and the expected and actual return dates.
- The patient’s family members’ exam history is only available if you are an OfficeMate user and if the patient and his or her family members have OfficeMate patient records.
- If you have diagnosis codes recorded in previous exams that are outdated and no longer appear on the Diagnosis Codes tab on the Customization window, they will not appear in the Diagnosis/Problem List on the Patient Information Center window.
- To display PQRS procedure codes in the Procedures Performed table and keep track of PQRS reporting, select the Show PQRI check box.
- Click the Info buttons to view information from MedlinePlus Connect about the selected diagnosis codes.
- To maintain the patient’s problem list and add ICD-9 or ICD-10 codes documenting the patient’s existing diagnoses, click Maintain Problem List and follow the instructions below:
- Search for a diagnosis code and double-click on it in the Diagnosis table.
- Record the diagnosis date, status, and status date.
- Click Save/Add to add the diagnosis code to the Current Problem List table.
- Click Save/Exit to save the problem list and exit Problem List Maintenance window.
To delete an existing diagnosis code, select it from the Current Problem List table and click Delete.
To modify the status of an existing diagnosis code, select it from the Current Problem List table, select a new status from the Status drop-down menu, select a status date from the Status date calendar, click Save/Add, and then click Save/Exit.
- To record or update patient referral information:
- Click New Referral or double-click on an existing referral.
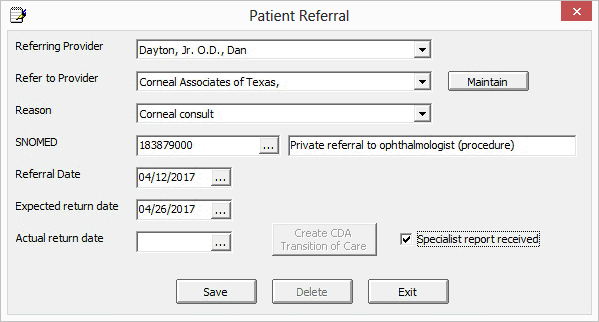
- If you are recording a new referral, select the Referring Provider, Refer to Provider, Reason, SNOMED, Referral Date, and Expected return date.
- If you are updating an existing referral, select the Actual return date and select the Specialist report received check box.
- Click Save.
- If you want to save the patient’s record to transmit later through secure messaging, click Create CDA Transition of Care and click Exit.
 To send the clinical summary, click the eDocuments tab, select the CDA Export - Transition of Care from the list of eDocuments. Select the Provider radio button and click Secure Send. The Secure Message window opens. Type the provider’s email address or select it from the drop-down menu, type a Subject, and type a message, and click Send. Your message and the patient’s CDA are sent securely.
- Click Exit to close the Patient Information Center window.
In addition to the procedure above, watch this video.