Setting Up Electronic Prescribing of Controlled Substances
You can legally prescribe Schedule II–V controlled substances electronically in all 50 states, and many states require all controlled substances be e-prescribed. Check with your state board to find out if or when electronic prescribing of controlled substances (EPCS) is required in your locality. EPCS is intended to protect your patients as well as your practice by discouraging doctor-shopping, preventing drug abuse, eliminating stolen and altered prescriptions, and providing an auditable record of prescriptions.
While ExamWRITER's ePrescribing interface is capable of EPCS, you must undergo an authentication process before you’re able to prescribe controlled substances. You should begin the registration process at least two weeks before you’re required to use EPCS.
Before you can set up and use EPCS, you must have e-prescribing enabled in ExamWRITER.
EPCS registration involves these main steps for providers:
- Request EPCS access.
- Receive a registration invitation via email containing a link and unique code (invite ID). An administrator usually generates these emails.
- Complete identity proofing with Experian by answering credit related questions and providing personally identifiable information.
- Associate two-factor authentication to your account. The DEA requires two-factor authentication to prescribe controlled substances.
- Have an administrator complete Logical Access Control (LAC) to authorize (activate) the provider to e-prescribe controlled substances.
EPCS is an add-on to existing ePrescribing accounts. To initiate the process, click the button below to request EPCS access.
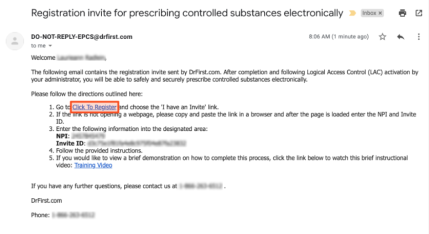
- Open the email that contains the following subject line: "Registration invite for prescribing controlled substances electronically."
- Select the Click To Register link to be directed to the EPCS Gold login page.
- On the next screen, locate the I have an invite box with your NPI number and Invite ID auto-populated. Click Proceed to continue.
Note: It is recommended that you use a computer (not a phone) to complete the registration.

- You will now be redirected to a screen to verify your identity.
- Accept the Terms of Use and Conditions by selecting the individual gray check boxes, then clicking the I Agree button in the bottom-right corner of the page.
- On the next screen, you will be provided a temporary password. The temporary password will allow you to resume the session if you need to exit the session and complete it later. You can use this temporary password within 24 hours to return to where you left off previously.
- Click the check box labeled I have read and understood this agreement, and I declare that I am authorized to sign this document. Then, click the I Accept button at the bottom-right of the page.
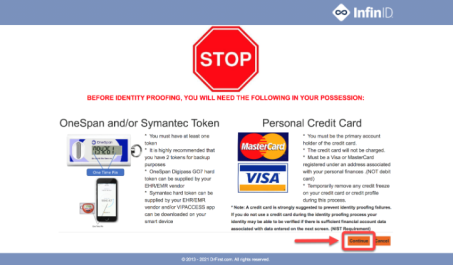
- The next screen lists pre-requisites. Click Continue at the bottom of your screen to move forward.
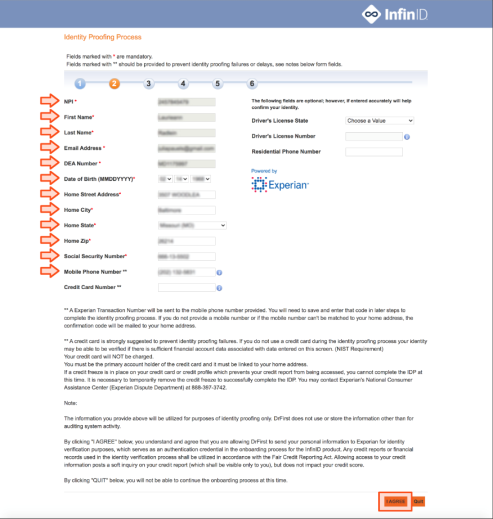
- On the next screen, fill in the required fields and click the I Agree button at the bottom of the page.
Note: The Mobile Phone Number field is not required, but please provide it to allow an Experian Transaction Number (ETN) to be sent to you. You will need to provide this number in later steps.
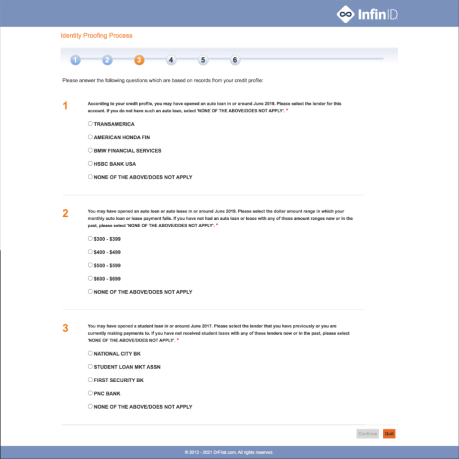
- You will be redirected to a page where you will answer 3-4 financial questions based on your Experian credit report. You will have 5 minutes to answer the questions before your session times out. Answer the questions, then click the Continue button at the bottom of your screen.
- If you pass, you will be redirected to a confirmation page to be prompted to add a token.
- Input your 6-digit ETN sent via text from the number 7332-873 on the bottom of the screen in the final “Identity Proofing Process” page. Once you click Verify Code, you will be ENROLLED in EPCS, with an INACTIVE Grant.
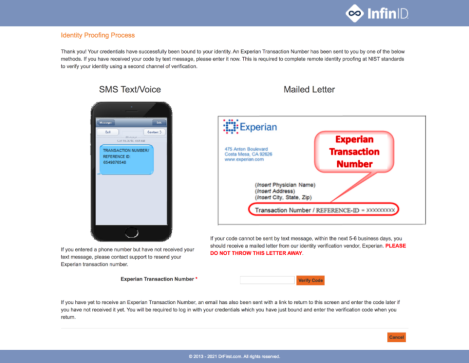
- Once your enrollment is complete and you are enrolled in EPCS with an inactive grant, you will need to complete the activation step, LAC (Logical Access Control), with a staff admin.
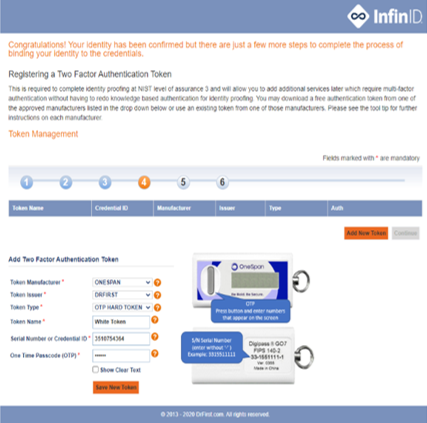
- Click the Add New Token button at the bottom of your screen.
Note: It is highly recommended that you add at least two tokens if one is lost or inaccessible. If you can not attach two tokens at this step, you can manage tokens later from the EPCS Dashboard.
- On the next screen, enter the fields listed below, then click Save New Token.
- Token Manufacturer: SYMANTEC or ONESPAN
- Select SYMANTEC if you are using a soft token (VIP Access App on mobile phone/tablet/computer) or a keychain hard token that has the SYMANTEC name and logo on the face of the token.
- Token Issuer: DrFirst
- Token Type: OTP HARD TOKEN (key fob) or OTP SOFT TOKEN (VIP Access app)
- Token Name: Nickname for the token to help identify it (e.g., "iPhone token", "key fob", etc.)
- Serial Number or Credential ID
- If you are using a SYMANTEC HARD TOKEN (key fob): enter the Serial Number (S/N) on the back of the token without any spaces.
- If you are using a OneSpan HARD TOKEN (key fob): enter the Serial Number (S/N), the long string of numbers on the back of the token without any dashes.
- If you are using a SYMANTEC VIP Access SOFT TOKEN (app): enter the Credential ID that appears at the top of the screen without any spaces.
- One Time Passcode (OTP): The number generated on the hard token or the Security Code from the VIP Access app.
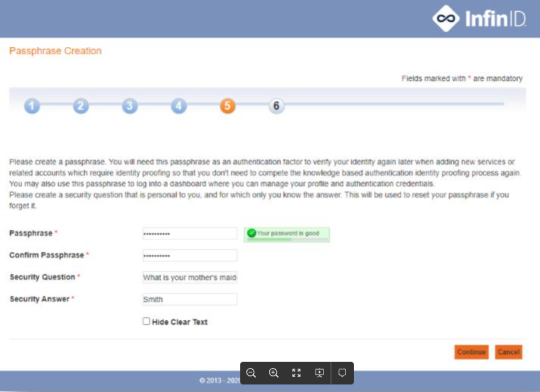
- Next, create a passphrase, security question, and security answer for the account.
- The passphrase must be at least 8 characters long, be mixed case, and contain at least one number — avoid special characters.
- The security answer is case sensitive.
Note: The passphrase can only be reset by correctly answering your security question. In the event that the passphrase is forgotten and cannot be reset, your account will be DISABLED, and you will be required to complete verification again from the beginning.
The designated practice administrator who will complete LAC will:
- Log in to their Rcopia account by navigating to Rcopia's Login Page: https://web3.drfirst.com/login
- Go to the main menu on the top left corner and select Utilities.
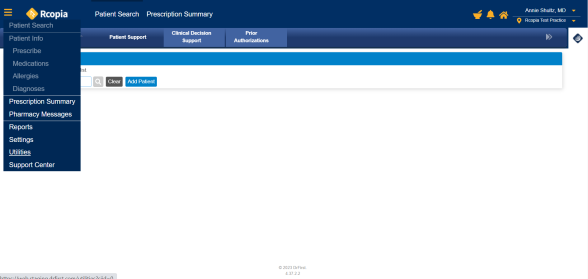
- Select Logical Access Control (LAC).

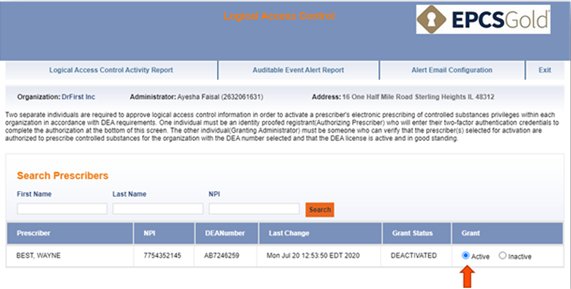
- To locate the provider, enter provider information in the search field, then click Search.
- First Name
- Last Name
- NPI

- Click the Active radio button for the appropriate/desired prescriber to grant EPCS authorization.
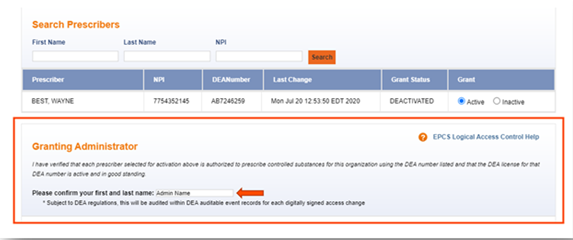
- Under Granting Administrator, the administrator will enter their own first and last name as it appears on their user account.
- Under Authorizing Prescriber, the administrator will populate the Enter NPI field with the provider's NPI number, then click Validate.
- Have the Provider complete the remaining fields and click Authorize. Alternatively, any provider with an EPCS status of ENROLLED in EPCS Gold may substitute for the requesting provider.
- Choose a Device from list. This field should auto-populate all active registered tokens. Ensure the token being used is selected.
- Enter the signing passphrase. The provider should have already set the signing passphrase (controlled substance password) during EPCS enrollment.
- Enter the One Time Pin (OTP) from the selected token: This 6-digit code generates every 30 seconds.

- You will be redirected to a page that will prompt you to click Refresh. Doing so will reload the LAC page with the desired grant change(s) applied.
Note: If you receive the error "Your Logical Access Control session has ended. No changes were made", repeat this process and be sure the Active button is selected in Step 4.