Creating and Printing Custom Appointment Reports
- Open the Reports & Statements window and click the Custom tab. For more information on opening this window, see Opening the Reports & Statements Window.
- Select Appointment Reports from the Report Name list and click Open.
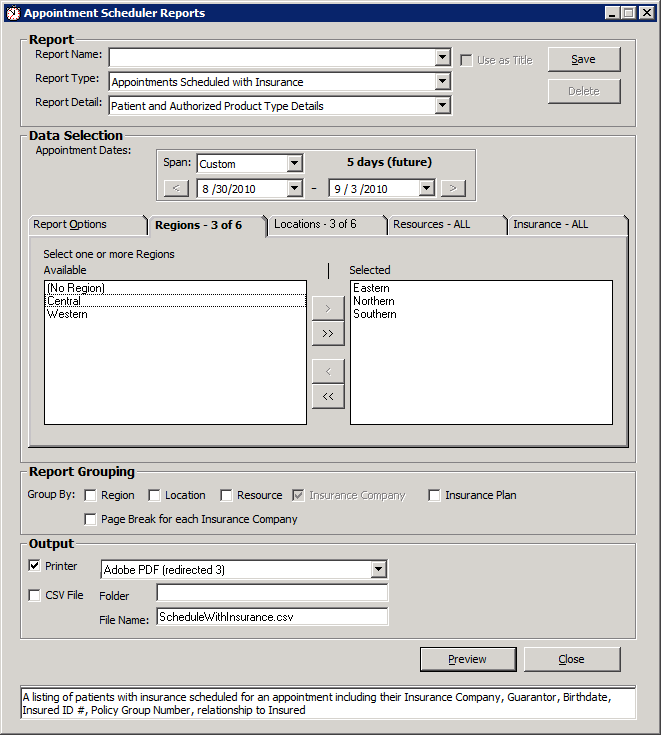
The Appointment Scheduler Reports window opens.
- Select a report from the Report Type drop-down menu.
Appointments Scheduled with Insurance lists the insured patients who have appointments during the given time period. For each listed patient, the report includes the insurance carrier, birth date, information of the insured party, ZIP code, policy group number, and authorization number.
- Select the level of detail that you want to display in the report from the Report Detail drop-down menu.
- Select a date range for the appointments you want to include in the report:
- Select a range from the Span drop-down menu and use the left and right arrows to advance the time period.
OR
- Enter beginning and ending dates in the date range fields.
- Select a range from the Span drop-down menu and use the left and right arrows to advance the time period.
- Refine the report results by selecting the report options, as needed:
- Click the Report Options tab.
- Select the Select Only Patients with Insurance Requiring Authorization check box to list patients whose insurance plan requires eligibility. For information about indicating that an insurance plan requires eligibility, see To set up insurance plan preferences.
- Select the Select Only Patients with Missing Authorization check box to list patients whose insurance plan requires eligibility, but have not received an authorization code. For information about recording authorizations, see Recording Patient Information.
- Select the Include Service Type check box to list the type of service that is scheduled.
- Select the Include Insurance Notes check box to display notes recorded for the patients’ insurance plans. For information about recording insurance notes, see Recording Patient Information.
- Select the Include Eligibility Comments check box to display any notes that were recorded with the authorization ID. For information about recording a patient’s eligibility and authorization, see Recording Patient Information.
- Refine the report results by selecting the regions you want to include, as needed:
- Click the Regions tab.
- Select only the regions that you want to include in the report in the Selected box.
To select more than one region, press and hold the Ctrl key and then select multiple regions.
- Click the single left arrow (<) to move a region to the Available box, and therefore, exclude the region from the report.
- Click one of the double arrows (<< or >>) to move all the regions from one box to another.

- Refine the report results by selecting the locations you want to include, as needed:
- Click the Locations tab.
- Select only the locations that you want to include in the report in the Selected box.
To select more than one location, press and hold the Ctrl key and then select multiple locations.
- Click the single left arrow (<) to move a location to the Available box, and therefore, exclude the location from the report.
- Click one of the double arrows (<< or >>) to move all the locations from one box to another.
- Refine the report results by selecting the providers you want to include, as needed:
- Click the Resources tab.
- Select only the providers that you want to include in the report in the Selected box.
To select more than one provider, press and hold the Ctrl key and then select multiple providers.
- Click the single left arrow (<) to move a provider to the Available box, and therefore, exclude the provider from the report.
- Click one of the double arrows (<< or >>) to move all the providers from one box to another.
- Refine the report results by selecting the insurance carriers you want to include, as needed:
- Click the Insurance tab.
- Select only the insurance carriers that you want to include in the report in the Selected box.
To select more than one carrier, press and hold the Ctrl key and then select multiple providers.
- Click the single left arrow (<) to move an insurance carrier to the Available box, and therefore, exclude the insurance carrier from the report.
- Click one of the double arrows (<< or >>) to move all the insurance carriers from one box to another.
- Select the Report Grouping check boxes to sort the report results into groups, as needed. You can select any number of the check boxes that are available. Not all check boxes are available for all reports.
- To save the report settings for future use, see Saving Custom Report Settings.
- Select the Printer check box.
- Select a printer from the drop-down menu.
- Click Process.
The Report Viewer window opens and displays a preview of the report, chart, or graph.
- Click the Print Report icon.
- Close the Report Viewer window when finished.
For more information about the Report Viewer window, see Using the Report Viewer Window.
- Select the CSV File check box.
- Type a folder location in the Folder text box.
- Type a name for the file in the File Name text box.
- Click Process.
- Click View File to view the data in the CSV format.