Recording Insurance Payments Using Electronic Remittance Advice (ERA)
The Electronic Remittance Advice (ERA) feature saves time and improves the accuracy of your billing records by automatically adjudicating payments, overpayments, underpayments, write-offs, lab chargebacks, patient transfers, and secondary insurance transfers. Using the ERA feature, an insurance check that used to take hours to record and balance will now only take you about thirty minutes or less!
Do not record an ERA until you are completely finished reviewing, processing, and resolving any issues in it! If you record an ERA prior to completing these tasks, the ERA will close, you will not be able to reload it, and you will need to manually record insurance payments.
To begin using the ERA functionality, complete one of the following tasks:
- If you are a VSP user, ensure that the location’s VSP Integration information is recorded correctly on the Location Maintenance window and Eyefinity Customer Care (877.448.0707) has turned on your electronic remittance advice functionality. Call your administrative location for more information. (If you have OfficeMate Administration access, see Maintaining Locations for OfficeMate for information about recording VSP Integration information.)
- If you are a non-VSP user, ensure that your clearinghouse is saving ERA data files in the OfficeMate\DATA\EMC\ERA folder. Refer to your clearinghouse’s website for more information.
- If TriZetto is your clearinghouse, you must include \era%.rmt at the end of the path you enter on TriZetto’s website. For example, C:\OfficeMate\DATA\EMC\ERA\era%.rmt.
For more information, watch this video.
- Click the Receipts icon and select Electronic Remittance Advice.
OR
Click Tasks on the main window toolbar, select Receipts, and select Electronic Remittance Advice.
The Insurance Remittance Advice Entry window opens.
- Continue by loading the ERA file. For more information, see To load the electronic remittance advice file.
- If VSP is your clearinghouse, see step 2; otherwise, see your clearinghouse’s website and download the ERA file to the OfficeMate\DATA\EMC\ERA folder.
If TriZetto is your clearinghouse, you must include \era%.rmt at the end of the path you enter on TriZetto’s website. For example, C:\OfficeMate\DATA\EMC\ERA\era%.rmt.
- Open the Insurance Remittance Advice window. For more information, see To open the Insurance Remittance Advice Entry window.
- Click Load ERA File.
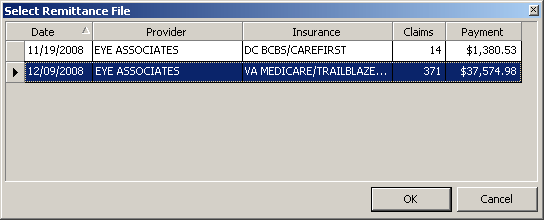
OfficeMate looks for available batch claim payments on VSP’s secured server or located in the OfficeMate\DATA\EMC\ERA folder and displays the available claim payments in the Select Remittance File window.

- Select a batch to process and click OK.
- You can select only one batch to process at a time.
- OfficeMate displays only those batches that have not been processed.
OfficeMate analyzes the ERA file and matches the claims in the file to claims in OfficeMate.
The Select Coverage window, which appears after you select an ERA file to load in the Select Remittance File window, displays this information:
From ERA: This field shows the correct insurance plan to use for loading the remittance. It also shows the plan’s payer ID.
Insurance: The plan automatically selected in this drop-down list is the plan in the OfficeMate database that has the same payer ID as the remittance plan.
If necessary, you can select a different plan from the Insurance drop-down list, but you will receive this message: “For better insurance match, add payer ID to OfficeMate insurance data through Administration > Setup > Insurance Setup > Plan tab.”
To get a better match for the payer ID shown in the From ERA field:
In Administration, select Setup, and then click Insurance Setup.
In the Insurance Billing Initial Setup window, select the appropriate insurance carrier from the Select Carrier drop-down list.
Click the Plan tab.
From the Select Plan drop-down list, select the appropriate plan.
In the bottom-right section of the tab, enter the From ERA payer ID in the Payor ID field.
Click Save.
The name of the insurance plan associated with the payer ID you specified above is displayed in the Insurance field in the Select Coverage window.
- Review any error messages that appear and perform the following steps:
- Click Yes to search for the patient.
The Find Patient window opens.
- Select the patient from the results list and click Select.
If you choose to not search for the patient, or if the patient cannot be found in the Find Patient window, you can locate the patient after adjudicating the payments for patients that can be found. For information on processing the patients that could not be found, see To resolve irreconcilable entries.
The Insurance Remittance Advice Entry window populates with information about the payment and lists all of the patients and claims covered in the payment.
- Click Yes to search for the patient.
- Review the information displayed in the Insurance Remittance Advice Entry window. For more information, see To review the ERA information.
The claims with green check marks are fully adjudicated. The claims without check marks could not be matched to items on fee slips and require manual intervention. The line items that require attention are bold, and the text of the line items are different colors, depending on the nature of the mismatch.
- Resolve any line items in bold text.
- For black, bold text, see To resolve overpayments for more information.
- For green, bold text, see To resolve lab chargeback entries for more information.
- For red, bold text, see To resolve lab chargeback entries or To resolve nonexistent line items for more information. Although nonexistent line items and lab chargebacks both appear in red, bold text, you can easily tell the difference between the two. The nonexistent line items will have a product listed in the Description column, while lab chargebacks have Lab Chargeback listed in as the description.
For more information, watch this video.
- Ensure that the Insurance Remittance Advice Entry window is open and an ERA file is loaded. For more information, see To open the Insurance Remittance Advice Entry window.
The Insurance Remittance Advice Entry window populates with information about the payment in the upper portion of the window and lists all of the patients and claims covered in the payment in the lower portion of the window.
- Click the following buttons, as needed:
- Click No Detail to view only the header of each claim, which gives a summary of each claim as a single line. You cannot edit or adjudicate claims within the header row.
- Click All Detail to view the detail of each claim by showing all of the line items.
- Click Unchecked Detail to view the detailed line items for only those claims that require your attention. Claims that do not require your attention will display only the header row.
- Review the information in the header rows. Use the following table to understand the information displayed in the header rows and where the information comes from:
This column... Displays this information... check box
Indicates whether the claim was automatically adjudicated. A green check mark indicates that the claim was fully adjudicated. If the check box does not have a green check mark, one or more items in the claim require your attention.
S
Displays the status of the claim.
P: Primary
PX: Primary crossover
S: Secondary
I: Informational
R: Reversal
D: Denied
Pat #
Displays the patient number from OfficeMate.
Fee Slip
Displays the fee slip number associated with the claim.
Ref #
Displays the reference number assigned to the claim by the clearinghouse.
Patient Name
Displays the patient’s name.
Billed
Displays the insurance amount billed on the fee slip in OfficeMate.
PatPaid
Displays the amount the patient paid, as recorded in OfficeMate.
Open
Displays the open charges for the claim, as recorded in OfficeMate.
Allowed
Displays the amount covered by insurance according to the ERA.
Patient
Displays the amount for which the patient is responsible.
SecInsur
Displays the amount for which the secondary insurance is responsible (crossover).
Payment
Displays the insurance payment from the ERA. This field can be edited.
Adjust
Displays the amount of any adjustments that are made to reconcile the payment to the amount billed on the fee slip. this field can be edited.
To Pat
Displays the amount that is assigned to the patient according to the ERA. This field can be edited.
To Sec
Displays the amount that is assigned to the secondary insurance. This field can be edited.
Balance
Displays any amount that is not covered under the Adjust, To Pat, and To Sec amounts.
- Review the information in the claim detail rows.
Use the following table to understand the information displayed in the detail rows and where the information comes from:
This column... Display this information... Service Date
Displays the service date recorded on the fee slip.
CPT
Displays the CPT code either from the fee slip or, if the line is a nonexistent item, from the ERA file.
Units
Displays the number of items billed with that row’s CPT code.
Description
Displays the product description from the fee slip.
Billed
Displays the amount billed on the claim in OfficeMate.
PatPaid
Displays the amount the patient paid, as recorded in OfficeMate.
Open
Displays the open charges for the claim, as recorded in OfficeMate.
Allowed
Displays the amount covered by insurance according to the ERA.
Patient
Displays the amount for which the patient is responsible.
SecInsur
Displays the amount for which the secondary insurance is responsible (crossover)
Payment
Displays the insurance payment from the ERA. This field can be edited.
Adjust
Displays the amount of any adjustments that are made to reconcile the payment to the amount billed on the fee slip. this field can be edited.
To Pat
Displays the amount that is assigned to the patient according to the ERA. This field can be edited.
To Sec
Displays the amount that is assigned to the secondary insurance. This field can be edited.
Balance
Displays any amount that is not covered under the Adjust, To Pat, and To Sec amounts.
- Click the button at the far right of the detail rows to view additional details and remarks for individual line items.

- Resolve line items that are in bold text. For information on resolving nonexistent line items in red, bold text, see To resolve nonexistent line items. For information on resolving overpayments in black, bold text, see To resolve overpayments. For information on resolving lab chargebacks in red, bold or green, bold text, see To resolve lab chargeback entries.
- Provider adjustments are payments made by insurance companies but not necessarily applicable to an individual patient. For example, VSP may pay an in-office finishing (IOF) payment, which is a provider incentive.
- To process interest payments or provider adjustments, you must have first set up one fictitious patient to which all interest payments may be applied and one fictitious patient to which all provider adjustments may be applied. For information on creating a patient record, see Creating and Opening Patient Records.
- You can save your work as you enter ERA information over a period of time and before you record it. Click Save anytime you get interrupted and need to change tasks.
- Ensure that the Insurance Remittance Advice Entry window is open and an ERA file is loaded. For more information, see To open the Insurance Remittance Advice Entry window.
- Review the information displayed in the Insurance Remittance Advice Entry window. For more information, see To review the ERA information.
- If an amount appears in the Interest Paid or Provider Adjustment fields, click Select Account.
The Find Patient window opens.
- Find and select the fictitious patient record that was created to accept interest payments or provider adjustment amounts.
The amount of the interest payment or provider adjustment is applied to the fictitious patient’s account. To verify, go to the Receipts & Adjustments window. For more information about viewing a patients receipts and adjustments, see Opening a Patient’s Receipts and Adjustments.
You can save your work as you enter ERA information over a period of time and before you record it. Click Save anytime you get interrupted and need to change tasks.
- Ensure that the Insurance Remittance Advice Entry window is open and an ERA file is loaded. For more information, see To open the Insurance Remittance Advice Entry window.
- Review the information displayed in the Insurance Remittance Advice Entry window. For more information, see To review the ERA information.
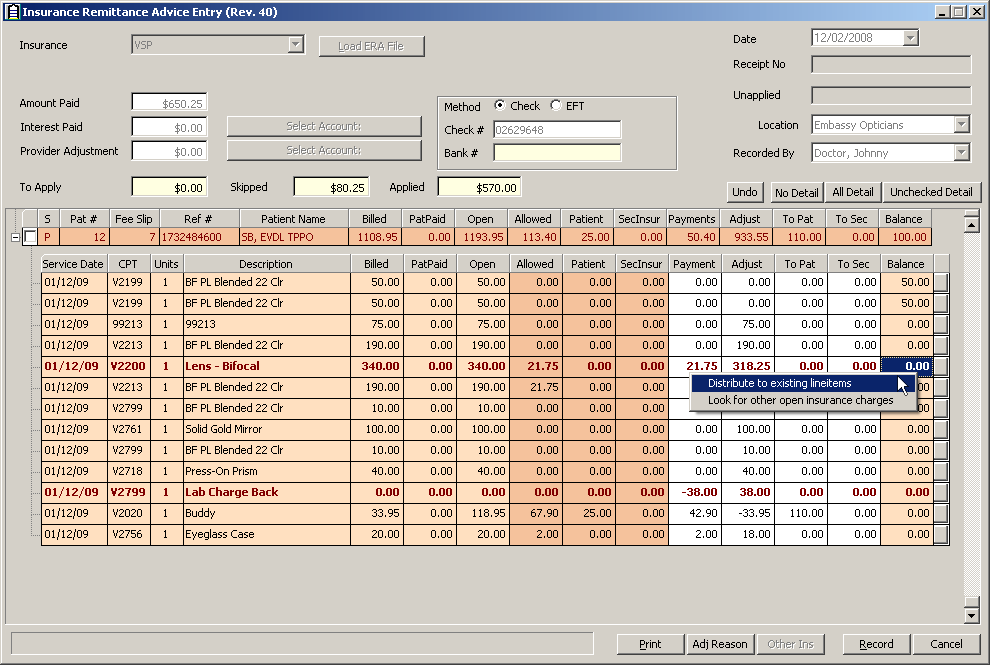
Nonexistent line items (i.e., items that appear in the ERA file, but were not included on the original claim sent to the insurance company) are listed in red, bold text.
- For each line item listed in red, bold text, click the Balance column to view the available options.
- Select Distribute to existing line items to distribute the payment to open line items on the fee slip.
- Select Look for other open insurance charges to apply the overpayment to the open charges for the insurance carrier that may have appeared on another fee slip. The Ledger history will be updated.
Select the Look for other open insurance charges option when two or more fee slips are associated with one payment. You cannot undo this operation.

-
Move your cursor over the fee slip Payments column and click Accept Payments. Repeat this step to record each fee slip payment.
- If you make a mistake, click Undo to undo your last action.
- Resolve other line items that require attention. For information on resolving overpayments in black, bold text, see To resolve overpayments. For information on resolving lab chargebacks in red, bold text, see To resolve lab chargeback entries.
- If you are completely finished resolving nonexistent line items and recording insurance payments in the ERA, click Record.
Do not record an ERA until you are completely finished reviewing, processing, and resolving any issues in it! If you record an ERA prior to completing these tasks, the ERA will close, you will not be able to reload it, and you will need to manually record insurance payments.
For more information, watch this video.
You can save your work as you enter ERA information over a period of time and before you record it. Click Save anytime you get interrupted and need to change tasks.
- Ensure that the Insurance Remittance Advice Entry window is open and an ERA file is loaded. For more information, see To open the Insurance Remittance Advice Entry window.
- Review the information displayed in the Insurance Remittance Advice Entry window. For more information, see To review the ERA information.
Nonexistent line items (i.e., items that appear in the ERA file, but were not included on the original claim sent to the insurance company) are listed in red, bold text.
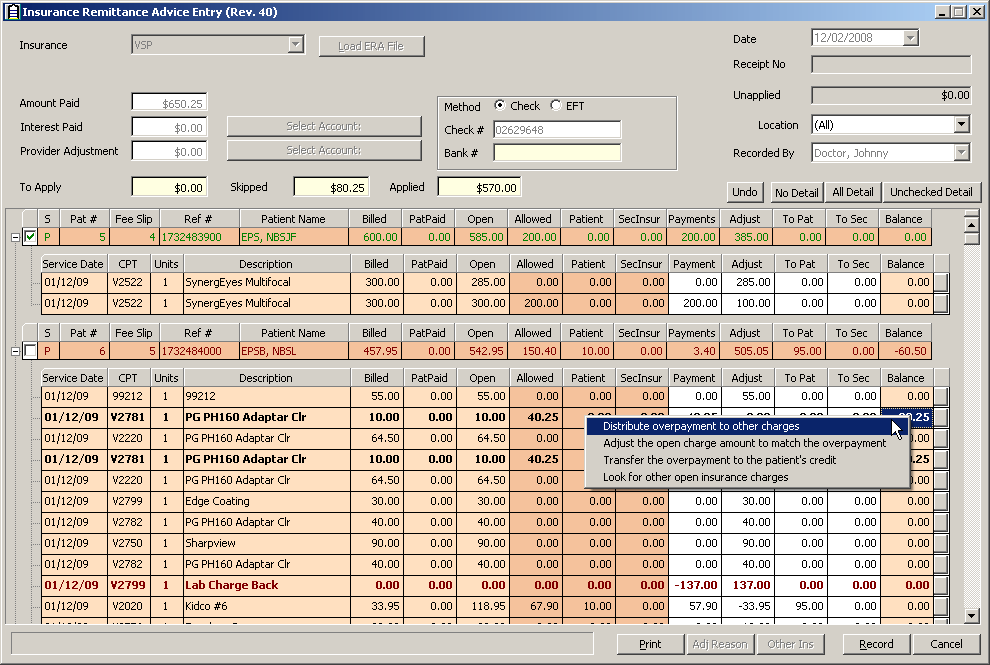
- For each line item listed in black, bold text, click the Balance column to view the available options.
- Select Distribute overpayment to other charges to distribute the overpayment to open line items on the fee slip. The overpayment is applied to each item on the fee slip, starting with the first item listed and moving down, until the overpayment is exhausted.
- Select Adjust the open charge amount to match the overpayment to add an adjustment line item to the fee slip. The overpayment amount moves from the Balance column to the Adjust column.
- Select Transfer the overpayment to the patient’s credit to transfer the overpayment amount to the patient’s account.
- Select Look for other open insurance charges to apply the overpayment to the open charges for the insurance carrier that may have appeared on another fee slip.

- If you make a mistake, click Undo to undo your last action.
- For information on resolving nonexistent line items in red, bold text, see To resolve nonexistent line items. Resolve other line items that require attention. For information on resolving lab chargebacks in red, bold text, see To resolve lab chargeback entries.
- If you are completely finished resolving overpayments and recording insurance payments in the ERA, click Record.
Do not record an ERA until you are completely finished reviewing, processing, and resolving any issues in it! If you record an ERA prior to completing these tasks, the ERA will close, you will not be able to reload it, and you will need to manually record insurance payments.
For more information, watch this video.
You can save your work as you enter ERA information over a period of time and before you record it. Click Save anytime you get interrupted and need to change tasks.
- Ensure that the Insurance Remittance Advice Entry window is open and an ERA file is loaded. For more information, see To open the Insurance Remittance Advice Entry window.
- Review the information displayed in the Insurance Remittance Advice Entry window. For more information, see To review the ERA information.
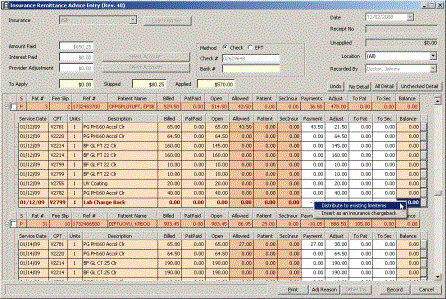
- For each line item listed in red, bold text, click the Balance column to view the available options.
- Select Distribute to existing line items to distribute the negative amount across line items on the fee slip. Payments made to the other line items in the fee slip will be reduced by the amount of the lab chargeback.
- Select Insert as an insurance chargeback to add the chargeback as a new line item to the fee slip. The line turns green and the Ledger history is updated.

Lab chargeback entries that are in green, bold text do not require your attention. These entries simply indicates that the patient’s payment matches or exceeds the lab chargeback.
-
Move your cursor over the fee slip Payments column and click Accept Payments. Repeat this step to record each fee slip payment.
- If you make a mistake, click Undo to undo your last action.
- Resolve other line items that require attention. For information on resolving nonexistent line items in red, bold text, go to To resolve nonexistent line items. For information on resolving overpayments in bold, black text, go to To resolve overpayments.
- If you are completely finished resolving lab chargeback entries and recording insurance payments in the ERA, click Record.
Do not record an ERA until you are completely finished reviewing, processing, and resolving any issues in it! If you record an ERA prior to completing these tasks, the ERA will close, you will not be able to reload it, and you will need to manually record insurance payments.
For more information, watch this video.
Occasionally, OfficeMate cannot match claims in the electronic remittance advice file to a fee slip. This mismatch is usually due to the patient’s name being different in the insurance carrier’s records than the name recorded in OfficeMate.
You can save your work as you enter ERA information over a period of time and before you record it. Click Save anytime you get interrupted and need to change tasks.
- Ensure that the Insurance Remittance Advice Entry window is open and an ERA file is loaded. For more information, see To open the Insurance Remittance Advice Entry window.
- Resolve the line items requiring attention. For information resolving line items, see To resolve nonexistent line items, To resolve overpayments, and To resolve lab chargeback entries.
- If you are completely finished resolving irreconcilable entries and recording insurance payments in the ERA, click Record and close the Insurance Remittance Advice Entry window.
Do not record an ERA until you are completely finished reviewing, processing, and resolving any issues in it! If you record an ERA prior to completing these tasks, the ERA will close, you will not be able to reload it, and you will need to manually record insurance payments.
- Open the Receipts & Adjustments window to record the irreconcilable entries. For more information, go to Opening a Patient’s Receipts and Adjustments.
- Click the Apply to Insurance tab.
- Apply the insurance payments to open balances. For more information, go to Applying Insurance Payments to Any Open Balances.
For more information, watch this video.
For more information on navigating ERAs, watch this video.