Sharing Folders on Windows 7
You may need to disable your Windows Firewall in order to properly view shared folders. Contact your hardware and network technician and discuss the ramifications of disabling your Windows Firewall before completing this action.
For more information on Windows 7, go to www.microsoft.com and search for “Windows 7.”
- Click the computer’s Start button.
- Select Control Panel.
- Click Network and Sharing Center.
- Click Change advanced sharing settings.
- Click the down arrow button to expand the Home or Work [or Domain (current profile)??] network profile and then select the following Network discovery settings:
- Turn on network discovery.
- Turn on file and printer sharing.
- Turn on sharing so anyone with network access can read and write files in the Public folders.
- Select the Turn off password protected sharing radio button at the bottom of the window if you want any user to be able to access the public shared folders. If you are prompted for an administrator password or confirmation, type the password or provide confirmation. [Where is this? I don’t see it on my Windows 7 machine.]Password protected sharing is not available on computers on a domain; it is only available on computers in a workgroup.
- Click Save changes.
- Close the Network and Sharing Center.
- Right-click on the computer’s Start button.
- Select Open Windows Explorer.
Windows Explorer opens.
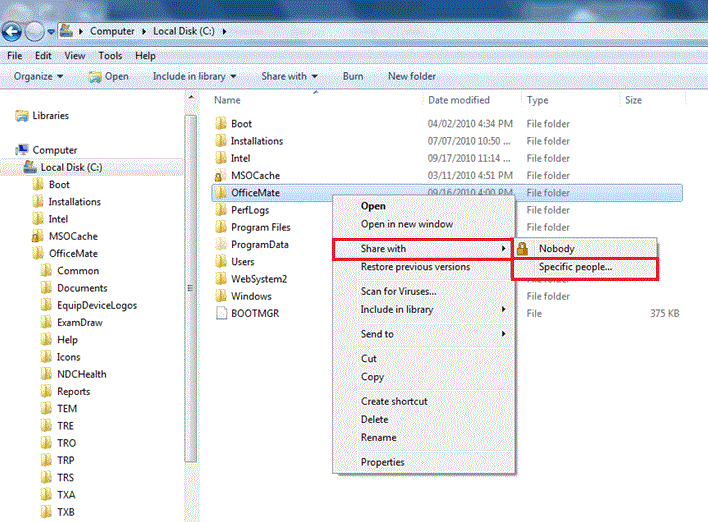
- Right-click on the OMATE32 or OfficeMate folder, select Share with, and select Specific People.
The File Sharing window opens.
- Type the name of the person with whom you want to share this folder and click Add.
OR
Click the arrow to find people with whom to share or share with Everyone.
- Select Co-owner from the Permission level column for all users.
- Click Share.