What's New in AcuityLogic 7.11 for Cloud Users
Release Date: August 20, 2019
Eyefinity announces the newest version of AcuityLogic. In addition to resolving known issues in previous versions of AcuityLogic, this updated version offers new features and expanded functionality.
Topics include the following:
For more information on AcuityLogic features, training, and integrations, contact your account representative, or call Eyefinity at
Admin Enhancements
Admin includes an enhancement in the following area:
Customizing Session Timeout Periods
You now have more flexibility when configuring timeout settings for your company. Using the new Session Time Out Configuration menu, you can now customize how long an idle user session remains open before timing out in the following AcuityLogic modules:
- Admin
- BackOffice
- Billing
- POS
After you configure a timeout period for a module, a warning appears one minute before an idle session times out and prompts the user to extend the session. If the user does not extend the session, AcuityLogic automatically logs the user out. Since the warning appears one minute before the timeout period expires, a timeout period greater than one minute is recommended.
- As part of the this enhancement, the Session Time Out field was removed from the Company Information window. The POS timeout period you entered previously in the Session Time Out field will be transferred to the POS field in the Session Time Out Configuration menu.
- By default, a 20-minute timeout period is entered for all modules.
- The timeout period cannot be blank for any module and must be greater than zero and less than 1000 minutes.
To customize session timeout periods
- In Admin, click Company and select Company Setup.
- In the Company Information window, click the link for your company in the Company column.
- In the Company Information window, expand the Session Time Out Configuration menu.
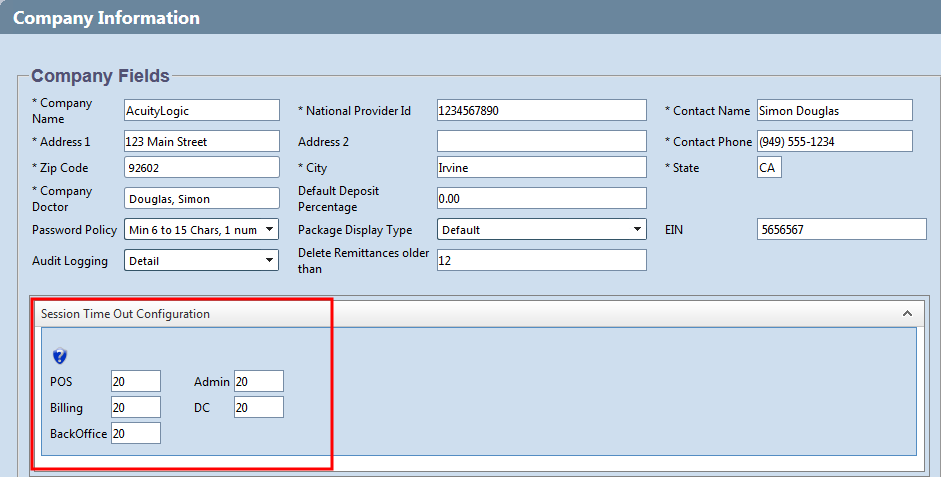
- For each AcuityLogic module your company uses, enter a timeout period in minutes that is greater than zero and less than 1000.
Since a warning appears one minute before the timeout period expires, a timeout period greater than one minute is recommended.
- In the Company Information window, click Save.
POS Enhancements
POS includes enhancements in the following areas:
Submitting Maui Jim Orders
Maui Jim has joined the VSP Formulary and VSP Contract Lab Network. After completing the product and lab set up required in Admin, VSP network doctors who are authorized Maui Jim retailers will be able to submit Maui Jim lab orders from POS for both VSP members and private-pay customers.
Applying Coupons to Orders
The process for adding discounts has been improved so that you can apply coupons more quickly and easily. When you scan a coupon or enter a coupon number while adding a discount, the discount type and amount for the coupon are automatically entered based on its configuration in Admin.
The details are entered automatically for coupons with the following discount types selected in the Coupon window in Admin:
- Dollar Amount
- Percentage Amount
- Charge Amount (Available for line discounts only)
As part of this enhancement, the following updates were made in Admin:
- In the Discount Types window, a Coupon discount type was added if it was not added previously. For the new or existing Coupon discount type, the Description, Start Date, End Date and Coupon fields can no longer be edited.
- In the Coupons window, the Discount Amount column name was updated to Amount and the Amount Type column was removed.
For discount and coupon configuration in Admin, see Setting Up Discounts and Setting Up Coupons.
To apply coupons to orders
- In the Pricing window in POS, click a link in the Line Discount or Global Discount column to apply a line or global discount.
The Discount window opens.
- Scan the coupon or enter the coupon number in the Coupon Number field and select a reason type from the Reason drop-down list if necessary.
The discount type and amount for the coupon are automatically entered. If you did not select a reason type, Coupon is selected automatically from the Reason drop-down list.
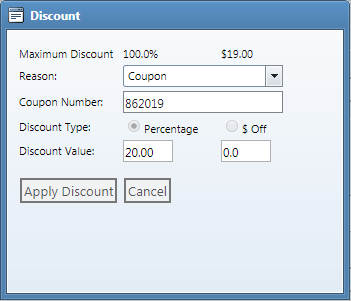
- Click Apply Discount.
The discount amount is applied to the order and the order pricing is updated.
Fixed Issues
AcuityLogic 7.11 fixes issues in the following areas:
BackOffice
- When you generate the Daily Transactions Sales report (AC105), a note now appears at the bottom of the report to let users know that the Net AR reported for one location may be impacted by the payments collected at other locations.
Billing
- The Billing Adjustments Report (GB116) has been optimized so that you can generate the report more quickly.
POS
- The Accounts Receivable Aging report now lists the correct patient balances based on the criteria you select. Previously, the report did not return any patient balances for some locations.
- Patient statements can now be generated for patients with balances. Previously, patient statements could not be generated for some locations.
-
The patient balance shown at the top of the Orders tab is now updated correctly when you apply multiple payments to an order. Previously, the balance was not updated correctly if two equal payment amounts were applied to an order.
- On the Orders tab, the order status is now updated after you update an order using the options in the Actions drop-down list. Previously, the order status did not update until the Orders tab was refreshed.
- Claims are now created successfully for orders with prescriptions from an outside doctor for offices without a provider assigned.
- If the office you are logged in to is not set up as a retail store, the following message now appears when you click Appointments in the left column of menu options: "To access the appointment book, select Retail in the office setup in Admin." Until you do, you cannot access the Calendar View of the Scheduler in POS.
(Clicking OK in the message returns you to the Select Patient window.)