Scheduling Appointments in the Multiple Schedule View in AcuityLogic BackOffice
This section explains how to schedule appointments in the Multiple Schedule View of the AcuityLogic BackOffice Scheduler.
To schedule appointments in the Multiple Schedule View
- Open the Multiple Schedule View. See Opening and Navigating the Multiple Schedule View in AcuityLogic BackOffice.
- Click the Schedule link to schedule an appointment.
- Select a patient to schedule by using one of the following methods:
- For an existing patient, start entering the patient’s name in the Select Patient section, and select the patient’s name when it appears, or select a patient from the Today’s Patients drop-down list.
- For a new patient, enter the patient’s information in the fields in the Select Patient section, and click New Patient.
- From the Service Type drop-down list, select a service.
- If a Lock icon appears next to the Service Type drop-down list, a service template that restricts available appointments to a specific service group was applied to the resource’s schedule.
- If the service you want to select is unavailable, select a different time slot or a different resource.
- If you must schedule a service for the unavailable resource, click the Lock icon to select services not in the specified service groups. When you click the Lock icon, you are prompted to enter login credentials for an account with sufficient security access to override the locked service groups.
- In the Service Type drop-down list, services recommended by the applied service template appear in bold.
- If the correct resource is not already selected, select the doctor or nonperson resource from the Resource drop-down list.
- Select a platform partner from the In-Office Telehealth drop-down list.
- The In-Office Telehealth drop-down list is available only if one or more platform partners has been configured for your company and the resource has been configured as a full-time or part-time telehealth user.
- If the resource has been configured as a full-time telehealth user, the platform partner is automatically selected if the office has a single platform partner configured.
- Telehealth appointments are denoted by a Telehealth Visit (camera) icon. If the resource has been configured as a full-time telehealth user and a platform partner was not selected from the In-Office Telehealth drop-down list, a warning message appears when you attempt to save the appointment and a warning icon appears next to the Telehealth Visit icon.
- If the platform partner selected for the appointment is deactivated, you will need to modify the appointment and select another platform partner for the telehealth appointment. The system will not automatically update the appointment with changes made to the platform partners.
- If the patient has vision insurance, perform one of the following tasks to add the patient’s vision insurance to the appointment:
- If the patient has at least one vision insurance plan in his or her profile, select the patient’s primary vision insurance from the Vision Ins drop-down list. Only the vision insurance plans set up in the patient’s profile appear in the drop-down list.
- If the patient does not have any vision insurance plans in his or her profile, click the blue Insurance icon next to the Vision Ins drop-down list. The patient’s insurance profile opens, and you can record the patient’s insurance information. Click Close Window to continue scheduling the appointment.
- To record the patient’s eligibility for the selected vision insurance, click the red Eligibility icon next to the Vision Ins drop-down list. The patient’s insurance profile opens, and you can record the patient’s eligibility information. Click Close Window to continue scheduling the appointment.
- If the patient has medical insurance, perform one of the following tasks to add the patient’s medical insurance to the appointment:
- If the patient has at least one medical insurance plan in his or her profile, select the patient’s primary medical insurance from the Medical Ins drop-down list. Only the medical insurance plans set up in the patient’s profile appear in the drop-down list.
- If the patient does not have any medical insurance plans in his or her profile, click the blue Insurance icon next to the Medical Ins drop-down list. The patient’s insurance profile opens, and you can record the patient’s insurance information. Click Close Window to continue scheduling the appointment.
- To record the patient’s eligibility for the selected medical insurance, click the red Eligibility icon next to the Medical Ins drop-down list. The patient’s insurance profile opens, and you can record the patient’s eligibility information. Click Close Window to continue scheduling the appointment.
The following figure shows the fields and icons mentioned in steps 6 through 9:
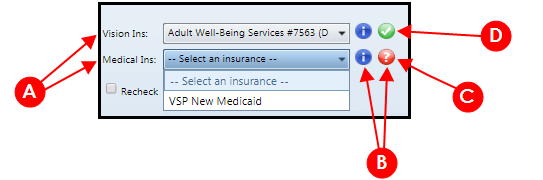
- Select vision and medical insurance.
- To add insurance information, click any of the insurance or eligibility icons.
- Red icon: Eligibility is not recorded or has expired.
- Green icon: Eligibility is recorded and up to date.
- (Optional) In the Start Date field, update the date of the appointment.
- (Optional) In the Start Time field, update the appointment start time.
- (Optional) In the Duration field, update the appointment duration (in minutes). The default duration time is the duration assigned to the service; if the service does not have a default duration, the duration defaults to the doctor’s exam minutes.
The appointment duration can be determined by different settings in AcuityLogic Admin and AcuityLogic POS. The appointment duration defaults to those duration settings in this order:
- Exam/service type (product setup)
- Service template
- Exam Minutes in office employee profile
- Exam Minutes in company employee profile
The duration defaults to the exam minutes of the provider with the shortest duration of exam minutes at this location. For example, if one provider's exams are in 20-minute durations and another provider's are in 30-minute durations, the default duration is 20 minutes.
If you schedule a 15-minute appointment in a 20-minute time slot, the entire time slot appears blocked. If you schedule a 25-minute appointment in a 20-minute time slot, two 20-minute time slots appear blocked.
- If the appointment is a recheck appointment, select the Recheck check box.
This disables the Appointment Not Invoiced (red dollar sign) icon so that it does not appear with the appointment when the patient is checked in. (Recheck appointments are usually not invoiced.)
- If the appointment is a pre-appointment, select the Pre-Appointment check box.
- In the Confirmation section, select one of the following statuses if necessary:
- Scheduled: This is the default. It indicates that you have not yet asked the patient to confirm the appointment.
- Not Available: You have attempted to contact the patient to confirm the appointment, but you were unable to contact the patient or leave a message.
- Left Message: You left a message for the patient.
- Confirmed: The patient confirmed the appointment.The appointment may default to Confirmed depending on when the appointment is scheduled and the value entered in the Auto Confirm Appt. Days field in the Scheduler Fields menu in the Company Information window.
- In the Show Status section, select one of the following statuses if necessary:
- None: This is the default. It indicates that the patient is neither a show nor a no-show.
- Checked-In: The patient arrived and checked in for the appointment.
- No Show: The patient did not show up for the appointment.
- Walk In: The patient scheduled a walk-in appointment.By default, the status is set to none and will be updated automatically when you record patient check-ins or no shows.
- To add a note to the appointment:
- Click Add Note.
The Add Appointment Note window opens.
- Enter the note in the Note Detail field.
- Select the Urgent or Followup check boxes if necessary.
- Click Save to close the window and continue scheduling the appointment.
- Click Add Note.
- Click OK to schedule the appointment.