Creating Vendor Orders in AcuityLogic DC
This section explains how to create From Quantity and New vendor orders.
Topics include the following:
You can create From Quantity vendor orders for items set up to be replenished from the vendor. By default, the item quantities on the orders are based on the reorder points and stock levels set up in AcuityLogic Admin.
- Click Vendor and select Vendor Orders.
The Vendor Orders window opens.
- Click Create From Qty OnHand.
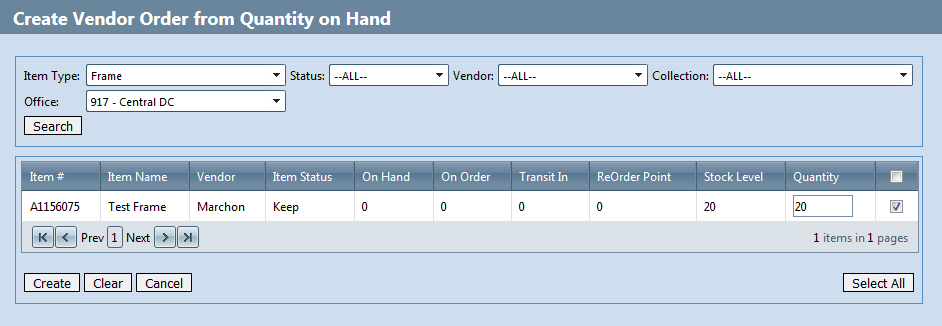
The Create Vendor Order from Quantity on Hand window opens.
- To search for items that have reached the reorder point, select the item type, item status, vendor, collection, or ship to office for the items and click Search.A message appears in the product grid if no items that meet the search criteria have reached the reorder point.
- Click OK in the dialog box that opens if items that meet the search criteria have reached the reorder point.
AcuityLogic adds the items to the product grid.
- Select the check box next to each item to add to the vendor order.
- Update the item quantity to order a different quantity, if needed.

- Click Create and click OK in the dialog box that opens.
AcuityLogic creates the vendor order.
- Click the Expand (+) icon to review the items added to the vendor order.
In the Vendor Order Detail section, click Edit to update an item or click Delete to remove an item from the vendor order.

- Do one of the following:
- To print the document, click the Print icon and click OK in the dialog box the opens to update the status to Printed.
The document opens in PDF format.
- To export the document in CSV format, click the Export icon and click OK in the dialog box the opens to update the status to Printed.
The document is exported in CSV format to your default download folder. You can open the document in Excel, where the headers and data are displayed in tabular, not CSV, format.
- To print the document, click the Print icon and click OK in the dialog box the opens to update the status to Printed.
You can create New vendor orders to order inventory from a vendor.
- Click Vendor and select Vendor Orders.
The Vendor Orders window opens.
- Click Add Manual Order.
- Select Frame or Accessory in the Item Type drop-down list.
- Select the shipping method in the Ship Via drop-down list.
- Select the vendor in the Vendor drop-down list.
- Enter a description in the Description field, if needed.
- Enter a vendor order number in the Vendor Order # field, if needed.
- Type or select the scheduled delivery date in the Delivery Date field, if needed.
- Enter notes in the Notes field, if needed.
- Click the OK(green check mark) icon to create the vendor order.
- To add an item to the vendor order, follow the process below:
- Click Add Detail.
- Click the Lookup icon to search for the item or click inside the UPC Code field and scan the barcode or enter the UPC code for the item. Depending on your configuration, the barcode represents the UPC or item number.
AcuityLogic populates the item details.
- Update the item cost in the Cost field, if needed.
- Enter the item quantity in the Quantity field.
- Enter a reference number for the order in the Reference # field, if needed.
- Select the ship to office in the For Office drop-down list.
- Click the OKicon (green check mark).
- Do one of the following:
- To print the document, click the Print icon and click OK in the dialog box the opens to update the status to Printed.
The document opens in PDF format.
- To export the document in CSV format, click the Export icon and click OK in the dialog box the opens to update the status to Printed.
The document is exported in CSV format to your default download folder. You can open the document in Excel, where the headers and data are displayed in tabular, not CSV, format.
- To print the document, click the Print icon and click OK in the dialog box the opens to update the status to Printed.