Preparing the Frame or Accessory File
The frame or accessory file must be properly formatted for the products to be uploaded to AcuityLogic correctly. This topic explains how to prepare the frame file before performing your initial upload.
- Prior to preparing the frame file, you want to ensure the frame or accessory vendors are added in Admin. The vendor name in Admin must be an exact match with the vendor name in the load file.
- The following procedure is based on Excel 2016. The user interface may vary in other versions of Excel.
- The frame file is a macro-enabled document, and you must enable macros in Excel to use the review functionality.
Before you begin, check out this video:
To prepare the frame or accessory file
- In Excel, open the frame file template provided to you. If prompted, select enable macros in the dialog box. Macros are required for using the validation feature. If the data is entered correctly, the Data Check row will display Valid in green. If data is entered incorrectly, you an alert displays. If the file is not formatted correctly, the process will fail so it's important to pay attention to the validation.
- At the bottom of the Excel window, click the Frame File worksheet tab.
- At the top of the Excel window, click the Data tab.
- On the Data tab's ribbon, click From Text/CSV.
- Click Browse to locate and select the file you want to import, then select Next.
The data displays in the Preview File data window.
- Click Load. Your data displays in a new worksheet.
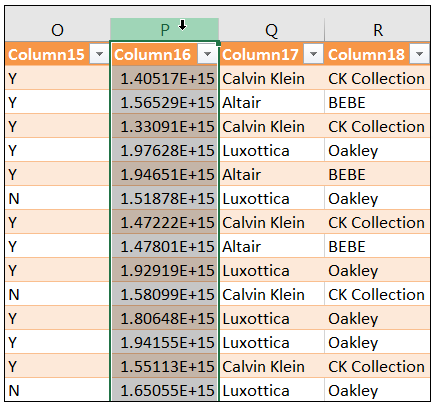
- Check the data in columns L and P. If they look like normal UPC and Item numbers, you are good to go. However if they appear in scientific notation (with a decimal and an E), they must be corrected. To correct:
- Click the header to select the column you want to correct.
The column entries are highlighted. For example:
- Click the header to select the column you want to correct.
- In the Data menu, select Text to Columns. The Convert Text to Columns wizard appears.
- In the Step 1 of 3 wizard window, select Delimited .
- Click Next.
- In the Step 2 of 3 window, do the following:
- In the Delimiters list, ensure that only the Tab check box is selected.
- In the Text qualifier drop-down list, ensure that the double-quotation mark ( " ) is selected.
- Click Next.
- In the Step 3 of 3 window, select the Text option in the Column data format list.
By default, General is selected.
- Click Finish.
The data format in the selected column is now correct.
If necessary, repeat these steps to fix the format in the other column.
- Copy the frame data to import as follows:
- In Sheet1, select row 2 by clicking it.
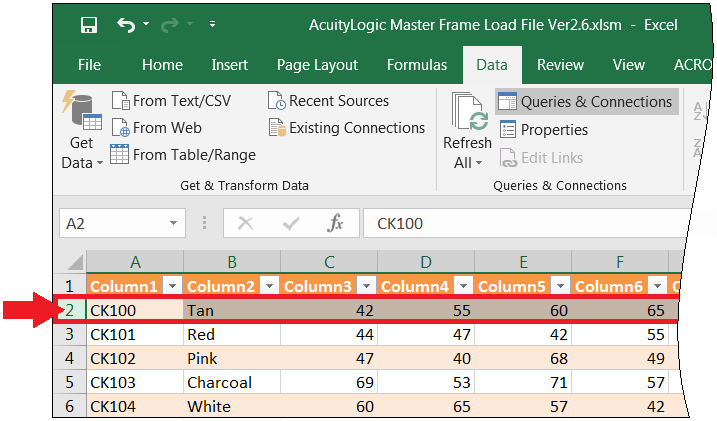
- Select the rest of the data in the worksheet by pressing CTRL + SHIFT + DOWN ARROW.
- Copy the selected data to your clipboard by pressing CTRL + C.
- In Sheet1, select row 2 by clicking it.
- At the bottom of the Excel workbook, click the Frame File worksheet tab.
-
In the Frame File worksheet, right-click cell A12, and select the Values paste option from the pop-up menu to paste your data into the worksheet.
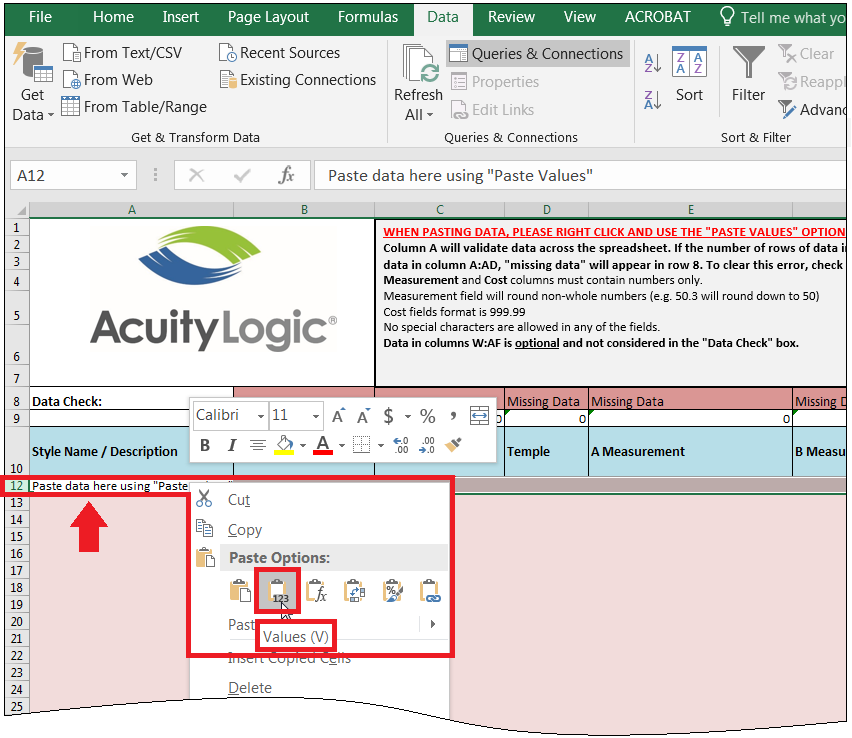
The Values paste option retains the validation formatting used by the frame file template.
A large amount of pasted data may take a minute to load into the frame file.
- Ensure that macros are enabled.
- Validate the data by clicking Check Data.
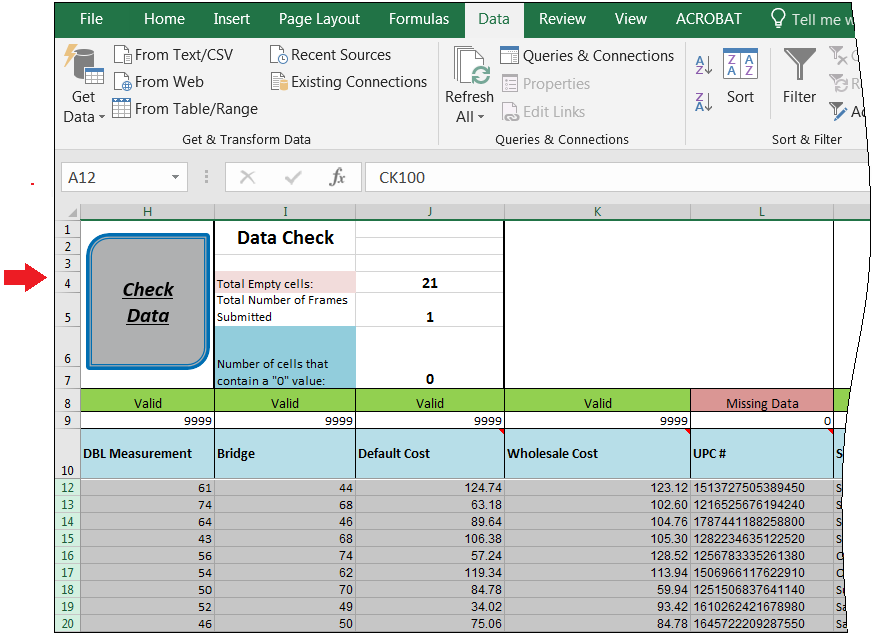
If data is invalid or missing, the information is displayed at the top of columns I and J.
The total number of frames loaded into the worksheet is also displayed.
- Review the pasted data:
- Red cells: Required data is missing. Cells with missing data can potentially cause the file upload to fail.
- Blue cells: A "zero" measurement must be corrected. Cells with zeros can be uploaded but must be manually corrected at the individual frame level.
- Yellow cells: Optional data is missing. The missing data is not required for the upload.
- Row 8 contains a data check field that compares the total number of entries in column A against all other columns in the tab:
- If a green "Valid" cell appears at the top of a column, the column is not missing data in any of its cells.
- If a red "Missing Data" cell appears at the top of a column, check the column for red cells.
- If price list values need to be added or updated in columns W (Custom Retail Price 1) through Z (Custom Retail Price 4), ensure you rename the columns as "Retail XYZ" where XYZ is the name of your price list.
The name of each column must start with "Retail". - Ensure values are entered for all frames in column AE (Company ID).
- Ensure "Complete" is entered for all frames in column AI (Frame Part).
- Save the frame file in CSV format.
- Ensure the frame file name includes "Frame".
- If you are updating frame information, save the file with a different name as your previous frame files. Using a different name for each version of the frame file allows the load process to determine if a file was loaded previously.
- Reopen the frame file, delete rows 1 through 9 and 11 and save the file in CSV format.
- Open the file in Notepad++ and confirm that the values in columns L (UPC #) and P (Item Number) are not in scientific notation. If the values are in scientific notation, reopen the file in Excel, change the columns to Numbers format with no decimal places, and save the file CSV format.
- If the data is acceptable, place the file in the target directory on the FTP server for processing as part of the integration.
- The file should be placed in the configured target directory in the FramesAndAccessories folder.
- The AcuityLogic X-Link integration parses the file and places it in the XIF Server\C:\XlinkTemp folder to be processed if it passes preliminary inspection.
- Successfully processed files are moved from the XIF Server\C:\XlinkTemp folder to the XIF Server\C:\XifArchive folder. If the integration runs and the load process cannot process a file, it remains in the XIF Server\C:\XlinkTemp folder. When the integration runs next, the load process attempts to process the file that could not be processed before attempting to process new or corrected files. To resolve potential processing issues, it is recommended that you remove the file from the XIF Server\C:\XlinkTemp folder. If you are using a hosted server, contact Eyefinity Customer Care to remove the file before attempting to process additional files.
- Files that cannot be processed need to be corrected, renamed, and placed in the FramesAndAccessories folder for processing.