Navigating the Detailed Visit Overview in the iPad App
Use the Detailed Visit Overview to document an entire visit from a single screen! Some users refer to the Detailed Visit Overview as the "pancake view" because the sections resemble a stack of pancakes. To open the Detailed Visit Overview screen, open an existing visit or create a new visit and tap the toggle in the upper-right corner of the screen.
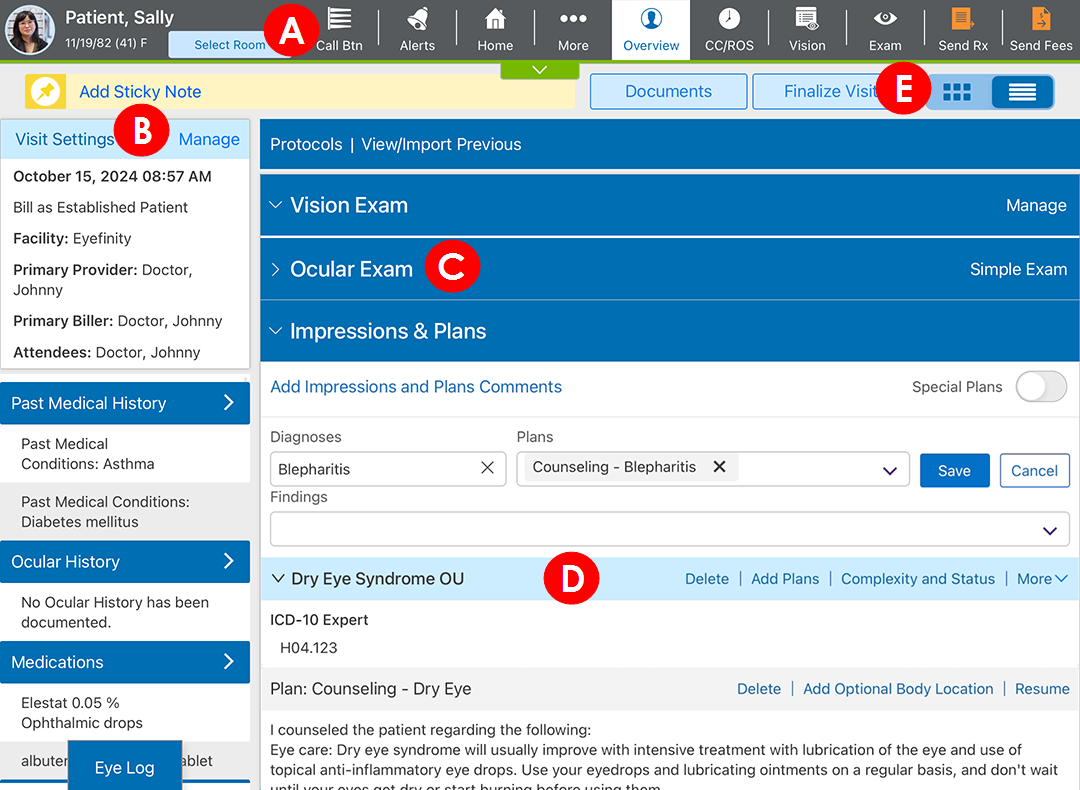
The Visit Overview in the Encompass app displays details of the patient’s exam. Swipe up or down to view additional sections of the exam. Tap the links in the section and element headings to edit or add information in place.
While you can tap the icons on the Action Bar to perform a task within the exam, they will navigate you away from the single-screen workflow. The orange Alerts button indicates that alerts are available for the patient.
The Action Bar enables you to perform specific actions within the patient chart. The following actions are available from the Action Bar in the patient chart.
| Button | Description | Notes |
|---|---|---|
| Call Btn | Places a request for a quick task to be completed by a staff member. | |
| Alerts | Displays alerts documented for the patient. | When the Alerts icon is orange, there are alerts regarding important information about the patient. |
| Home | Returns you to the Home screen. | |
| More | Displays many actions you can perform while reviewing the visit overview screen. | The contents of the More menu change to show the most helpful options, depending on which section of the app you are currently using. |
| Overview | Indicates you are on the Detailed Visit Overview screen. | Tapping this button is the fastest way to return to the Visit Overview when you are on other screens. |
| CC/ROS | Opens the Chief Complaint tab where you can record the patient's chief complaint and review of systems. |
|
| Vision | Opens the Vision Exam screen where you can record the patient's patient’s pretest information as well as prescriptions. | This button navigates you away from the single-screen workflow. If you swipe up to the Vision Exam section, you can document this information directly in the Visit Overview. |
| Exam | Opens the Ocular Exam Room where you can record the results of the patient's ocular exam, including your impressions, the findings, and plans. | This button navigates you away from the single-screen workflow. If you swipe up to the Ocular Exam and Impressions & Plans sections, you can document this information directly in the Visit Overview |
| Send Rx | Sends any eyeglass and contact lens prescription to the practice management system. | When the Send Rx button is orange, a prescription is available to send to your practice management system. When the prescription has been sent, the Send Rx button turns green. |
| Send Fees | Sends any eyeglass and contact lens prescription to the practice management system. | When the Fees button is orange, fees are available to send to your practice management system. When the fees have been sent, the Send Fees button turns green. |
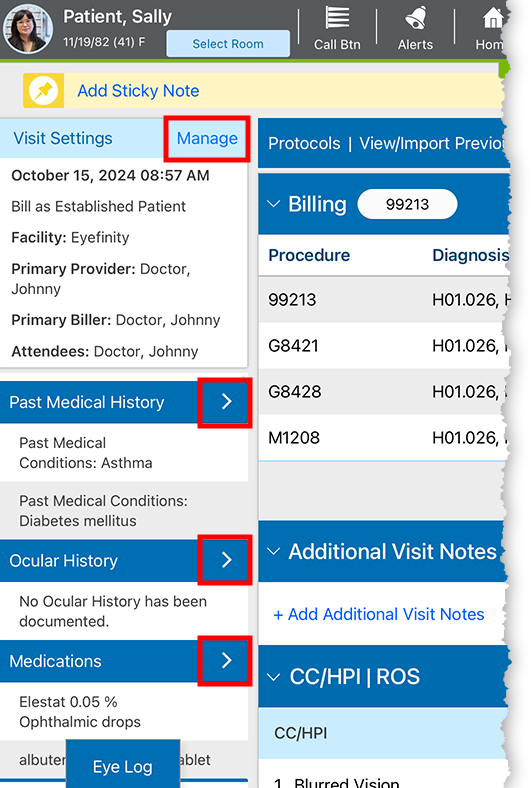
The sidebar on the left side of the screen gives you a snapshot of the visit settings and the patient's medical history. Not only can you view this information quickly, but you can also update this information by tapping the Manage link or the arrow in a section heading. This means that as you learn new information about the patient that didn't come up during intake, you can update the patient's history without laving the exam.
Swipe up to reveal additional sections, including the following:
- Visit settings
- Past medical history
- Ocular history
- Medications
- Allergies
- Social history
- Quality measures
- Family history
- Procedures and plans
- Problem list
The visit section headings allow you to identify the various parts of the visit quickly jump from one section of the exam to another.
Swipe up or down to reveal additional sections. When you swipe up the heading of the current section is pinned to the top of the column until you swipe completely past it.
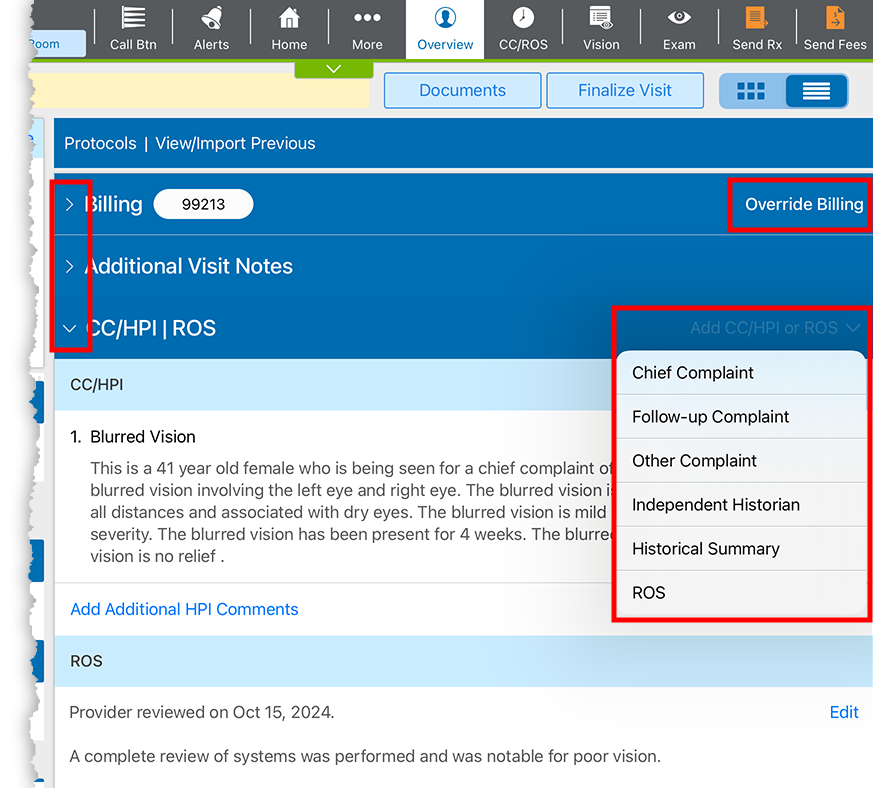
Tap the down-pointing chevron () to collapse a section or tap the right-pointing chevron () to expand a section. All sections are expanded by default when you open or resume the exam.
Tap the links on the right side of the section heading to perform actions on that part of the exam. Such actions as Override Billing, Simple Exam, and Manage are easily in reach.
The visit element headings display what information (e.g., CC![]() The main reason for the patient’s visit to the doctor./HPI
The main reason for the patient’s visit to the doctor./HPI![]() History of Present Illness. A detailed account of a patient's current health issue, including when it started and how it has changed over time., ROS
History of Present Illness. A detailed account of a patient's current health issue, including when it started and how it has changed over time., ROS![]() Review of Systems. An ROS is an inventory of the body systems obtained through a series of questions seeking to identify signs or symptoms that the patient may be experiencing or has experienced., diagnoses, plans) is documented in each section the exam.
Review of Systems. An ROS is an inventory of the body systems obtained through a series of questions seeking to identify signs or symptoms that the patient may be experiencing or has experienced., diagnoses, plans) is documented in each section the exam.
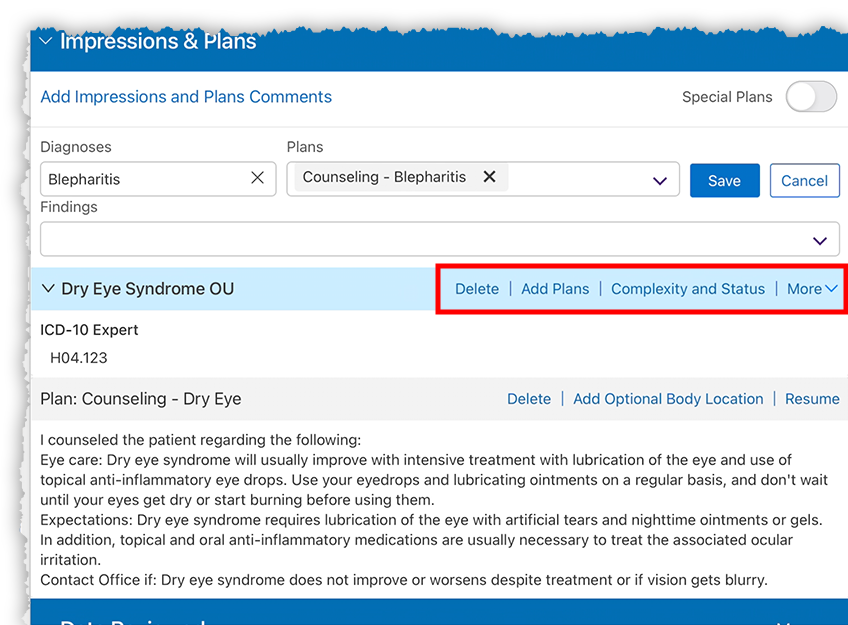
Tap the links on the right side of the element heading to perform actions on that element. The links are contextual to the specific element, so you can add, edit, reorder, and delete depending on the context of the element.
Tap the toggle to switch between the Detailed Visit Overview and the Visit Overview. Your choice is sticky. So, you're always presented with the last option you selected.


