Creating Fillable PDF Forms
In order for Encompass to populate patient, provider, or visit information on a predesigned PDF form, the PDF must have form fields drawn onto it, and the field names must correspond to specific Encompass data elements.
What do you want to do?Think of the PDF form as two layers. The background layer is the visual representation of the form; this can be an image or an electronic representation of a page. The foreground, or top layer, includes fields where text will appear in front of the form image.
The background layer—or form image—can come from anywhere:
- You can find a PDF of the form on the web
- Another organization or entity can send you a PDF of the form. If the PDF includes form fields, you'll need to rename them.
- You can scan a physical copy of a form and save it as a PDF.
- You can design your own form using Microsoft Word or a page-layout software and save your designed form as a PDF.
Refer to the data fields reference sheet to ensure you're creating fields that Encompass can populate. Log in to the Encompass web application as an administrator. Locate Firm Forms and click Manage PDFs. Click the Reference Sheet action bar icon.
You may add form fields that are not listed on the data fields reference sheet. Encompass will not prepopulate these fields, but providers and staff may manually enter information into these fields.
You may add a signature to gather patient consents on the iPad.
Regardless of how you find or create the form image, you must create or edit PDF form fields using Adobe Acrobat Pro.
To add or edit fillable form fields to your PDF, follow the steps below. These instructions outline only the steps required to create a PDF form that's compatible with Encompass. For complete instructions, visit Adobe's "Create and Distribute PDF Forms" help.
While many PDF "writer" programs allow you to add form fields, Encompass officially supports PDF forms created used Adobe Acrobat Pro. The free Adobe Reader software does not support creating form fields. Learn more about Adobe Acrobat Pro.
If your Acrobat interface looks different than the one depicted here, go to Creating Fillable PDF Forms to learn more.
- Open the PDF in Adobe Acrobat Pro.
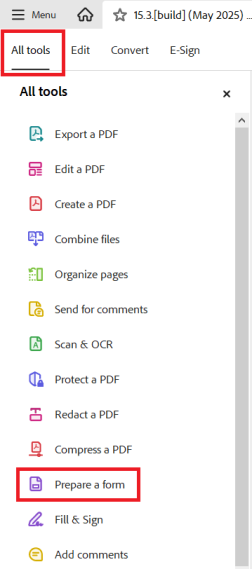
- Click the All tools tab and select Prepare a form.
- Click Start or Create Form to allow Acrobat to automatically detect fields in your form image.
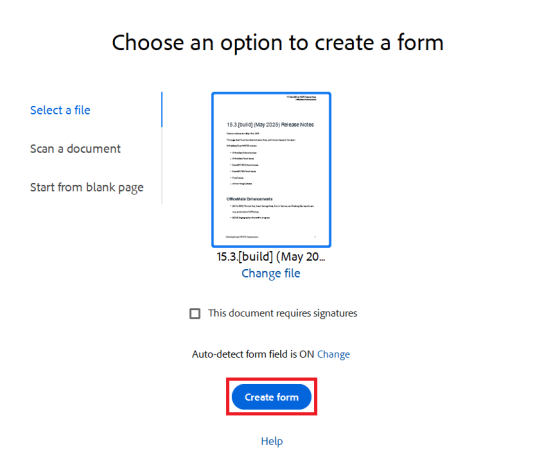
Do not select the This Document Requires Signatures check box. Selecting this box adds additional data to form fields that is incompatible with Encompass.
Acrobat processes your form and displays the fields it detected as purple boxes on your form image. The purple highlighting helps you identify the fields for editing, but the highlighting does not print or impact the appearance of your form.
If you'd rather draw the form fields manually, change your Adobe Acrobat preferences:
- Windows.Edit menu > Preferences > Forms > deselect Automatically Detect Form Fields
- macOS.Acrobat Pro menu > Preferences > Forms > deselect Automatically Detect Form Fields
- Draw any additional text fields manually:
- Select the Add a Text Field tool.
- Click on the form image and drag your cursor to the desired size and location for the field.
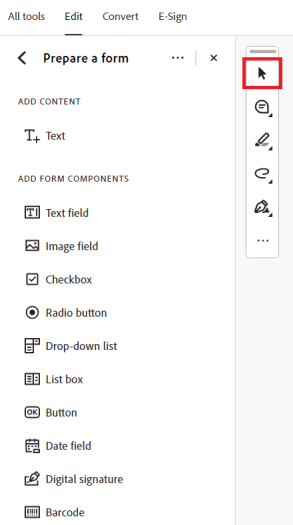
- Click the Arrow tool on the Prepare a form toolbar.
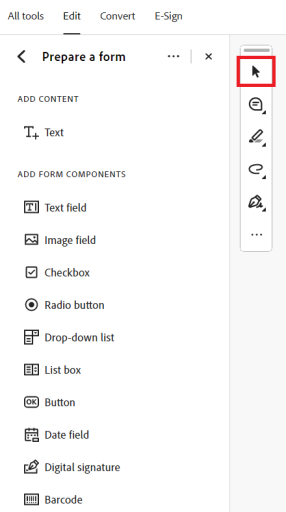
- Edit the field names so they match the names of Encompass data elements. Repeat these steps for every form field:
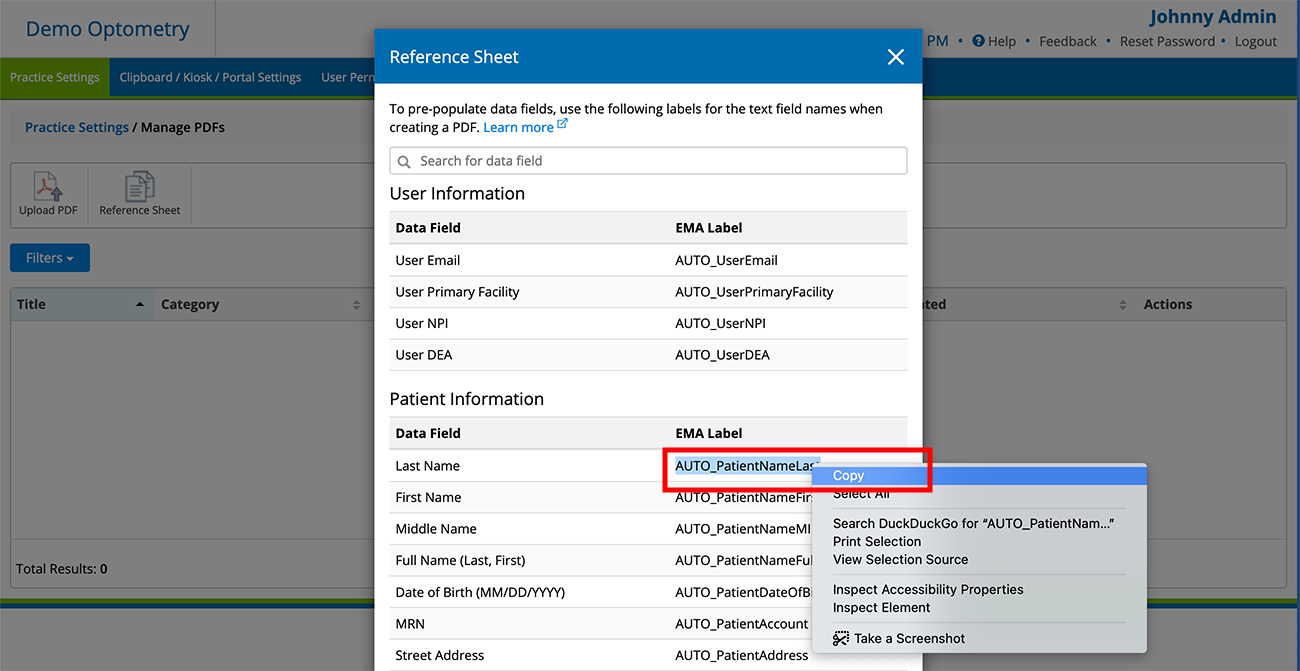
- Open the data fields reference sheet. Log in to the Encompass web application as an administrator. Locate Firm Forms and click Manage PDFs. Click the Reference Sheet action bar icon.
- Locate the Data Field you wish to populate in the form, highlight the corresponding EMA Label, right-click, and select Copy.
The field name must be entered exactly as displayed on the reference sheet, including the "AUTO_" prefix. Field names are case sensitive.
You may add form fields that are not listed on the data fields reference sheet. Encompass will not prepopulate these fields, but providers and staff may manually enter information into these fields.
- Return to the form in Adobe Acrobat.
- Right-click the form field and select Properties.
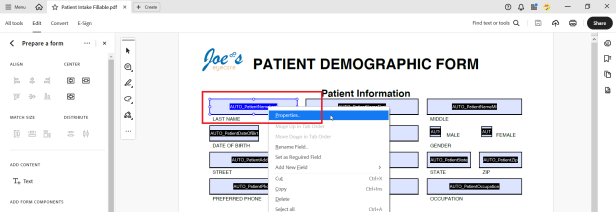
- Under the General tab, locate the Name field, delete any text in this field, right-click, and select Paste.
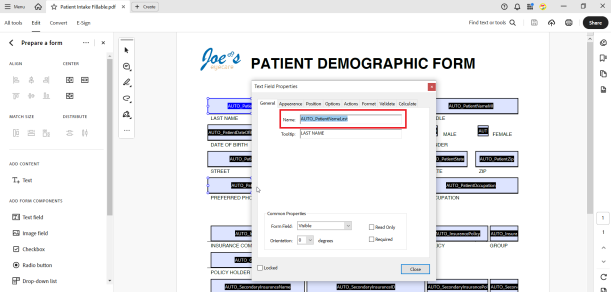
- Click Close.
- Add any check boxes or signature fields to your form as needed.
- Save your fillable PDF form.
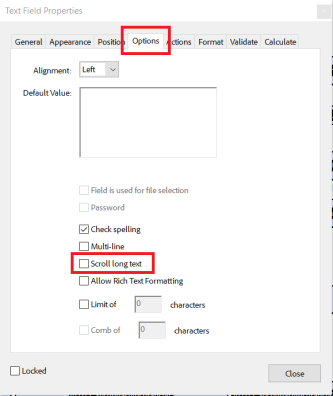
By default, Acrobat text fields allow text to display as large as the field will accommodate. They also allow text to scroll if the text exceeds the width of the field. These default settings have the effect of making your form look inconsistent.
If your Acrobat interface looks different than the one depicted here, go to Creating Fillable PDF Forms to learn more.
Follow these optional steps to ensure the text on the form displays consistently:
- Click the Arrow tool on the Prepare a form toolbar.
- Select all text fields:
- Windows. Press Ctrl–A.
- macOS. Press Command–A.
- Right-click any one of the selected text fields and select Properties.
- Click the Appearance tab and select a Font Size. Size 10 or 12 is recommended.
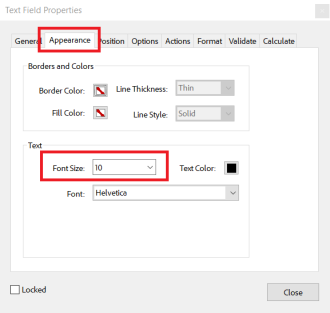
- Click the Options tab and deselect the Scroll Long Text check box.
- Click Close.
- Save your fillable PDF form.
Once your PDF form is saved, you can add it to Encompass. For more information, go to Adding PDF Forms to Encompass.
If your Acrobat interface looks different than the one depicted here, go to Creating Fillable PDF Forms to learn more.
