Recording Diagnoses, Findings, and Plans in the Detailed Visit Overview (iPad)
You can document diagnoses, findings, and plans directly in the Detailed Visit Overview. While you can document multiple diagnoses within a visit, you'll need to document them one at a time so you can associate plans and findings with each diagnosis. It doesn't matter in what order you document diagnoses—you can rearrange them later.
What do you want to do?
- Open a patient visit. To learn how, go to Creating or Opening a Visit (iPad).
- Swipe up to the Impressions and Plans section.
- Tap the Diagnosis drop-down menu and select a diagnosis.
The Diagnosis drop-down lists your most frequently used diagnoses at the top. Tap the (magnifying glass) and enter the first few characters of a diagnosis name or ICD-10 code to search for a diagnosis you don't see listed.
Tap Complete Diagnosis Search to display additional systemic diagnoses based on the search text you entered. The complete diagnosis search accommodates colloquial synonyms and common misspellings.
Once you select the diagnosis, Encompass displays the options in the Plans drop-down menu.
- Select one or more Plans.
The Plan drop-down lists your most frequently used plans at the top. Tap the (magnifying glass) and enter the first few characters of a plan name to search for a plan you don't see listed. All of the plans you select are listed in the Plans field. If you need to remove a plan, tap the × next to the plan name.
- Select any Findings relative to the current diagnosis.
The Findings drop-down lists your most frequently used findings at the top. Tap the (magnifying glass) and enter the first few characters of a finding to search for a finding you don't see listed.
Tap Custom Findings to manually type your own custom finding. Tap the Always Remember this Finding toggle to save the finding to make it selectable with other patients.
- Tap Save to add the diagnosis, plans(s), and findings to the visit.
If the diagnosis or plans require laterality to generate valid billing codes, the simple laterality screen opens. To learn more, go to Document simple laterality for diagnoses and plans.
- Locate an existing diagnosis, tap Add Plans, and select Order for Ophthalmic Surgery (comprehensive)
OR
record a new diagnosis and add it in the Plans section.
- Locate the plan under the diagnosis and tap Resume.
- Update the sticky fields in the Details, Order Details, and other tabs on the left as needed and tap Done.
- Navigate back to the home screen and click the Queues tab, then select Orders.
- Tap the order you wish to review and update the details as needed.
- Tap View Attachments and tap the send icon in the lower left corner of the screen.
- Tap Fax Attachments, select the attachment you want to send, and tap Next.
- Fill in the required To field and select a Template, and tap Send when finished.
- Create a new patient exam or enter an existing one.
- In the Impressions and Plans section, search for and select a diagnosis in the Diagnosis menu.
- In the Plans menu, search for and select CPT Biller and tap Save.
- Locate the diagnosis you just entered in the Impressions and Plans section.
- Locate the CPT biller plan and tap Resume.
- Enter custom CPT codes in the CPT Code # and Modifier # boxes as necessary and tap Done when finished.
When you save a diagnosis or plan that requires laterality to generate valid billing codes, a screen opens, prompting you to select the laterality. The screen lists the diagnosis and all the plans selected, but it highlights only the ones where laterality is required. For all others, the laterality is optional. For simple laterality, "no diagram" is noted.
- Tap the diagnosis or plan to select it.
- Select the Right, Left, or Bilateral buttons.
Each tap of the Right, Left, and Bilateral buttons adds laterality documentation. If you accidentally tapped a button too many times or tapped the wrong button, tap the to delete errant laterality entries.
- Repeat for each item that requires a laterality and then tap Done.
When you save a diagnosis or plan that requires a body location to generate valid billing codes, the body atlas opens, prompting you to select a location.
- Tap the diagnosis or plan to select it.
- Select the Right, Left, or Bilateral buttons.
- Repeat for each item that requires a laterality and then tap Done.
When you save a diagnosis or plan that requires a body location to generate valid billing codes, body atlas opens automatically. Here's how to navigate to the body atlas manually:
- If you're in the simple laterality screen, tap the Body Atlas tab.
- If the diagnosis ICD-10 Expert indicates "Review Required," tap the Specificity Requires Body Click link.
- If you're in the Detailed Visit Overview, locate the diagnosis, tap the More menu, and select Add Body Locations.
OR
Locate the plan, and tap the Add Optional Body Location.
The special plans feature is intended to enable technicians to document tests and procedures performed without requiring a diagnosis. The doctor can then resume the plan later to add interpretations. Here's how to document a special plan.
- Open a patient visit. To learn how, go to Creating or Opening a Visit (iPad).
- Swipe up to the Impressions and Plans section.
- Tap the Special Plans toggle.
- Tap the Special Plans drop-down menu and select a test type.
- Select one or more Plans.
The Plan drop-down lists your most frequently used plans at the top. Tap the (magnifying glass) and enter the first few characters of a plan name to search for a plan you don't see listed. All of the plans you select are listed in the Plans field. If you need to remove a plan, tap the × next to the plan name.
-
Tap Save.
The plan is added to the Special Plans section in the Detailed Visit overview. This section appears just above the Impressions and Plans section so the doctor will see it before documenting their own diagnoses and plans.
- Open a patient visit. To learn how, go to Creating or Opening a Visit (iPad).
- Swipe up to the Special Plans section, which appears just before the Impressions and Plans section.
- Tap Associate Impression.
The Complete Diagnosis Search opens.
- Enter the first few characters of a diagnosis name or ICD-10 code to search for a diagnosis.
- Select a diagnosis and tap Save Impression.
The diagnosis is added to the Impressions and Plans section of the Detailed Visit Overview. The associated plan is noted, but it remains listed in the Special Plans section.
- Open a patient visit. To learn how, go to Creating or Opening a Visit (iPad).
- Swipe up to the Impressions and Plans section.
- Locate the diagnosis, tap the More menu in the diagnosis header, select Associate Tests.
The Associate Tests with Diagnoses window opens.
- Select the test and tap Save.
The associated plan is noted, but it remains listed in the Special Plans section.
You can reorder diagnoses to improve billing. Here's how:
- Open a patient visit. To learn how, go to Creating or Opening a Visit (iPad).
- Swipe up to the Impressions and Plans section.
- Tap the Reorder Impressions link.
The Reorder Impressions window opens.
- Tap, hold, drag, and drop the to move the diagnoses in the desired order.
- Tap Save.
You can adjust the complexity of diagnoses and associated diagnoses to ensure that Encompass calculates the estimated E/M code for the visit is accurately. Choosing the status of a diagnosis is available in this section. It is optional and does not contribute the MDM calculation of the visit.
- Open a patient visit. To learn how, go to Creating or Opening a Visit (iPad).
- Swipe up to the Impressions and Plans section.
- Locate the diagnosis and tap the Complexity and Status link.
The Select Complexity and/or Status window opens.
- Tap the Presenting Problem Complexity drop-down menu and select a complexity.
Every diagnosis is assigned a default complexity based on AMA guidelines. Tap the Definitions link to learn more about the complexities.
- Select a Status as needed.
Selecting a Status is optional and does not impact billing.
- Tap Done.
- Open a patient visit. To learn how, go to Creating or Opening a Visit (iPad).
- Swipe up to the Impressions and Plans section.
- Locate the associate diagnosis and tap Edit.
The Associated/Cause Dx sreen opens.
- Tap the Complexity and Status link.
The Associated Dx Complexity window opens.
- Select a Complexity and tap Save.
Every diagnosis is assigned a default complexity based on AMA guidelines. Tap the Definitions link to learn more about the complexities.
- Tap Done.
If your practice administrator has enabled the feature, you can now record a patient discharge status. This feature is intended for large ophthalmic centers, and statuses include such options as home, left against advice, and other healthcare facility. Here's how to record the discharge status on the iPad app:
- In the Visit Overview or Detailed Visit Overview, locate the Visit Settings card.
- Tap Manage.
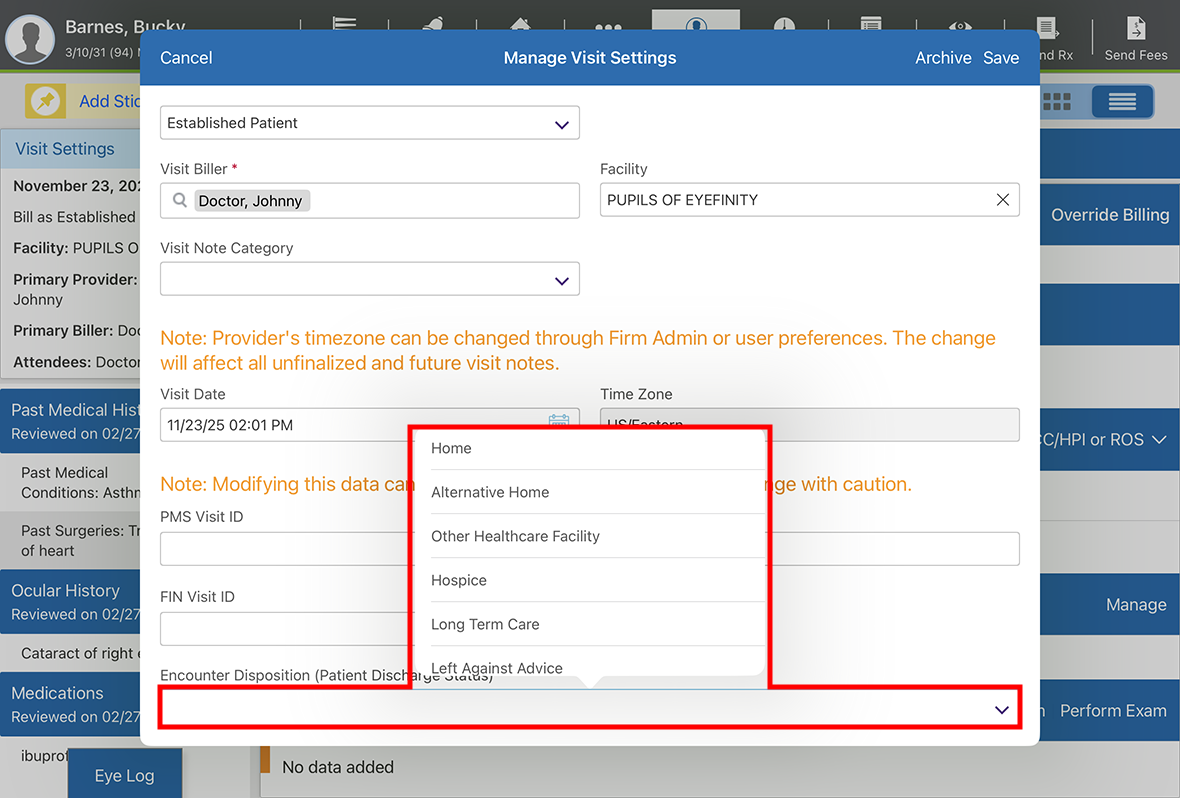
The Manage Visit Settings window opens.
- Swipe up to the bottom of the window.
- Tap the Encounter Disposition drop-down menu and select a discharge status.
- Tap Save.
The discharge status renders on the visit note PDF.