Performing a Simple Eye Exam in the Detailed Visit Overview (iPad)
Simple Eye Exam enables you to document a routine eye exam with just a few taps. With Simple Eye Exam, you can enter exam findings without having to dive into the different segmented sections of the Ocular Exam. The Simple Eye Exam is accessible directly in the Visit Overview. What do you want to do?
- Open a patient visit. To learn how, go to Creating or Opening a Visit (iPad).
- Swipe up until you see the Ocular Exam card in the right-hand column.
- Tap Simple Exam.
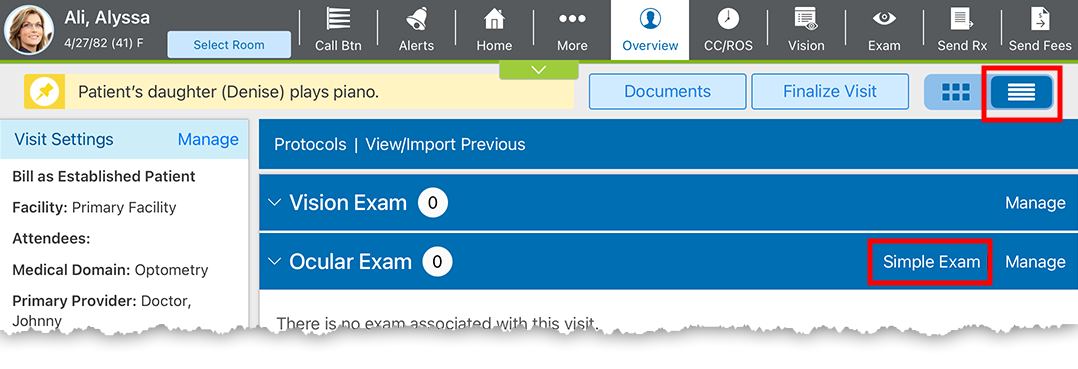
The Exam screen opens and displays the exam controls, findings, and CD ratios. Continue to Set Simple Eye Exam controls.
Exam controls enable you to quickly change exam settings that impact billing. These controls are sticky, meaning your latest selections will be your default until you change them again. This is where you can quickly turn such components as dilation, slit lamp, and fundus photos on or off.
- Open the Simple Eye Exam. To learn how go to Open Simple Eye Exam
- Tap Options to expand the control panel.
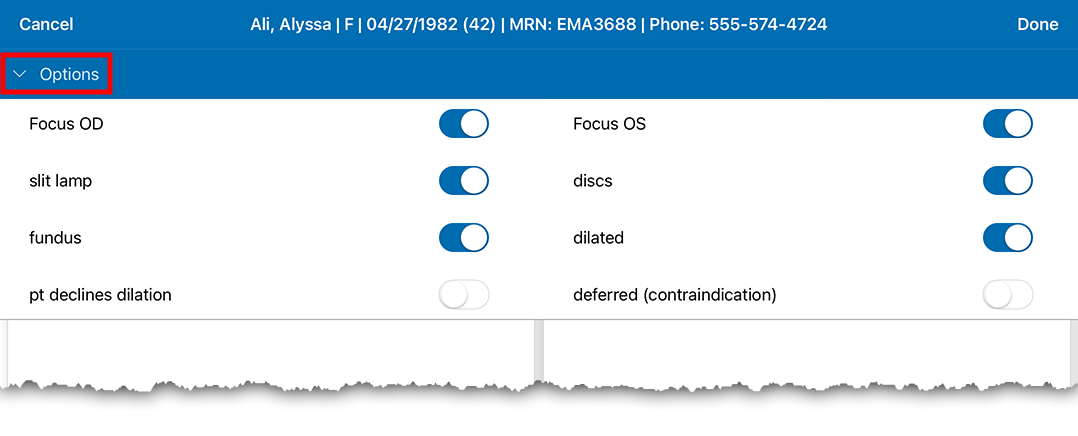
- Tap the Focus OD and Focus OS buttons to toggle those lateralities off or on.
When Focus OD or Focus OS are toggled off, the corresponding side of the Simple Eye Exam is disabled and does not accept inputs.
- Tap the remaining toggles to indicate those tests are performed as part of the exam:
- Slit Lamp
- Discs
- Fundus
- Dilated
- If the patient refuses dilation, tap the Pt Declines Dilation toggle on.
- If the patient cannot be dilated due to a medical condition, tap the Deferred (contraindication) toggle on.
- Tap Options again to hide the panel as needed.
Continue to Document the Simple Eye Exam.
The Simple Eye Exam enables you to quickly document findings and CD rations. Here's how:
- Open the Simple Eye Exam. To learn how go to Open Simple Eye Exam.
- Set the exam controls as needed. To learn how go to Set Simple Eye Exam controls
- Enter your findings:
- Tap the Findings field and type the name of a condition.
As you type, the drop-down displays possible matches.
- Select a finding from the drop-down.
The finding now appears in the Selected Findings list.
- Repeat for each finding you want to document.
- Copy findings from one eye to the other by selecting the check box next to the finding and tapping Copy Selected to OS/OD.
To add a finding that isn't listed, go to Add and save custom findings.
- Tap the Findings field and type the name of a condition.
- Select measurements for CD Ratio.
- Select the measurements for vertical CD ratio as needed.
- Tap Done when you're finished.
Your changes are saved to the visit and you are returned to the Detailed Visit Overview.
If a specific condition isn't coming up as you type in the Findings drop-down, you can add it as a custom finding. This is helpful for turning your attention back to the patient quickly. You can also save your custom findings to use again later. Your custom findings are only available to you, and they are available from the Simple Eye Exam and from the advanced mode in Impressions and Plans.
Here's how to add a custom finding:
- Open the Simple Eye Exam. To learn how go to Open Simple Eye Exam.
- Tap the Findings field and type the name of a condition.
As you type, the drop-down displays possible matches. If no match is found, a result that says "Add:" followed by the name of the condition your typed.
- Tap the Add result.
The Custom Finding popup window opens.
- Edit the Finding name as needed.
- Select an area the Finding Relates To.
- Tap the Remember drop-down menu and select Yes to add the finding to the Findings drop-down menu in the Simple Eye Exam window. Otherwise, select No if you don't intend to use this custom finding again.
- Tap Done to add the custom finding to the patient's visit.
The custom finding now appears in the Selected Findings list in the Simple Eye Exam window. If the Remember drop-down is set to Yes, the custom finding is also added to the Finding drop-down search for future exams.
Continue to Document the Simple Eye Exam.
If you need to edit a custom finding to correct a misspelling or delete a custom finding you no longer need, you must first add it to an exam in the Simple Eye Exam. Once the custom finding is listed, you'll see the option to edit the finding. Here's how to edit or delete a custom finding:
- Open the Simple Eye Exam. To learn how go to Open Simple Eye Exam.
- Tap the Findings field and type the name of the custom finding.
As you type, the drop-down displays possible matches.
- Select your custom finding from the results.
The custom finding now appears in the Selected Findings list.
- Locate the custom finding in the Selected Findings list and tap Edit.
The Custom Finding popup window opens.
- Edit the custom finding as needed.
- If you no longer want the finding to appear in the Simple Eye Exam Findings search, tap the Remember drop-down menu and select No.
- Tap Done to save your changes.
Selecting No from the Remember drop-down menu means the custom finding will no longer appear in the Findings drop-down menu. The custom finding will still be listed in any exams in which it was selected, including the current exam. If you want to remove the custom finding from the current exam, tap Remove.