Setting Up Resource Schedules
You must set up a provider’s, staff member’s, or office resource's schedule before you can assign any appointments to them. You must have permission to create or modify a resource's schedule and office hours must be set up before you can establish resource schedules. (See Setting Up Office Hours.)
You can customize a resource’s schedule by setting up date ranges or rotating weeks. If you don’t add date ranges or rotating schedules, then a resource’s schedule at an office will be “Normal Hours - No Rotation,” which means he or she will have the same schedule each week at the office, indefinitely.
- On the Encompass home screen, click Administration.
The Company: Setup screen opens.
-
On the top menu bar, click the Office Config. drop-down list and select the office.
The office setup screen opens.
- On the top menu bar, click Scheduler and select Resource Schedule.
You can also access this feature by clicking Modify in the Office Resource Setup screen. For more information on office resources, see Setting Up Office Resources.
- Select the Resource you want to schedule.
- To view all 24 hours of each day on the schedule grid, click Show 24 hours below the schedule grid.
To return to viewing only the scheduled office hours, click Show business hours.
- To set up a rotating schedule:
- Click Rotation Setup.
- Record the Week Rotation Start Week for your rotating schedule. Weeks must start on a Sunday.
- Select the Number of Rotating Weeks.A rotating schedule is not tied to a month. For example, Week 1 is not the first week of the month; it is the Week Rotation Start Date that you selected.
- Click Save.
- To add a date range:Create a date range only for temporary adjustments to the normal schedule, such as holiday hours, limited hours due to renovation, etc.
- Click Range Setup.
- Click Add Date Range, or click Edit.
- Record the Range Description.
- Record the Range Start Date and Range End Date. The date range must start on a Sunday and cannot overlap with any other date ranges you have already set up.
- Click Save.
- Click Return.
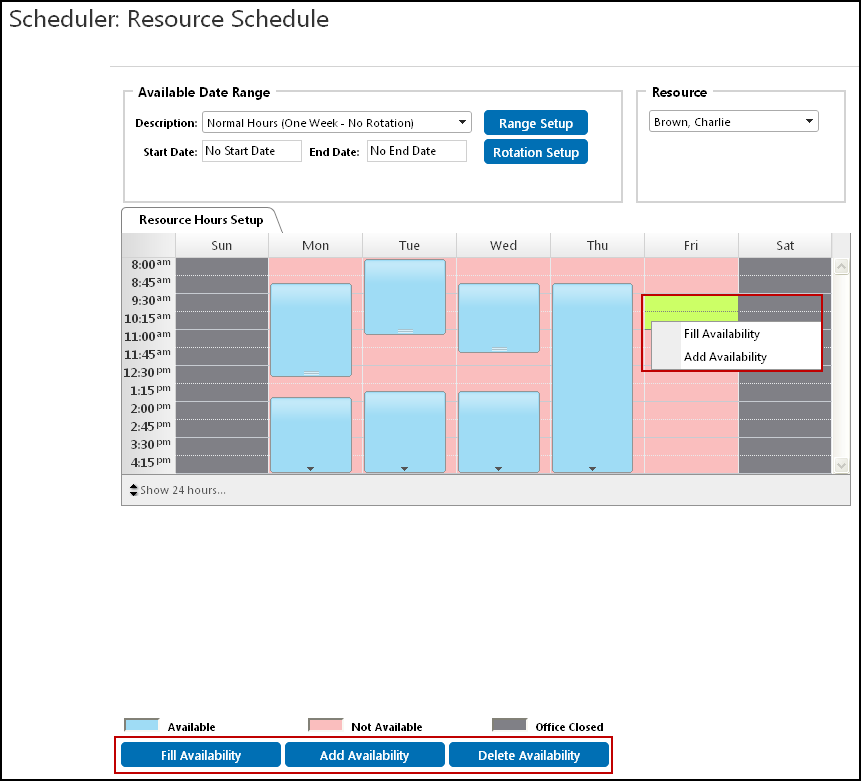
- Select an available date range or rotating week from the Description drop-down list.The default date range is “Normal Hours - No Rotation,” which is not limited by a start or end date.
- To mark the resource as being available, complete one of the following actions:
- Click and drag your mouse cursor over the day and time that you want to mark the resource as being available. Then, right-click the schedule grid and select Add Availability or click the Add Availability button.
- Right-click on a date that has no availability already recorded and select Fill Availability or click the Fill Availability button to fill a resource’s availability for a day so that it is the same as the location’s hours.
- To delete a time slot of availability from the resource’s schedule, select the currently available time slot and click Delete Availability.
Alternatively, you can right-click and select Delete.
 You can change the colors assigned to each availability status. For more information, go to Setting Up Scheduler (Appointment Calendar) Preferences.