Connecting Your SATO WS408TT Barcode Label Printer Not Purchased from Think Smart
If you did not purchase your barcode label printer from Think Smart, follow the instructions below.
Before you get started, you'll need the following cables:
- RS232 DB9 Male to Female Null Modem
- USB to SIIG Serial Adapter
- USB 2.0 printer cable for troubleshooting
You can purchase these cables at an electronics retail or online store.
Initial Setup
- If you have not already done so, verify that your SATO WS408TT barcode label printer's reflective media sensor is properly aligned. See Aligning the SATO WS408TT Reflective Media Sensor.
- Plug the printer's AC power cord into the AC adapter (power supply).
- Plug the other end of the cord (round tip) into the DC input power terminal on the back of the printer.
- Plug the power cord into a power outlet.
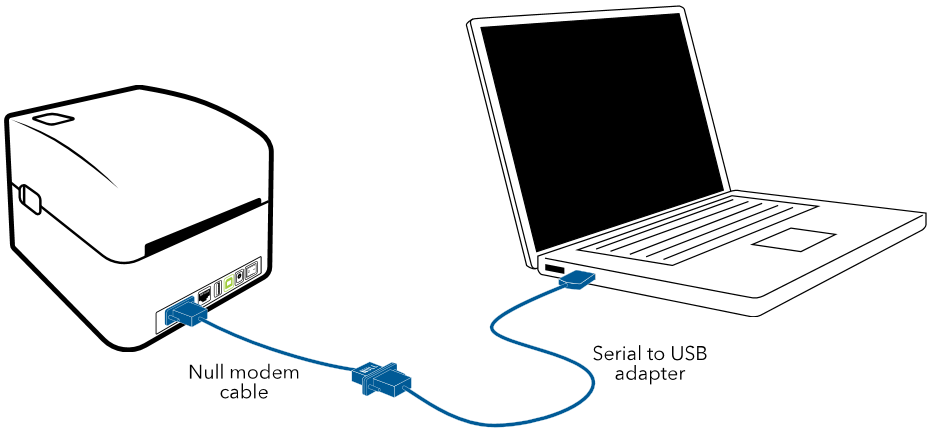
- Use the following cables to connect the printer to your computer:
- RS232 DB9 Male to Female Null Modem: Attach the male end to the back of the printer.
- USB to SIIG Serial Adapter:Attach the serial end to the Null Modem cable; attach the USB end to the computer.

Configuring Settings
- Go to SATO WS4 Printer Utility, and download the WS4 Printer Utility.
-
Install the utility and then start it.
The main window of the SATO WS4 Printer Utility opens.
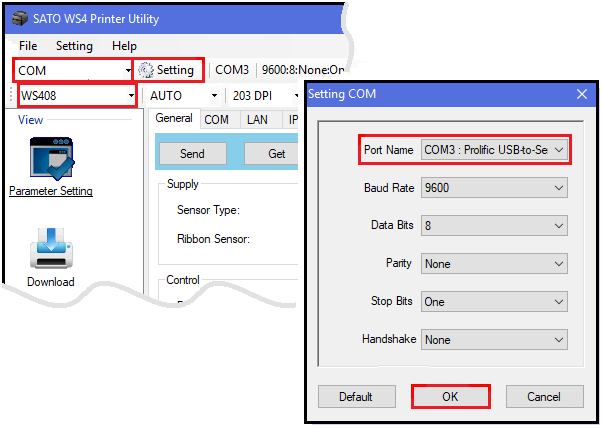
- From the drop-down list on the top-left side of the utility’s toolbar, select COM for the printer’s input/output port.Make a note of the COM port number displayed to the right of the Setting button (COM3 in the following example). You'll need itfor the OfficeMate barcode label printer setup (see Setting Up the Barcode Label Printer in OfficeMate).
- From the drop-down list beneath the port specification, select WS408 for the SATO printer model.
- Click the Setting button.
The Setting COM window opens:

- From the window's Port Name drop-down list, select the COM port that the USB adapter uses to connect to the SATO printer and click OK.
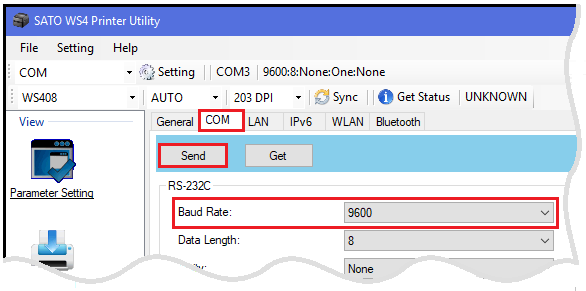
- In the properties pane, click the COM tab to the right of the General tab.
-
From the Baud Rate drop-down list, select 9600, then click Send:

- In the confirmation message, click OK.
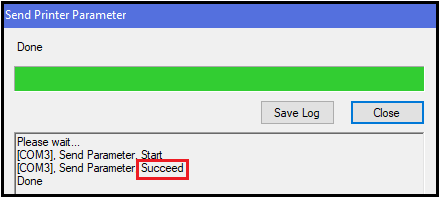
The Send Printer Parameter window opens.
- After the Send Parameter operation says Succeed, click Close.
