Creating New Patient Exam Records
This section tells you how to create a new patient exam record in OfficeMate and ExamWRITER.
This topic describes how
- Click the Patients icon in OfficeMate.
The Find Patient/Guarantor window opens.
- Click New.
The Add New Patient Record window opens.
- Follow the instructions in Creating and Opening Patient Records to record new patient information in the Demographic, Insurance, Marketing, Notes, Recall, Financial Info, Correspondence Hx, HIPAA, and eDocuments tabs.
- Click ExamWRITER or right-click on the Patient Demographic window’s blue title bar and select ExamWRITER to open a new ExamWRITER EMR.
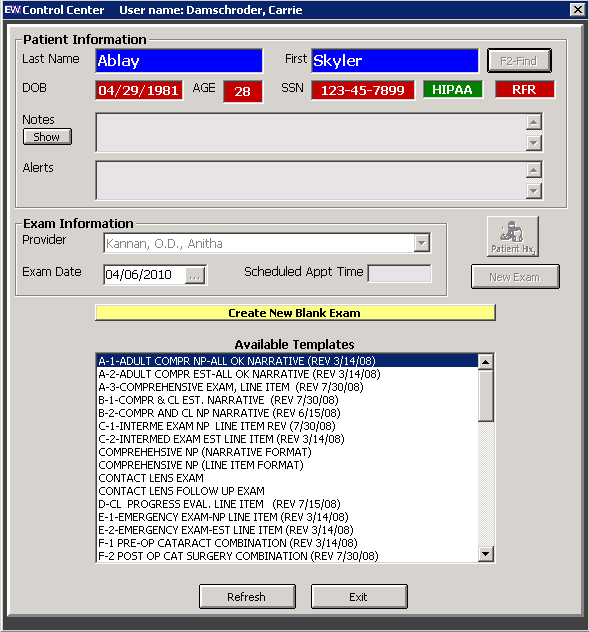
The ExamWRITER Control Center window opens.
- Click New Exam.
If the patient record has notes and alerts recorded, click the Show buttons to view the patient notes and alerts.

- Click Create New Blank Exam.
OR
Double-click on an available template.
A new exam opens.
For more information, watch this video.
In addition to the procedure below, go to Creating and Modifying Templates and watch this video.
- Complete the instructions in Modifying and Viewing Patient Demographic Information to add new patient demographic information to the ExamWRITER database.
- From the ExamWRITER Control Center, enter search information in the Patient Information text boxes and click F2-Find.
If the Find Patient window opens with a list of patients meeting your selection criteria, go to step 3.
If the ExamWRITER Control Center window opens, go to step 4.
If the patient record has notes and alerts recorded, click the Show buttons on the ExamWRITER Control Center to view the patient notes and alerts.
- Double-click on the patient for whom you want to create a new EMR.
OR
Click on the patient for whom you want to create a new EMR and then click Select.
The ExamWRITER Control Center window opens.
If the patient record has notes and alerts recorded, click the Show buttons to view the patient notes and alerts.
- Click New Exam.
- Click Create New Blank Exam.
OR
Double-click on an available template.
A new exam opens.
- From the ExamWRITER Control Center, enter search information in the Patient Information text boxes and click F2-Find.
If the Find Patient window opens with a list of patients meeting your selection criteria, go to step 2.
If the ExamWRITER Control Center window opens, go to step 3.
If the patient record has notes and alerts recorded, click the Show buttonson the ExamWRITER Control Center to view the patient notes and alerts.
- Double-click on the patient for whom you want to create a new EMR.
OR
Click on the patient for whom you want to create a new EMR and then click Select.
The ExamWRITER Control Center window opens.
If the patient record has notes and alerts recorded, click the Show buttonsto view the patient notes and alerts.
- Click New Exam if there are no previous exams on file.
OR
Right-click on a previous exam and select Copy forward to New Exam to copy a patient’s previous exam to a new exam.
- If there are no closed or finalized exams for a patient, then the patient will have no previous exams recorded in ExamWRITER.
- Exams and templates that were created using ICD-9 codes can be copied forward to new exams that use ICD-10 codes. If there is an exact correlation between ICD-9 codes copied forward and their ICD-10 counterparts, then the ICD-9 codes will be translated into ICD-10 codes in the new exams and templates. If there is no exact correlation between ICD-9 codes copied forward and their ICD-10 counterparts, then the ICD-9 diagnoses will be flagged as blue text in the exam so that you can manually re-code them as ICD-10 diagnoses them before billing the exam.
- If you are using ExamWRITER 10.6 or above and you copy forward an exam that was created before ExamWRITER 10.6, the selections you made during the previous exam in the Examinations, Impressions, Plans windows will not copy forward to the new exam. You will need to reselect the correct information in these windows.
- Click Create New Blank Exam.
OR
Double-click on an available template.
A new exam opens.
In addition to the procedure above, go to Creating and Modifying Templates and watch this video.