Manually Counting and Recording Your Physical Inventory
Follow the instructions below to manually count and record your physical inventory.
While you may record your inventory counts directly in the Physical Count window instead of first writing your counts on the printed worksheet, that method is not very practical and may result in inaccurate counts in your inventory.
- Click the Products icon, select Inventory, and select Physical Count.
OR
Click Tasks on the main window toolbar, select Inventory, and select Physical Count.
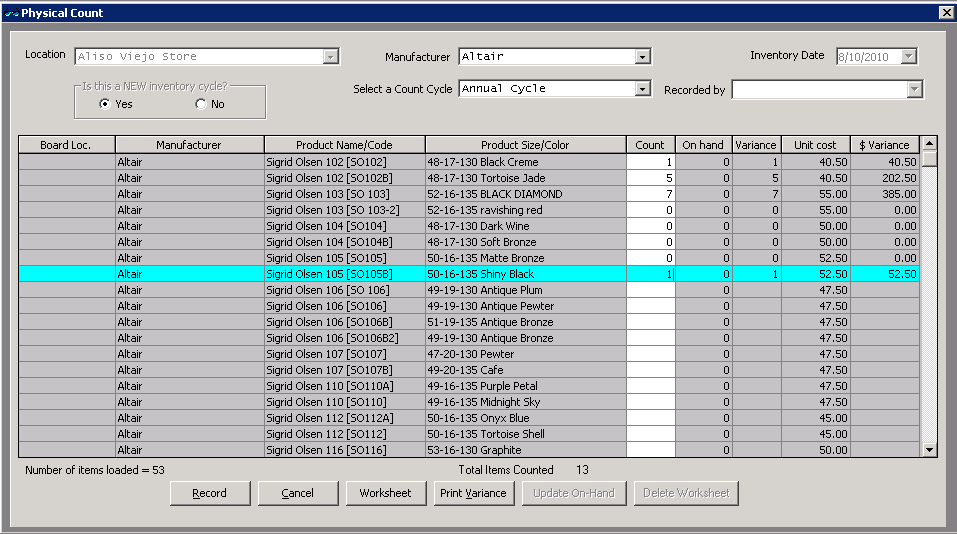
The Physical Count window opens.
- If the Location drop-down menu is available, select a location.
- Select the Yes radio button to indicate that this is a new inventory cycle.
- Select a manufacturer from the Manufacturer drop-down menu, if you are recording your inventory by manufacturer.
- Select an inventory count cycle from the Select a Count Cycle drop-down menu.
All of your products are displayed. To record stocking levels for products, go to Recording Product Inventory Details.
- Type or select the inventory date in the Inventory Date field.
- Select the user recording the physical inventory from the Recorded by drop-down menu, if this field is not locked. For more information on locking and unlocking this menu, go to Setting Up Security.
- Click Worksheet to print the inventory worksheet.
- Click Record to save the inventory cycle.
- Click Cancel to close the Physical Count window.
- Physically count your inventory and record your inventory counts in the Count field on the printed worksheet.
- Click the Products icon, select Inventory, and select Physical Count.
OR
Click Tasks on the main window toolbar, select Inventory, and select Physical Count.
The Physical Count window opens.
- Select the No radio button to indicate that this is not a new inventory cycle.
- Select an inventory count cycle from the Select a Previous Cycle drop-down menu.
All of your products that you recorded in your inventory cycle are displayed.
To delete a previously created open or closed inventory cycle, click Delete Worksheet.
- Type the actual number of inventory items counted in the Count column.
The last recorded item’s line is highlighted in teal on the Physical Count Entry window.

- Click Print Variance to print the Variance report.
The Variance report prints on your default printer and displays the difference between the inventory you actually have and the inventory recorded in OfficeMate.
- Click Record.
If you do not have time to finish recording the actual number of inventory items counted and print the Variance report, you must still click Record. You can continue your work where you stopped by selecting the inventory count cycle from the Select a Previous Cycle drop-down menu.
- Click Update On-Hand to update the quantity of inventory items that you have on hand and close the inventory cycle.
In addition to the procedures above, watch this video for more information.