Setting Up Insurance Carriers
The more information you build into your insurance carriers and plans the more streamlined and more accurate your insurance and patient billing will be. Since the payments from patients and insurance are very important to your practice, you are encouraged to build the most complete insurance carriers and plans in OfficeMate Administration as possible.
Setting up insurance carriers and plans may seem complex and intimidating. Many insurance plans, however, especially within the same carrier, are so similar, that you can use the copy function to duplicate plans and modify the specifics of the plan to reduce your work.
This section tells you how
- From the OfficeMate Administration main window, click Setup.
- Select Insurance Setup.
The Insurance Billing Initial Setup window opens.
- Open the Insurance Billing Initial Setup window. For information on opening the Insurance Billing Setup window, see To open the Insurance Billing Initial Setup window.
-
Select an insurance carrier from the Carrier drop-down menu.
-
Click the Active check box to change the insurance carrier status.
If the Active check box has a check mark, the insurance is active. If it does not have a check mark, the insurance is inactive.
- Open the Insurance Billing Initial Setup window. For information on opening the Insurance Billing Setup window, see To open the Insurance Billing Initial Setup window.
- Select an insurance carrier from the Carrier drop-down menu.
OR
Click New to add an insurance carrier.
If you are creating a carrier that is similar to one that you have already created, click Copy to duplicate the carrier, and adjust the carrier setup. See To copy insurance carriers for more information. - Type the insurance carrier’s name, address, and telephone information in the fields provided.
If you are filing DMERC claims in an ANSI format for this insurance carrier, the insurance carrier’s name must have “DMERC” in it. For example, if the insurance carrier is Medicare, type “Medicare DMERC” in the Name text box.
- If the insurance carrier is VSP, you must enter a valid VSP address, including all spaces and punctuation.
- Type the HL7 identifier for the insurance carrier in the HL7 ID field as needed.
- Enter a date in the Activation Date field.
- Enter a date in the Termination Date field.
- The activation and termination dates are determined by your contract with the insurance carrier and control when products and services can be billed to the insurance carrier.
- These dates are not required by OfficeMate, which can process claims even when the dates are missing or expired.
- Type the main contact information for the insurance carrier in the following fields as needed:
- Contact
- Job Title
- Contact Phone #
- Contact Email
- Web Address
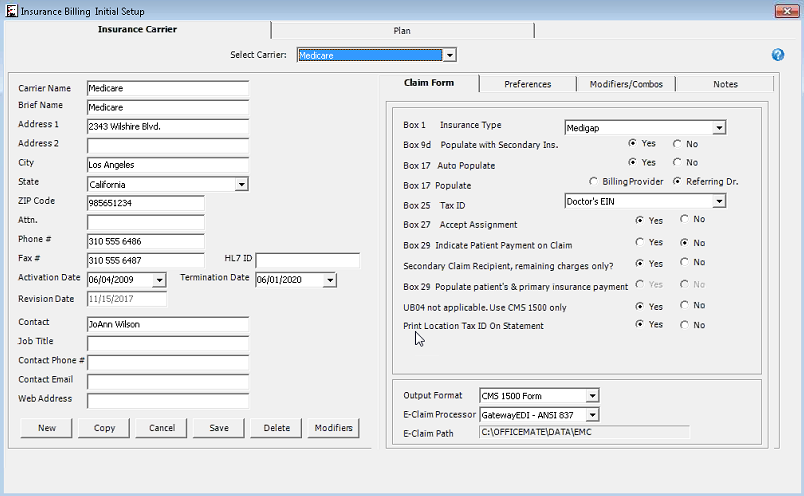
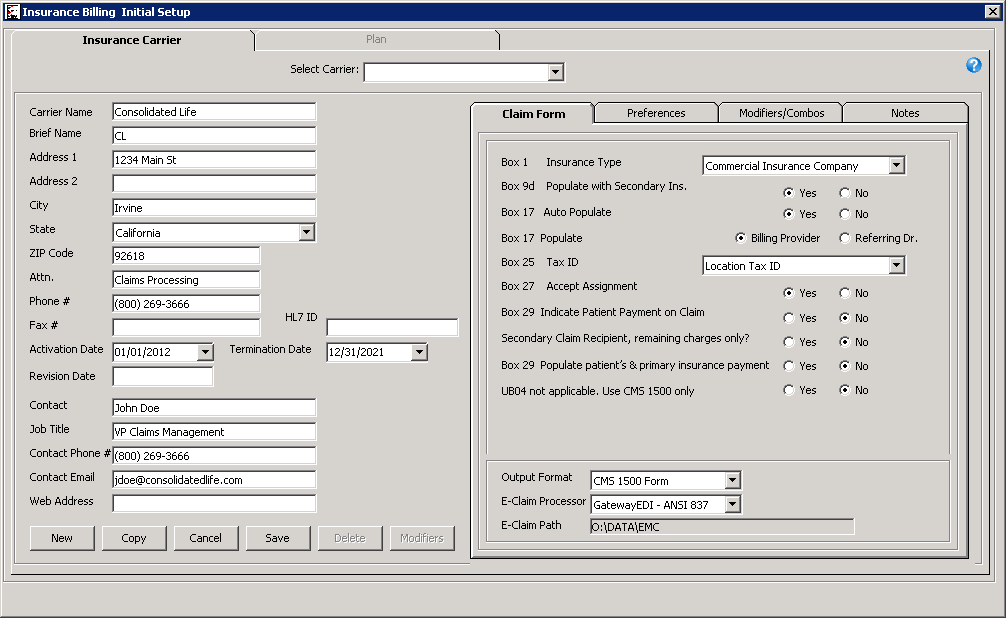
- Select the type of insurance from the Box 1 Insurance Type drop-down menu.
You must select an insurance type to process insurance claims.
- If the carrier is VSP, select VSP from the Insurance Type drop-down menu.
- Select Yes from the Box 9d Populate with Secondary Ins. radio buttons to populate the CMS 1500 with the patient’s secondary insurance when this insurance is the primary. Select No to not populate the CMS 1500 with the patient’s secondary information.The default for new insurance carriers is No. The default for insurance carriers that were included in data that was converted from OfficeMate 8.0 and below or OfficeMate Enterprise 1.0 and below is Yes.
- Select Yes from the Box 17 Auto Populate radio buttons to display the name of the referring provider on the CMS 1500. Select No to not populate box 17 on the CMS 1500.
- If you opted to populate box 17 with the referring provider in step 10, select the Billing Provider or Referring Dr. radio button.If you select the Billing Provider radio button, the provider that you select from the Provider drop-down menu at the top of the fee slip will populate in box 17.
- Select the type of provider identifier that displays on the CMS 1500 from the Box 25 Tax ID drop-down menu.
- The default for insurance carriers that were included in data that was converted from OfficeMate 8.0 and below or OfficeMate Enterprise 1.0 and below is Location Tax ID.
- If the carrier is VSP, select Doctor’s EIN from the Box 25 Tax ID drop-down menu.
- Select Yes from the Box 27 Accept Assignment radio buttons to accept agreed upon payments directly from the insurance carrier. Click No to not accept the assignment.
- Select Yes from the Box 29 Indicate Patient Payment on Claim radio buttons to populate the CMS 1500 form with the patient’s payment. Click No to not include the patient’s payment.
- Select Yes from the Secondary Claim Recipient, remaining charges only radio buttons to display only the remaining charges on the CMS 1500 when this insurance is the secondary. Select No to populate the CMS with the original charges.
- If you opted to show the original charges on a secondary claim in step 15, select Yes from the Populate Patient’s & primary insurance payment radio buttons to include payments received from the patient and primary insurance on the CMS 1500.
- Select Yes from the UB04 not applicable. Use CMS 1500 only radio buttons if this insurance carrier does not accept UB-04 claim forms.
- Select Yes from the Print Location Tax ID on Statement radio buttons to print the location’s tax ID on statements for patients who use this insurance carrier.
- If you selected Medicare Part A or Medicare Part B from the Box 1 Insurance Type drop-down menu, select Commercial from the Medicare Secondary Policy Type drop-down menu.
- Select an output for claims to this carrier from the Output drop-down menu.If the carrier is VSP, select CMS 1500 Form from the Output Format drop-down menu.
- Select an electronic clearinghouse from the E-Claim Processor drop-down menu.
-
To print all claims for this insurance carrier, select Print to Paper as the processor.
- To print all claims for this insurance carrier, select Print to Paper as the processor.
- If the carrier is VSP, select VSP Interface from the E-Claim Processor drop-down menu.
- Until you are ready to send VSP claims, select Commercial Insurance from the Box 1 Insurance Type drop-down menu and select Print to Paper from the E-Claim Processor drop-down menu. Later, when you’re ready to send claims, return to the Insurance Billing Initial Setup window and reselect VSP and VSP Interface from these drop-down menus.
- If the carrier is VSP, select VSP Interface from the E-Claim Processor drop-down menu.
Until you are ready to send VSP claims, select Commercial Insurance from the Box 1 Insurance Type drop-down menu and select Print to Paper from the E-Claim Processor drop-down menu. Later, when you’re ready to send claims, return to the Insurance Billing Initial Setup window and reselect VSP and VSP Interface from these drop-down menus. - Click Save to save your changes.The yellow highlighted fields are required. If any one of these fields is empty, the insurance carrier will not be saved, and OfficeMate Administration will prompt you to complete the required fields.
The insurance carrier is saved, and the other tabs on the Insurance Billing Initial Setup window become active.
- Open the Insurance Billing Initial Setup window. For information on opening the Insurance Billing Setup window, see To open the Insurance Billing Initial Setup window.
- Select an insurance carrier from the Carrier drop-down menu.
OR
Click New to add an insurance carrier. For information on adding insurance carriers, see To add and modify insurance carriers.
- Click the Preferences tab.
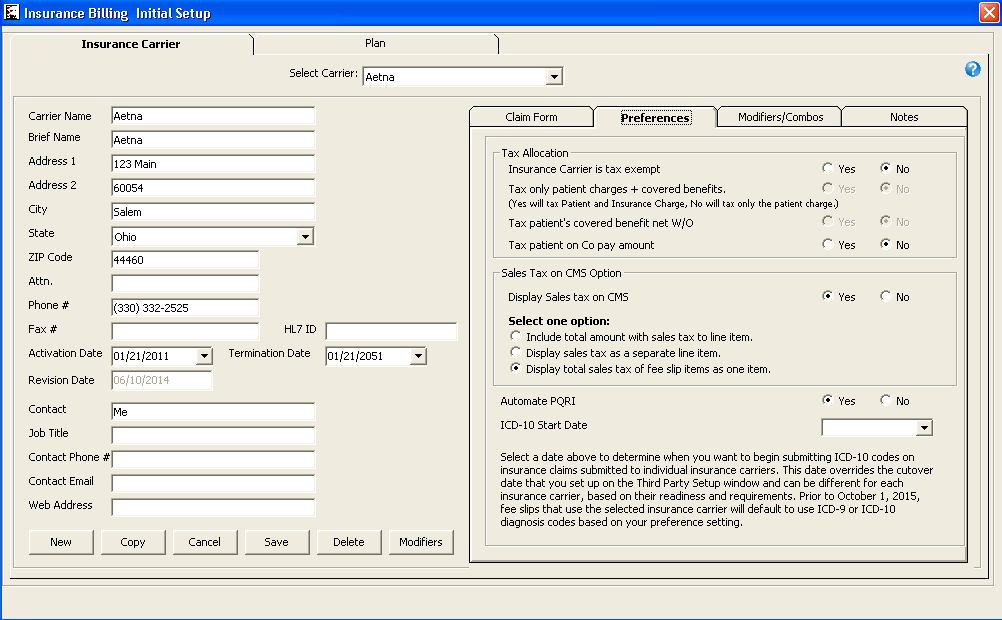
- Select Yes from the Insurance Carrier is tax exempt radio buttons if the insurance carrier is exempt from sales tax in your state. Select No if the insurance carrier is subject to sales tax.
- Select Yes from the Tax only patient charges + covered benefits radio buttons to assess tax on the patient and insurance charges. Select No to assess tax on only the patient charges.
- If you opted to assess tax on the patient and insurance charges in step 5, select Yes from the Tax patient’s covered benefit net W/O radio buttons to tax the benefit amount minus the write-off amount.
- Select Yes from the Tax patient on Co pay amount radio buttons to collect taxes on patient copays. Select No if the copay is not taxable.
- Select Yes from the Display Sales tax on CMS radio buttons to include sales tax on the CMS 1500. Select No to exclude sales tax.
- If you opted to include sales tax on the CMS 1500 in step 8, select one of the following radio buttons:
- Include total amount with sales tax to line item
- Display sales tax as a separate line item
- Display total sales tax of fee slip items as one item
- Select Automate PQRI to automatically apply PQRS codes on exams in ExamWRITER for patients who use this insurance carrier as their primary insurance carrier.After designating PQRS diagnosis codes and level II procedure codes and selecting to auto populate PQRS codes for select insurance companies, you will not receive a reminder on fee slips on which the insurance company is billed, level II procedure codes are recorded, and $0 fees are billed. Also, you will not receive the “Line Item cannot have ZERO” error in the Third Party Processing window. If all of the items on an insurance claim are level II procedure codes, then you can submit a $0 balance insurance claim. For more information on designating PQRS diagnosis codes, see To add & modify diagnosis codes. For information on designating level II procedure codes, see To add and modify procedure codes.
- Select the date that you want to begin submitting ICD-10 codes from the ICD-10 Start Date calender.
- This date can be different for each insurance carrier, based on their readiness and requirements. If you do not select an ICD-10 start date for an insurance carrier, then the ICD-10 start date will default to October 1, 2015.
- For more information about ICD-10 codes, see the Centers for Medicare and Medicaid Services website.
- Click Save to save your changes.
- Open the Insurance Billing Initial Setup window. For information on opening the Insurance Billing Setup window, see To open the Insurance Billing Initial Setup window.
- Select an insurance carrier from the Carrier drop-down menu.
OR
Click New to add an insurance carrier. For information on adding insurance carriers, see To add and modify insurance carriers.
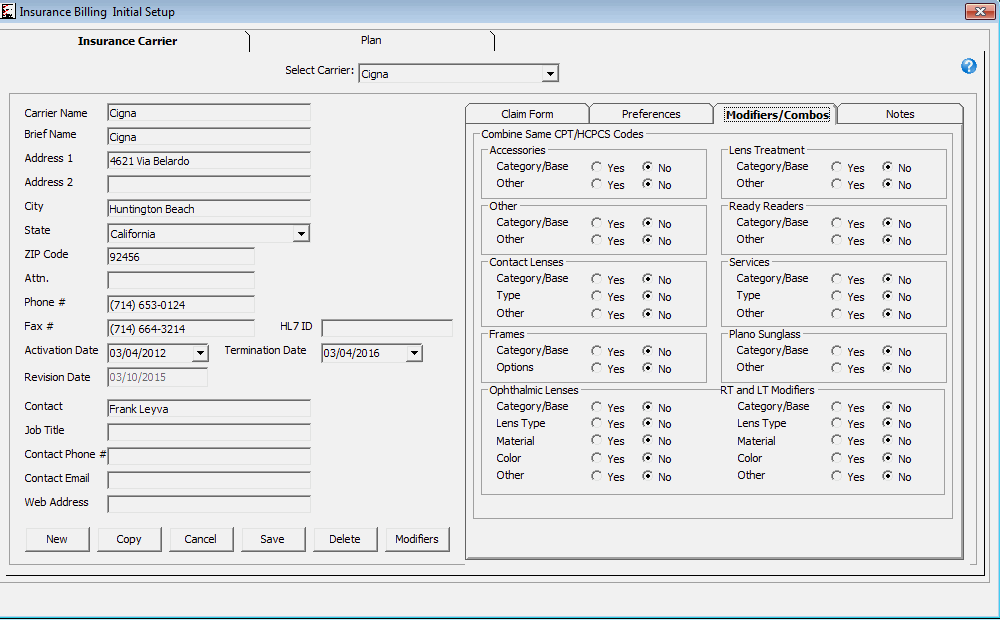
- Click the Modifiers/Combos tab.
- For each of the pairs of radio buttons, select Yes or No.
- If the carrier is VSP, ensure that all Ophthalmic Lenses and Lens Treatment radio buttons are set to No.
- Selecting the Yes radio button combines two or more items with the same CPT code onto one line on the insurance claim. The quantity on the claim reflects the number of items, and the charges on the claim reflects the sum of the charges for the individual items.
- Selecting the No radio button lists each item as a separate line item on the insurance claim.
- Selecting the Yes radio buttons in the RT and LT Modifiers section combines ophthalmic lens items that are listed twice (once for each eye with RT and LT modifiers) on the insurance claim. The quantity on the claim is 2, and the charges on the claim reflects the sum of the charges for the individual items.
- Selecting the No radio buttons in the RT and LT Modifiers section lists each item as a separate line item on the insurance claim. The item with the RT modifier always appears first.
- Open the Insurance Billing Initial Setup window. For information on opening the Insurance Billing Setup window, see To open the Insurance Billing Initial Setup window.
- Select an insurance carrier from the Carrier drop-down menu.
OR
Click New to add an insurance carrier. For information on adding insurance carriers, see To add and modify insurance carriers.
- Click the Notes tab.
- Click New Note to add a timestamp.
Today’s date and your name are inserted at the top the notes text box.
- Type your notes in the space provided.
- Click Save when you are finished.
- Click Print Notes to print the notes as needed.
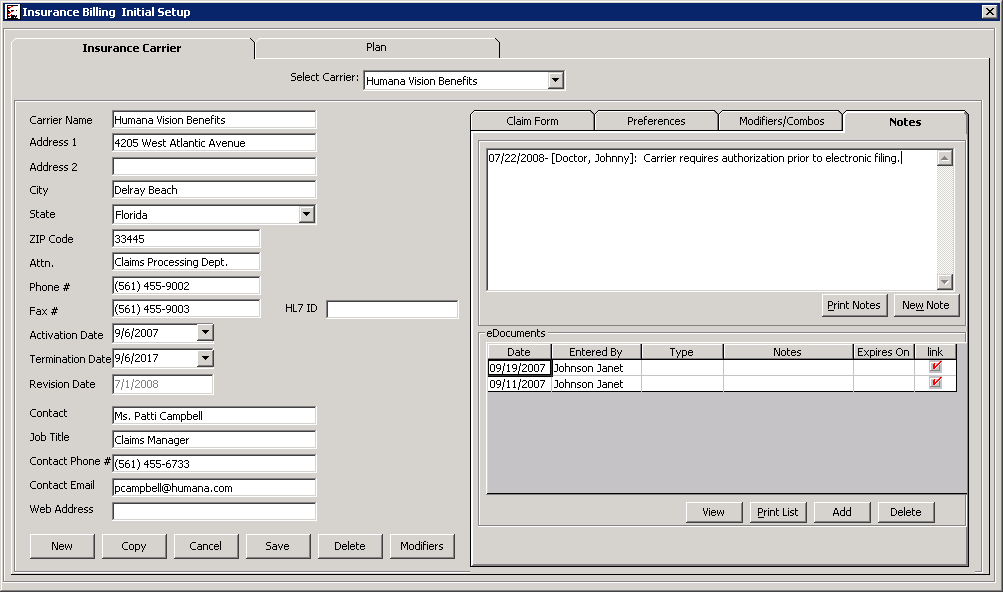 For information on attaching eDocuments (e.g., insurance contracts, plan descriptions), see Attaching Electronic Documents to Insurance Carriers & Plans.
Modifiers populate box 24D on the CMS 1500 claim form. Up to four modifiers can populate box 24D. Perform the following steps to create and modify insurance modifiers.
- Open the Insurance Billing Initial Setup window. For information on opening the Insurance Billing Setup window, see To open the Insurance Billing Initial Setup window.
- Select an insurance carrier from the Carrier drop-down menu.
OR
Click New to add an insurance carrier. For information on adding insurance carriers, see To add and modify insurance carriers.
- Click the Modifiers button.
The Insurance Modifiers window opens.
- Select a product type from the Product Type drop-down menu.
- Click New to create a new insurance modifier.
OR
Select a product from the tree to modify an insurance modifier.
If you are creating an insurance modifier that is similar to one that you have already created, click Copy to duplicate the existing insurance modifier, and adjust the details as needed. - Select a procedure code from the CPT/HCPCS drop-down menu.
- Select a diagnosis code from the ICD-9 / 10 drop-down menu as needed.
- Select up to four modifiers from the drop-down menus in the Covered column as needed.
- Select four noncovered modifiers from the drop-down menus in the Non-Covered column as needed.By default, the modifiers in the Covered column will populate box 24D of the CMS 1500. However, if an insurance plan is set to include noncovered items, the modifiers in the Non-Covered column will populate box 24D. For information on setting up insurance plan preferences, see To set up insurance plan preferences.
- Click Save to save the insurance modifier.
- Repeat steps 4–10 to add additional insurance modifiers.
- Open the Insurance Billing Initial Setup window. For information on opening the Insurance Billing Setup window, see To open the Insurance Billing Initial Setup window.
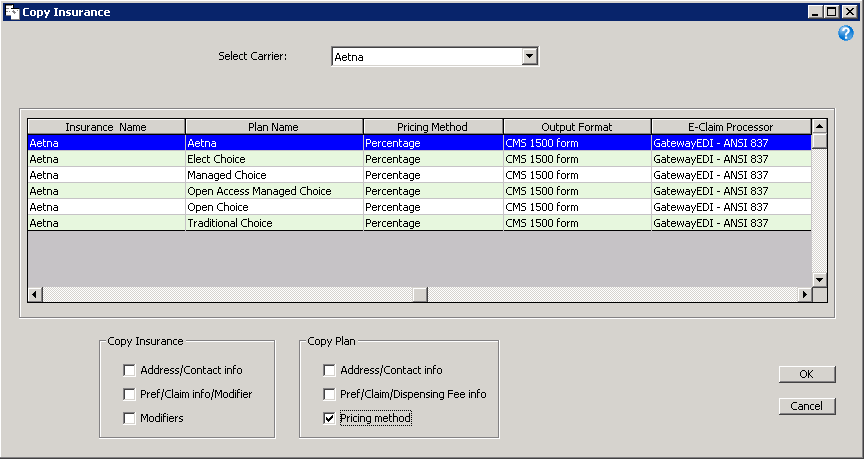
- Click Copy.
The Copy Insurance window opens.
- Select an insurance carrier from the Select Carrier drop-down menu.
- Select a plan from the results list.
- Select the check boxes that correspond to the information you want to copy into the new insurance carrier.
If the insurance plan that you selected in step 4 uses the detailed benefits pricing method, and if you select the Pricing method check box from the Copy Plan options, the Copy Pricing Method options will appear. The Copy Pricing Method options allow you to specify the product categories the you want to copy to the new insurance.
- Select the check boxes that correspond to the pricing methods that you want to copy into the new insurance carrier, if the Copy Pricing Method options are available.
- Click OK.
- Modify the insurance carrier as needed. For information on modifying insurance carrier information, see To add and modify insurance carriers.
For more information, watch this video.