Setting Up Insurance Codes, Modifiers, & Attributes
This section tells you how to set up detailed codes that drive insurance billing, including how
- From the OfficeMate Administration main window, click Setup.
- Select Third Party Setup.
The Third Party Setup window opens.
Setting up procedure codes enables you to associate CPT codes, costs, and fees with services that you bill.
- Open the Third Party Setup window. For more information, go to To open the Third Party Setup window.
- Click New Code to create a new code.
OR
Select a code from the list.
- Select a Filter radio button to narrow the list of codes as needed.
- Type a description or code in a Find field to narrow the list of codes as needed.
- Select the Include Inactive check box to include inactive codes in the list as needed.
- In the Code (Box 24d) field, type the CPT/HCPCS or carrier-specific code.
- In the Description text box, type a short description for the code.
- From the Type of Service drop-down menu, select a service type.
- Select the Level II CPT Codes check box to designate the procedure code as a level II procedure code for the CMS Physical Quality Reporting System (PQRS).
- For more information about the PQRS, go to the Centers for Medicare and Medicaid Services website.
- After designating PQRS diagnosis codes and level II procedure codes and selecting to auto populate PQRS codes for select insurance companies, you will not receive a reminder on fee slips with level II procedure codes and $0 fees, and you will not receive the “Line Item cannot have ZERO” error in the Third Party Processing window. If all of the items on an insurance claim are level II procedure codes, then you can submit a $0 balance insurance claim. For more information on designating PQRS diagnosis codes, go to To add & modify diagnosis codes. For more information on auto populating PQRS codes, go to To set up insurance billing preferences.
- Select the Inactive check box if the procedure code is no longer in use.
- Select the UB-04 Billing Code check box to designate the UB-04 as the suitable claim form for the procedure code if this code is a surgical procedure.
- If you have designated the UB-04 as the suitable claim form for the procedure code, type the revenue code for the procedure code in the Revenue Code text box, if desired. The revenue code is populated in box 42 on the UB04 form.
- If you want to be able to assign cost and fee information to a procedure code, select the procedure code and click Create Service Attribute.
The selected procedure code is now available under the Services Product Type (Exam Cat./Base category) on the Attributes tab. For more information on adding and modifying attributes, go to To add & modify attributes.
- Click Save when you are finished.
- Repeat these steps to add or modify additional procedures as needed.
- Click Exit to close the Third Party Setup window.
In addition to the procedure below, watch this video.
- Open the Third Party Setup window. For more information, go to To open the Third Party Setup window.
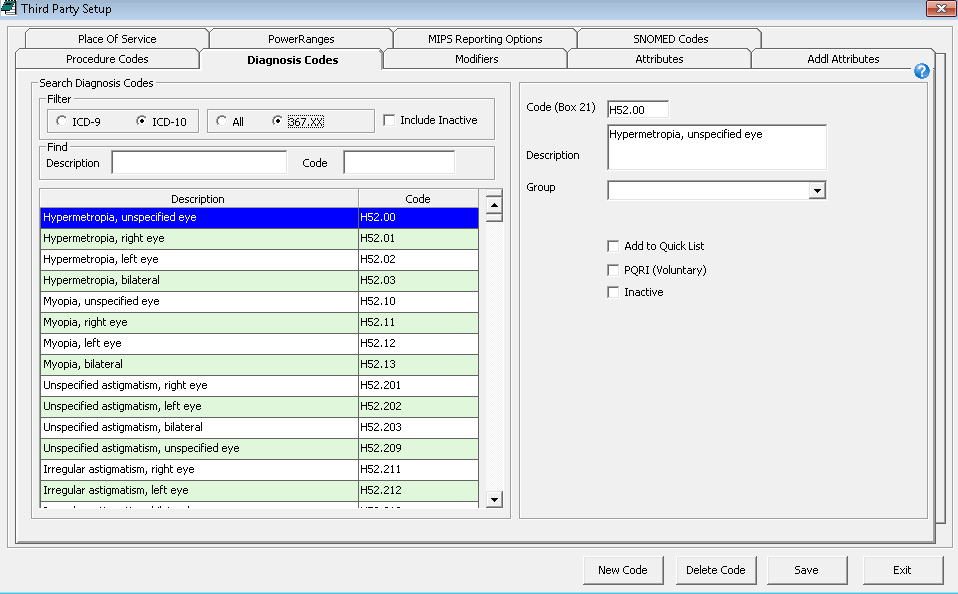
- Click the Diagnosis Codes tab.
- Click New Code to create a new code, select a code from the list, or click Add ICD-10 Code to search for and select an ICD-10 code to add it to your list of codes and make it available to record on fee slips.
- Select a Filter radio button to narrow the list of codes as needed.
- Type a description or code in a Find field to narrow the list of codes as needed.
- Select the Include Inactive check box to include inactive codes in the list as needed.
- In the Code (Box 21) field, type the ICD-9 or ICD-10 code.
- In the Description text box, type a short description for the diagnosis code.
- From the Group drop-down menu, select a category for the diagnosis code.
- Select the Add to Quick List to add the diagnosis code to the Quick List of frequently used codes.
- Select the PQRI (Voluntary) check box if the diagnosis is designated as a PQRS measure.
- For more information about the PQRS, go to the Centers for Medicare and Medicaid Services website.
- After designating PQRS diagnosis codes and level II procedure codes and selecting to auto populate PQRS codes for select insurance companies, you will not receive a reminder on fee slips with level II procedure codes and $0 fees, and you will not receive the “Line Item cannot have ZERO” error in the Third Party Processing window. If all of the items on an insurance claim are level II procedure codes, then you can submit a $0 balance insurance claim. For information on designating level II procedure codes, go to To add and modify procedure codes. For more information on auto populating PQRS codes, go to To set up insurance billing preferences.
- Select the Inactive check box if the diagnosis code is no longer in use.
- Click Save when you are finished.
- Repeat steps 3–10 to add or modify additional diagnoses as needed.
- Click Exit to close the Third Party Setup window.
In addition to the following procedure, watch this video for more information.
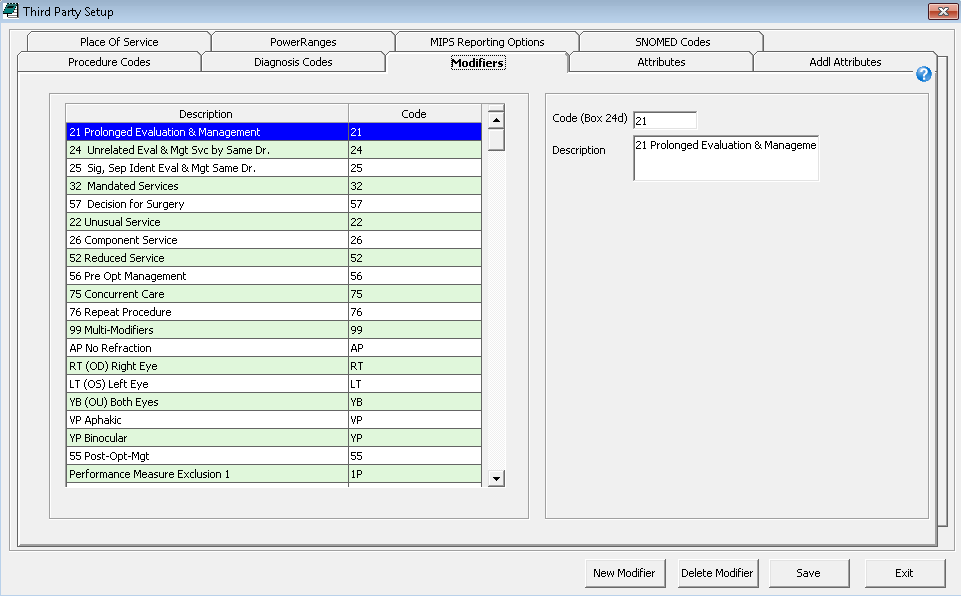
Modifiers provide extra descriptions about procedures and appear on insurance claims. Modifiers can be attached to services or selected on fee slips.
- Open the Third Party Setup window. For more information, go to To open the Third Party Setup window.
- Click the Modifiers tab.
- Click New Modifier to create a new code.
OR
Select a code from the list.
- In the Code (Box 24d) field, type the procedure modifier code.
- In the Description text box, type a short description for the modifier.
- Click Save when you are finished.
- Repeat steps 3–6 to add or modify additional modifiers as needed.
- Click Exit to close the Third Party Setup window.
In addition to the procedure above, watch this video.
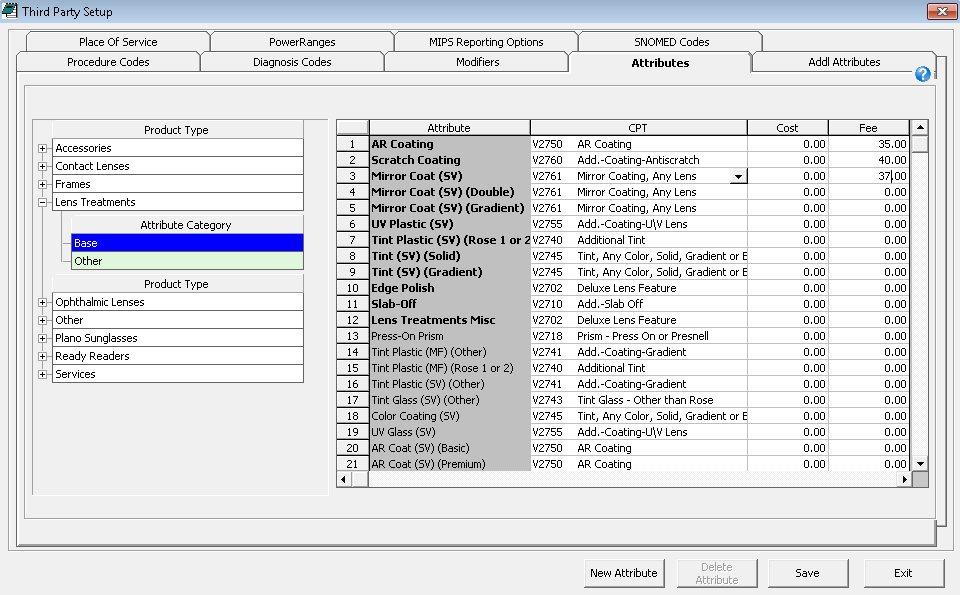
Attributes are the individual qualities and characteristics that define a product (e.g., color, material, lens type). Attributes are inherent to the product; add-ons are not attributes. For example, an ophthalmic lens may be described by the following attributes: a progressive lens type; plastic, high index material; transition gray in color; with a Crizal coating. Product attributes translate directly to billable codes on the CMS 1500 claim form and patient statement.
- Open the Third Party Setup window. For more information, go to To open the Third Party Setup window.
- Click the Attributes tab.
-
Select a Product Type from the list and click the plus (+) sign to expand it.
-
Select an Attribute Category.
- Select an Attribute from the list on the right to price it.
OR
Click New Attribute to create a new attribute.
- Select a procedure code from the CPT drop-down list.
- You do not need to select a CPT code for the ophthalmic Lens Cat./Base attributes. CPT codes are assigned based on the prescription recorded on the Eyewear Order window.
- With services, several possible CPT codes can be associated to a single attribute. Do not select a CPT for these types of services. For example, surgery should not have any CPT association. On each service product, associate the surgery attribute and select the appropriate CPT code at the product level.
- In the Cost and Fee columns, type the additional cost and fee for the attribute.
OR
For ophthalmic material, color, or other attributes, type the additional fees associated with single-vision, bifocal, trifocal, progressive lenses, and near variable focus lenses. If the fees are the same for each of these columns, enter the fee in the All Fee column only.
- The cost and fee associated with the attribute are added to the cost and fee of the product set up in the Products & Services window.
- Ophthalmic lens attributes are priced per lens. Lens treatment attributes are priced per pair.
- If you are updating the cost and fee, the change will only apply to products that are created after the change is saved. For information on updating the attribute cost or fee for individual products, go to To add manufacturer SKUs to OfficeMate product details. For information on updating the attribute cost or fee for multiple products, go to Updating Many Products and Services.
- If many of your costs and fees are the same, select a fee or cost, press Ctrl+C to copy, place your cursor in the next cell, and press Ctrl+V to paste. Once you copy a cost or fee, you can paste it many times.
- The costs and fees significantly effect the general ledger and accounting.
- Click Save when you are finished.
- Repeat steps 4–8 to add or modify additional attributes as needed.
- Click Exit to close the Third Party Setup window.
In addition to the procedure above, watch this video.
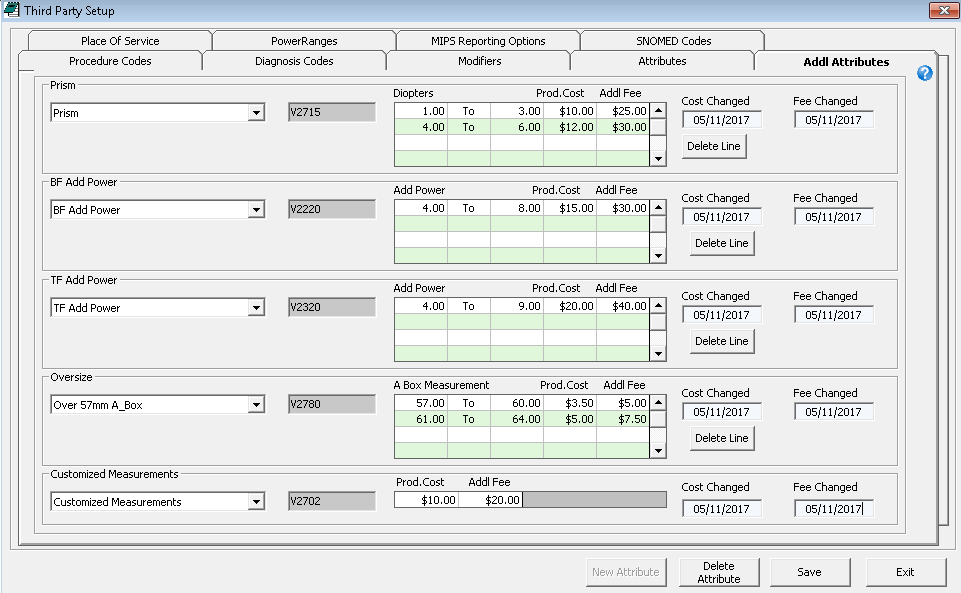
Often there are additional material or lab costs for high-power lenses, oversized lenses, and other prescription needs that need to be calculated into the patient’s fee slip. By recording additional attribute information, you ensure that OfficeMate automatically includes those fees on fee slips and insurance claims when they are applicable.
- Open the Third Party Setup window. For more information, go to To open the Third Party Setup window.
- Click the Addl Attributes tab.
- In the Prism group, enter the diopter range for each cost or fee point.
- Enter the Prod Cost and Addl Fee information for each measurement range per lens.
- Repeat steps 3 and 4 for the BF Add Power and TF Add Power groups. Enter cost and fee information per lens.
- In the Oversize and Customized Measurements groups, enter the Prod Cost and Addl Fee information. Enter cost and fee information per pair.
- Click Save.
OfficeMate confirms that you want to overwrite the pricing for these attributes on all ophthalmic lenses in the database.
- Click Yes to confirm.
- Click Exit to close the Third Party Setup window.
To adjust an individual lens’ additional attribute pricing, open the Products & Services window and click the Additional Attributes tab. For more information, go to To maintain ophthalmic lens additional attributes.
In addition to the procedure above, watch this video.
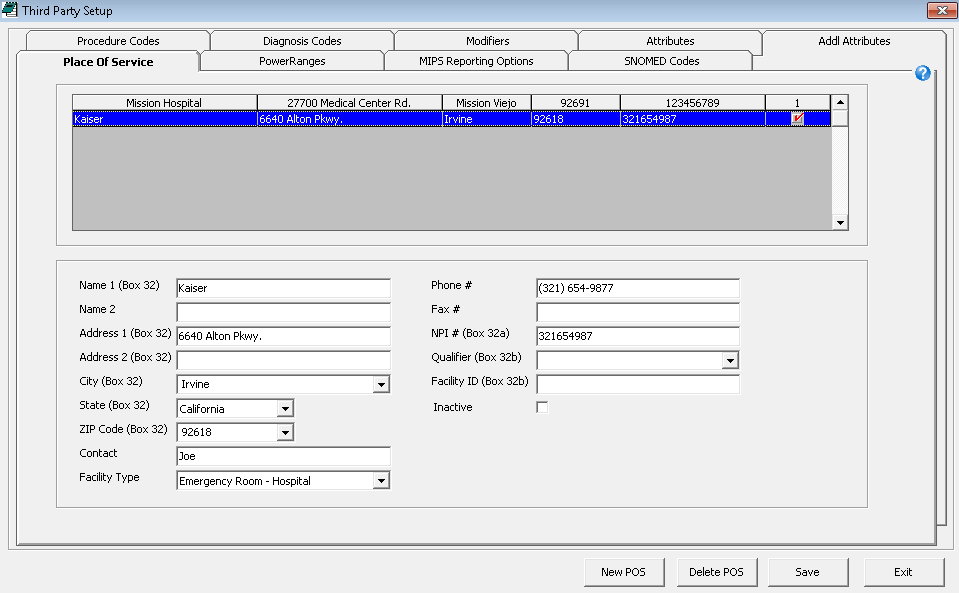
- Open the Third Party Setup window. For more information, go to To open the Third Party Setup window.
- Click the Place of Service tab.
- Click New POS to create a new place of service.
OR
Select a place from the list.
- Enter the place of service location information in the appropriate fields:
- Name 1 (Box 32)
- Name 2
- Address 1 (Box 32)
- Address 2 (Box 32)
- City (Box 32)
- State (Box 32)
- ZIP Code (Box 32)
- Type the name of the primary contact person in the Contact field as needed.
- Select the type of facility from the Facility Type drop-down menu.
- Type the place’s telephone number in the Phone # field as needed.
- Type the place’s fax number in the Fax # field as needed.
- Type the place’s NPI number in the NPI # (Box 32a) field.
- Select a qualifier from the Qualifier (Box 32b) drop-down menu as needed.
Ensure that you are selecting the appropriate qualifier description and ANSI code in the Qualifier (Box 32b) drop-down menu, as listed below:
Blue Cross Provider Number - 1A
Blue Shield Provider Number - 1B
CHAMPUS Identification Number - 1H
Clinical Lab. Improvement Amendment Number - X4
Federal Tax Payer’s Identification Number - TJ
Location Number - LU
Medicaid Provider Number - ID
Medicare Provider Number - 1C
Provider Commercial Number - G2
Provider Plan Network Identification Number - N5
Provider UPIN Number - 1G
State Industrial Accident Provider Number - X5
State License Number - 0B
- Type the place’s facility ID in the Facility ID (Box 32b) as needed.
- Select the Inactive check box if the place is no longer active.
- Click Save when you are finished.
- Click Exit to close the Third Party Setup window.
In addition to the procedure above, watch this video.
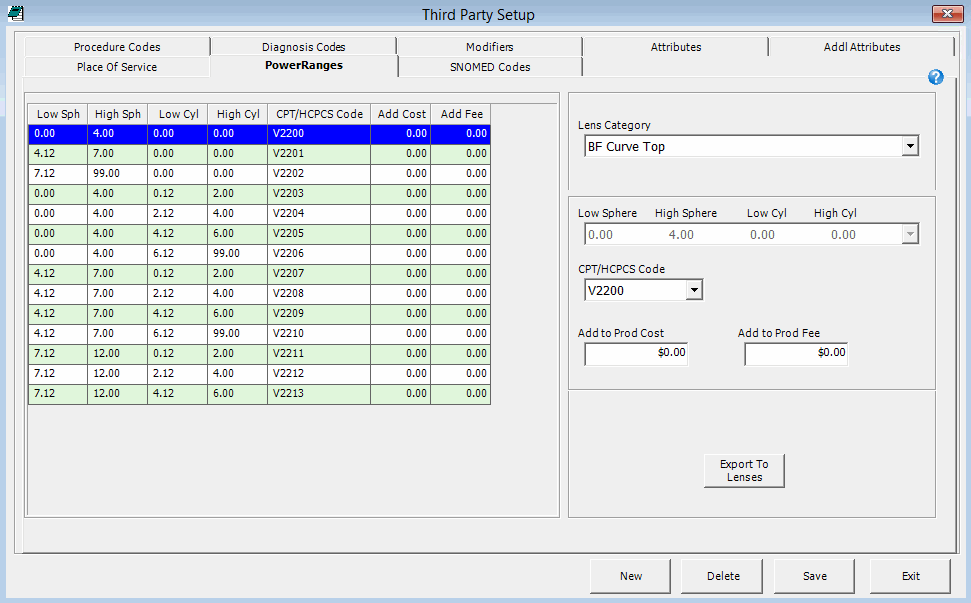
The Power Ranges tab allows you to assign CPT/HCPCS codes to specific power ranges for each ophthalmic lens type. The power ranges themselves (low sphere to high sphere and low cylinder to high cylinder) cannot be changed.
- Open the Third Party Setup window. For more information, go to To open the Third Party Setup window.
- Click the Power Ranges tab.
- Click New to set up a new power range.
- Select a lens type from the Lens Category drop-down menu.
The table on the left updates to reflect the power ranges that have been set up for the selected lens type.
- Select a power range from the Sphere drop-down menu.
- Select a procedure code from the CPT/HCPCS Code drop-down menu.
- Type the additional cost and fee associated with the selected lens type and power range in the Add to Prod Cost and Add to Prod Fee fields.
- Click Save.
- Repeat these steps to add additional power ranges as needed.
After you set the CPT/HCPCS code for a power range and lens type, you cannot modify it. You may, however, select the power range from the list, click Delete to remove that line, and then follow steps 2–8 to add a power range with the correct CPT/HCPCS code.
- To export the power range costs and fees to the products in OfficeMate, perform the following steps:
- Select a lens type from the Lens Category drop-down menu.
- Click Export to Lenses.
The costs and fees exported will replace any existing power range costs and fees.
- Repeat these steps for each lens type as needed.
- Click Exit to close the Third Party Setup window.
To adjust an individual lens’ power range pricing, open the Products & Services window and click the Product Details tab. For more information, go to To itemize product details.
In addition to the procedure above, watch this video.
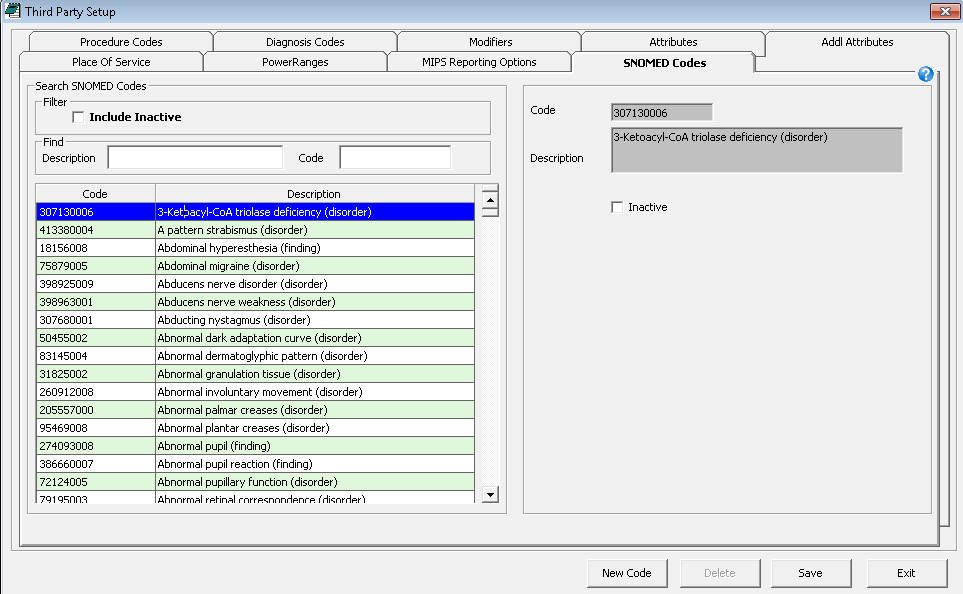
SNOMED codes are required for CPOE, health information exchange, lab results, and other meaningful use applications. Eyefinity has populated a list of SNOMED codes for you. You can add new SNOMED codes and delete SNOMED code that you have added, but you cannot edit the default SMNOMED codes.
- Open the Third Party Setup window. For more information, go to To open the Third Party Setup window.
- Click the SNOMED Codes tab.
- Click New Code.
- Type the SNOMED number in the Code text box.
- Type a name for the diagnosis in the Description text box.
- Click Save.
- Click Exit to close the Third Party Setup window.
