15.3.4396 Release Notes
Released November 15 for General Availability
This section describes the enhancements, fixes, and known issues in the latest OfficeMate/ExamWRITER release.
Topics include the following:
- COVID Codes for Novavax
- ePrescribing Features
- ePrescribing Fixes
- ExamWRITER Features
- OfficeMate Features
- OfficeMate Fixes
- Known Issues
For information about changes in earlier releases, see Previous Release Notes.
COVID Codes for Novavax
For providers who administer COVID vaccines, the following CPT codes were added to OfficeMate/ExamWRITER to cover the new vaccine from Novavax:
-
91304: SARS-CoV-2 (coronavirus disease [COVID-19]) vaccine (Novavax)
-
0041A: Immunization admin. intramuscular inject. first dose
-
0042A: Immunization admin. intramuscular inject. second dose
The new codes appear in the following areas:
-
Administration
-
Third Party Setup window as procedures
-
Product window as services
-
-
ExamWRITER
-
Procedures tab of Diagnosis/Procedure Coding window as selectable procedures
-
After an exam is closed or finalized, the new CPT codes and charges are automatically added to the patient’s fee slip and claim.
ePrescribing Features
ePrescribing includes the following enhancements:
-
Supporting Two Prescription Printing Templates for New Jersey
-
Highlighting Popular Fields in the Prescribe Medication Panel
Supporting Two Prescription Printing Templates for New Jersey
ePrescribing now supports the following prescription printing templates for practices located in the state of New Jersey. Previously, only one template was supported for New Jersey.
-
NJFOPFACILITY.10.2021 (facility format)
-
NJFOP.05.2021 (physician format)
If you have practice locations in New Jersey that use prescription printing templates, you must specify which template each location uses.
Only administrators can assign a prescription printing template to a location.
To assign a prescription printing template to a practice location
-
Open the ePrescribing interface. See Opening the ExamWRITER ePrescribing Interface.
-
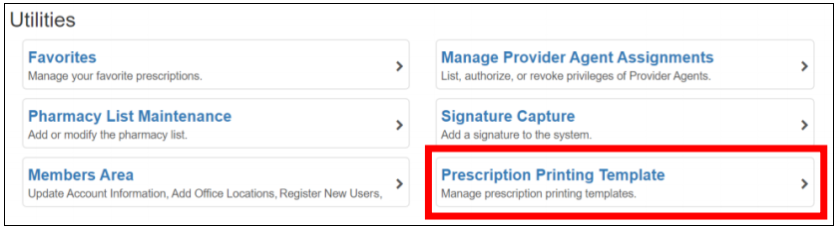
From the menu in the upper-left corner, select Utilities.
-
In the Utilities window, click Prescription Printing Template.
-
From the drop-down list, select the prescription template each New Jersey location is using:
-
NJFOPFACILITY.10.2021 (facility format)
-
NJFOP.05.2021 (physician format)
-
-
Click Save.
Highlighting Popular Fields in the Prescribe Medication Panel
To improve navigation, the following fields in the Prescribe Medication panel were highlighted yellow to make them easy to find. These fields are included in most prescriptions.
-
Provider
-
Supervisors
-
Patient Directions fields
-
Days Supply fields
ePrescribing Fixes
ePrescribing includes the following fixes:
-
Images of provider signatures now appear on faxed prescriptions as expected. Previously, faxed prescriptions did not include an image of the provider’s signature.
-
The patient scorecard now appears in the patient advisor toolbar the first time a user opens ePrescribing. Previously, the scorecard did not appear until after the user refreshed the ePrescribing window.
ExamWRITER Features
ExamWRITER includes the following enhancement:
Documenting Refined Glaucoma Diagnoses
Submenus to record suspected glaucoma risk levels (high or low) were added to the following forms in the Special Testing section of an exam:
-
Anterior Segment OCT > Suspect, Open Angle (317697)
-
Gonio, Scheie - 92020 > Open Angle (323101)
-
Gonio, Shaeffer - 92020 > Open Angle (323213)
-
Gonio, Spaeth - 92020 > Open Angle (323273)
-
OCT, NFL - 92133 > Glaucoma Suspect, Open (323615)
-
Pachymetry > Glaucoma, Suspect (324885)
-
Provocative Testing > Open Angle (323452)
You can select the following risk levels in the new submenus:
| Risk Level | Unspecified Eye (Unsp) | Right Eye (RT) | Left Eye (LT) | Bilateral (BI) |
|---|---|---|---|---|
| Low Risk | H40.019 | H40.011 | H40.012 | H40.013 |
| High Risk | H40.029 | H40.021 | H40.022 | H40.023 |
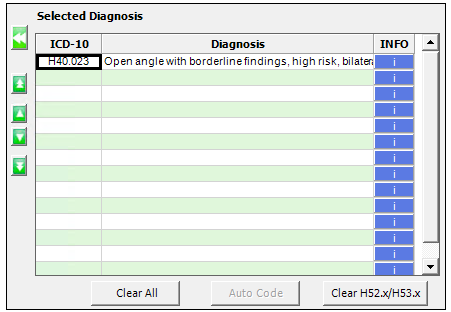
The refined diagnoses are posted under an exam’s Special Testing section bar:

They also appear in the Diagnosis/Procedure Coding window:
OfficeMate Features
OfficeMate includes the following enhancements:
Preventing Multiple Payment Reversals
To prevent a payment from being reversed more than once, the Reverse/Correct button on the Receipt History for Patient window is now disabled immediately after a payment is reversed:
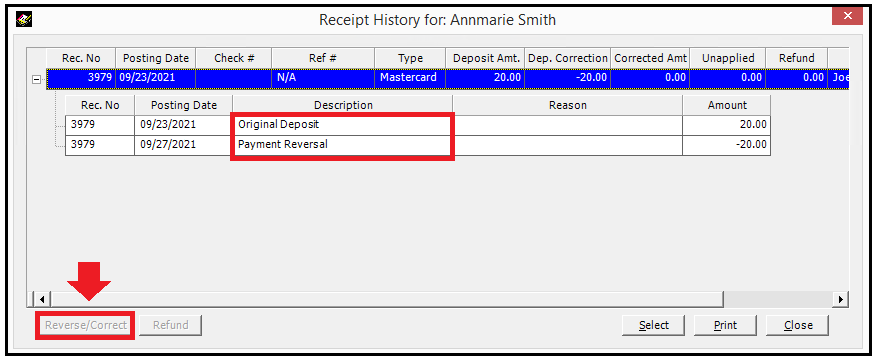
The button is not disabled after a payment is corrected.
Changing the Date of Payment Reversals and Corrections
By default, you can now change the date of payment reversals and corrections in OfficeMate.
-
Because of auditing requirements, you cannot change the date of deposit.
-
The posting date for a payment reversal or correction must be the same as or later than the posting date of the deposit.
To prevent users from changing payment reversal and correction dates
-
In the OfficeMate Administration main window, click Setup, and select Preferences.
-
In the System Preferences window, click the Finance tab.
-
On the tab, set the Allow Reversal and Correction Posting Date to Be Modified preference to No.
By default, that preference is set to Yes.
-
Click OK to return to the main window.
Dates of payment reversals and corrections can be changed in the following locations:
-
Receipt History for Patient window
DETAILED PATH: Receipts > Receipts and Adjustments > Receipts & Adjustments window > Apply to Patient Receivable tab > History button > Receipt History for Patient window
-
Receipt History for Insurance window
DETAILED PATH: Receipts > Receipts and Adjustments > Receipts & Adjustments window > Apply to Insurance tab > History button > Receipt History for Insurance window
-
Patient Receipt History tab
DETAILED PATH: Ledger > Patient Ledger > Patient Receipt History tab
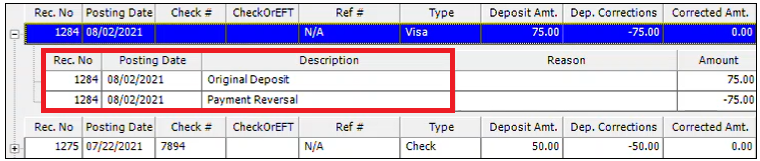
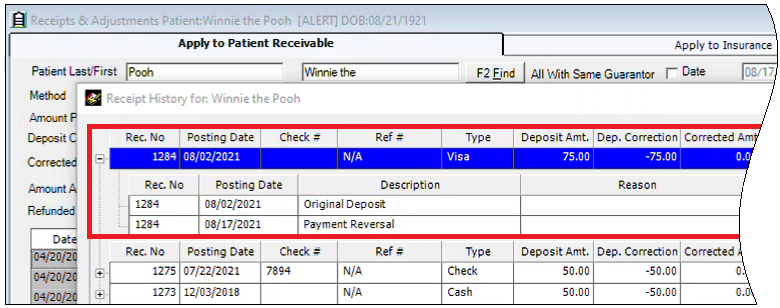
For example, suppose a payment is made on August 2 and reversed on August 17. To change the reversal date to match the payment date:
- Go to one of the Receipt History locations listed above.
- In the Receipt History window/tab, click the + next to the appropriate receipt to display the reversal you want to change.
- Left-click the reversal’s line item to highlight it.
-
Right-click the highlighted reversal, and then click the Change Reversal/Correction Posting Date pop-up window.
The Posting Date window opens:
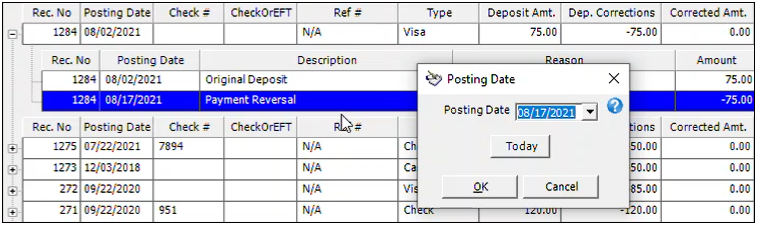
-
Click the down arrow next to the Posting Date drop-down list.
A calendar tool appears.
-
Use the tool to reset the reversal item’s posting date to 08/02/2021.
-
Click OK and OK.
The payment and reversal posting dates now match:
When you make a payment correction, the system automatically generates a payment reversal before completing the correction. Therefore, if you change the date of the payment correction, you should also change the date of the system-generated payment reversal to maintain accuracy in your reporting.
Matching Insurance in ERA Files and OfficeMate
When Electronic Remittance Advice (ERA) files are loaded into OfficeMate, they often list multiple insurance plans, none of which match the names of plans in the OfficeMate database. Users don’t know which plan to select. To provide guidance, the following messages were added to the Select Coverage window, which appears after you select an ERA file to load in the Select Remittance File window:
-
Insurance and remittance were matched by payer ID
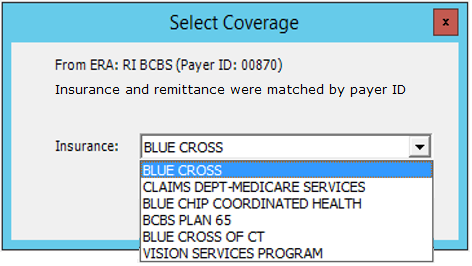
OfficeMate now uses insurance plan payer IDs to link the correct plan for a remittance with the correct plan in the OfficeMate database:
-
From ERA: This field shows the correct insurance plan to use for loading the remittance. It also shows the plan’s payer ID.
-
Insurance: The plan automatically selected in this drop-down list is the plan in the OfficeMate database that has the same payer ID as the remittance plan shown above this new message.
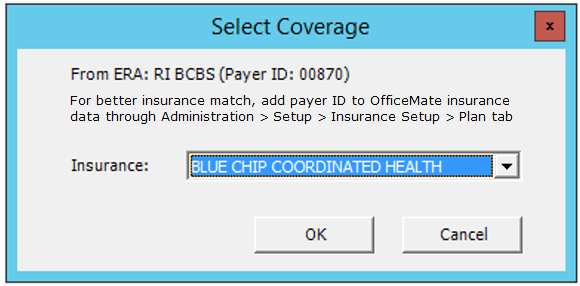
If necessary, you can select a different plan from the Insurance drop-down list, but the new message shown above will be replaced by the following message.
-
-
For better insurance match, add payer ID to OfficeMate insurance data through Administration > Setup > Insurance Setup > Plan tab.
To get a better match for the payer ID shown in the From ERA field:
-
In Administration, select Setup, and then click Insurance Setup.
-
In the Insurance Billing Initial Setup window, select the appropriate insurance carrier from the Select Carrier drop-down list.
-
Click the Plan tab.
-
From the Select Plan drop-down list, select the appropriate plan.
-
In the bottom-right section of the tab, enter the From ERA payer ID in the Payor ID field.
-
Click Save.
The name of the insurance plan associated with the payer ID you specified in step 5 is displayed in the Insurance field in the Select Coverage window.
-
Adding Chargebacks to Selected Fee Slips
Previously, chargebacks were automatically recorded on the most recent fee slip. Now, users can select the fee slip to which to apply the chargeback:
-
Open OfficeMate, click the Receipts icon, and select Receipts and Adjustments.
-
Select the Apply to Insurance tab.
-
From the Insurance drop-down list, select the appropriate insurance carrier.
-
(Optional) To display only date-specific explanations of benefits (EOBs), enter or select dates in the Date of Service fields.
-
Click Display Charges, and then select Display Detail View.
-
In the tab’s table, right-click the fee slip to which you want to apply the chargeback, and then click the Insurance Charge Back pop-up window.
The ChargeBack - Patient window appears. It lists the fee slips associated with the patient.

-
Select the fee slip to which you want to apply the chargeback.
If you click an empty row, this message appears: “Select a fee slip to associate with the insurance chargeback.”
-
Enter the amount to apply.
-
Click Record.
The amount is applied to the selected fee slip.
If the patient has no open charges, use the Ins Chargeback button to initiate the process.
Adding Mfg Assigned SKUs to Lab Orders
Maui Jim and other clients must include the Mfg Assigned SKU in lab orders. To enable this, FrameMate was modified to import a frame’s SKU number when it’s available. In OfficeMate Administration, the SKU is mapped to the UPC code, which is stored here:
-
Open OfficeMate Administration, click the Products icon, and then select Products and Services.
-
In the Products window, select Frames from the Product Type drop-down list.
-
(Optional) Select other search criteria.
-
Click F2-Find to search for frames that match your criteria.
-
In the search results, double-click the appropriate frame.
-
In the Products window, click the Product Details tab.
The UPC Code field is located in the middle section of the tab.
Users can view and edit the SKU in the UPC Code field. Because some SKUs contain more characters than the field can display, a pop-up window enables users to see the entire number.
OfficeMate Fixes
OfficeMate includes fixes to the following areas:
Electronic Remittance Advice (ERA)
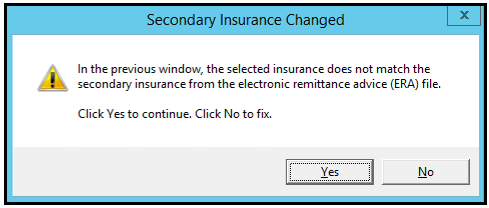
If you select the wrong secondary insurance plan from the Insurance drop-down list in the Other Coverage window, the following message now appears when you click Other Ins in the Insurance Remittance Advice Entry window:
The plan selected in the drop-down list should match the plan shown in the From ERA field at the top of the Other Coverage window.
The new message is just a warning. You can continue to process the remittance. To make the best match between primary and secondary insurance plans in your system, however, enter the payer ID of each insurance plan in the Administration > Setup > Insurance Setup > Plan tab > Payor ID field.
- If an insurance carrier is deactivated on the Insurance tab of the patient demographics, the carrier no longer appears in the Insurance drop-down list in the electronic remittance Other Coverage window and in the patient ledger.
You can now upload all remittances from your local ERA file into both OfficeMate and Administration. Previously, a problem with the search functionality caused some remittances not to upload to OfficeMate. That problem was fixed.
Fee Slips
The Detailed Benefits pricing method now calculates insurance balances properly in fee slips when a non-VSP authorization is created for the insurance carrier. Previously, insurance balances were calculated only if the authorization was removed.
Installation
- After installing OfficeMate, users no longer receive an error message saying “OfficeMate Practice Management has stopped working” when they perform the following tasks:
Log into OfficeMate or OfficeMate Administration on servers or workstations.
Open Business Insights Dashboard (GPN’s The EDGE).
Open the ExamWRITER ePrescribing window.
Ledger
- In the Patient Ledger window, adding a fee slip with numerous items no longer causes all fee slips on the Patient/Insurance tab to disappear.
Miscellaneous
When you specify a Referred By Patient or Professional name in the OfficeMate Patient Demographic tab and then close the tab by clicking X in its upper-right corner, the specified name is no longer removed. Likewise, a blank Last Exam field is no longer refilled with a date after you close the tab by clicking X or OK.
New VSP Interface
Previously, users were not notified when an Rx eyewear order in OfficeMate included a product whose required CPT code (V2020, V2204, V2781, V2784, V2762, V2744, V2750, or V2799) was missing. Instead, users were permitted to submit the order, which then failed, generating Error 400. The error did not explain what was wrong or how to fix it. Now, users receive a Failed to Send Claim to VSP error that lists the codes missing from the order. To fix the error, add the missing codes to the product as follows, and then resubmit the order.
In OfficeMate Administration, click the Products icon, and select Products and Services.
In the Products window, select the product’s type from the Product Type drop-down list.
Enter additional search criteria, and click F2 - Find to find the product.
In the search results, double-click the product to load its information into the Products window.
Click the Product Details tab.
Add the missing code as an attribute.
Click Save, and then click Save and Exit to close the loaded Products window.
Close OfficeMate Administration.
Return to the order, and remove and re-add the updated products.
Resubmit the order.
For more information, see the section about maintaining product attributes in Recording Product Information.
Orders
When copying forward an eyewear prescription for a contact lens in only one eye, you no longer receive an Invalid Product Error.
Reports
In Administration, the New Patient Growth Rate report now shows data for both new and existing patients.
The Internal Marketing report’s Hard, Soft, and Lens categories now list the correct options. In addition, the Soft - Lens Category was removed.
Patient receipt reversals and corrections no longer appear on custom insurance reports.
An error no longer occurs when the Products Sold report is run on specific dates.
Known Issues
New Patient Growth Rate Report Has Missing and Duplicate Months
In Administration, the New Patient Growth Rate report sometimes has missing or duplicate months and sometimes puts patient counts in the wrong month. This occurs when the report has incomplete data for the prior year.