Recording Product Information
Only users in distribution centers and the administrative location can modify information in the Products window.
You can record as little or as much product information in OfficeMate as is necessary for your practice. This topic tells you how to record products in OfficeMate.
- If you need to update multiple products and services at one time, see Updating Many Products and Services.
- If you are using the FRAMES Data SPEX UPC CD-ROM or On Demand electronic download or the FRAMES Data Quarterly CD-ROM, see Using FrameMate for instructions on how to use FrameMate to transfer frame information into OfficeMate.
- To update your contact lens (ABB) database using the Contact Lens Catalog Updater, read this knowledge base article.
- Before you add products to OfficeMate, set up your insurance fee schedule information and procedure codes. To set up insurance information, see To modify or add appointment schedule resources. To set up procedure codes, see To add and modify procedure codes.
- Press the F12 key when your cursor is in a drop-down box to open a Maintain window and add new items to the drop-down menu selections. For more information on using the F12 key, see To add and maintain list box selections (F12).
This section includes:
- Adding or Modifying Products
- Adding Additional Information to Products
- Itemizing Product Details
- Adding Manufacturer SKUs to OfficeMate Product Details
- Activating and Deactivating Products
- Maintaining Location Inventory Details
- Maintaining Product Cost Information
- Maintaining Ophthalmic Lens Additional Attributes
- Maintaining Ophthalmic Lense VSP Product Mapping
- Open the Products window. For more information, see Opening the Products Window.
- Select a product from the Product Type drop-down menu.
Frame and lens add-ons are included in the Other and Lens Treatment product types.
- Complete one of the following tasks:
- Click New Product to add a new product. For more information, see Recording Product Information.
- Enter additional search criteria and click F2 - Find or press Enter to search for and find an existing product. For more information, see Finding Products and Services.
Click Copy to copy the product details and then make changes to them to record a new product.
- Click Next and Previous to add or modify the previous or next product in your database.
- If you want to assign different patient fees for different types of patients:
- Select a patient fee type from the Patient Fee Type drop-down menu.
- Type a fee in the Fee text box.
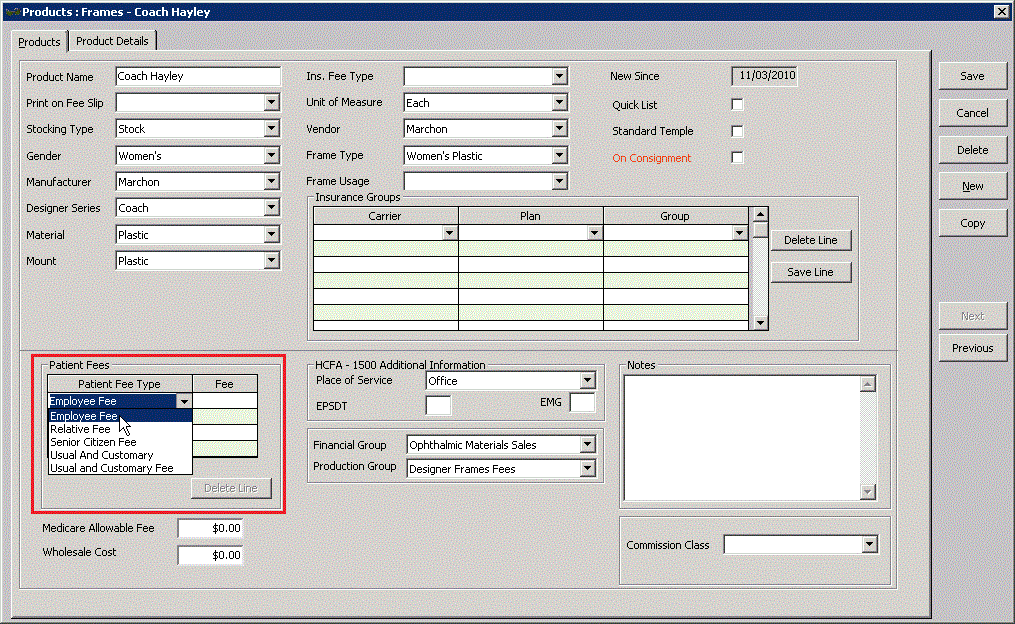
To delete an additional fee, select the line and click Delete Line.
- Type the Medicare allowable fee in the Medicare Allowable Fee text box, if applicable.
- Type the FRAMES cost, your wholesale cost, or your buying group cost in the Wholesale Cost text box, if applicable.
- Select a default place of service from the Place of Service drop-down menu if the product is typically sold off-site.
- Type Y in the EPSDT text box if the product is part of an early periodic screening and diagnostic test.
The EPSDT is automatically entered on the CMS 1500 form in box 24H.
- Type Y in the EMG text box if the product is related to an emergency or type N in the EMG text box if the product is not related to an emergency.
The EMG is automatically entered on the CMS 1500 form in box 24I.
- Select a financial group from the Financial Group drop-down menu if the CPT code and financial group are not already linked to each other. To modify CPT codes and their associated financial groups (if you have the proper access), see To add and modify procedure codes.
- Select a production group from the Production Group drop-down menu, if the CPT code and production group are not already linked to each other. To modify CPT codes and their associated production groups (if you have the proper access), see To add and modify procedure codes.
- Type notes in the Notes box.
- Select a commission class from the CommissionClass drop-down menu. To add or modify commission classes (if you have the proper access), see To set up commission classes.
- If you want to itemize product details, see To itemize product details; otherwise, click Save and select one of the following options:
- Save to save the information and keep the Products window open.
- Save and New to save the information and create a new product.
- Save and Exit to close the Products window.
If you are not maintaining inventory and you want to itemize the size and color of frames, contact lenses, or ophthalmic lenses with the same name, complete the instructions below. If you are maintaining inventory, see Recording Product Inventory Details to add product details.
- Open the Products window. For more information, see Opening the Products Window.
- Select a product from the Product Type drop-down menu.
Frame and lens add-ons are included in the Other and Lens Treatment product types.
- Complete one of the following tasks:
- Click New Product to add a new product. For more information, see Recording Product Information.
- Enter additional search criteria and click F2 - Find or press Enter to search for and find an existing product. For more information, see Finding Products and Services.
Click Copy to copy the product details and then make changes to them to record a new product.
- Click Next and Previous to add or modify the previous or next product in your database.
- Click the Product Details tab.
- If you downloaded ophthalmic lenses from the Lens Product Loader and you want to quickly import multiple power ranges for the lenses into the table:
- Click Import Power.
- Click New and type the power range per diopter in the table cells.
- Repeat step 9b for every power range with sphere and cylinder measurements: otherwise, the lens will not display on Rx orders.
- Click Save.
- Select the line with the default 0.00 to 99.00 power range and click Delete.
- Click Import.
- Select the next blank line in the table to add new product details or select an existing line to modify product details already recorded.
Select a line and click Delete to delete the line if it is not linked to a fee slip, Rx order, or purchase order.
- Select the product’s status:
- Select the Stock/Inline radio button if the product is regularly kept in inventory at store locations and is available for sale.
- Select the Non Stock/Not Inline radio button if the item is not regularly kept in inventory at the store locations, but is ordered from a vendor when a unit is sold.
- Select the Inactive radio button if the product is not regularly kept in inventory at the store locations, nor is it ordered from a vendor when a unit is sold. Items marked as inactive do not appear in product order search results.
- Select the Discontinued radio button if the product is no longer available. Items marked as discontinued do not appear in product order search results.
- Select the Backordered check box if the item is not currently available from the vendor or manufacturer and type the date in which the item is again expected to be available in the ETA text box. This date can also be entered on the Receive PO window. In the event two different dates are entered, the latest date is displayed.
- Select the Display Sample check box to indicate that there are sample or display units of this product. The minimum display quantity for the product is set to one. You can change the minimum sample quantity on the All Locations Inventory tab.
- To view the history of status changes for the selected product, click Status Changes; otherwise see step 10.
The Product Status Change History window opens.
- Click Close when you are finished reviewing the status change history.
- Type the product size information in the appropriate fields.The Product window displays the appropriate fields based on the type of product:
- Contact lens: BC, Dia, Sph, Cyl, Axis, and Add text boxes.
- Frames, plano sunglasses, and ready readers: Eye, Bridge, Temple, DBL, A, B, and ED text boxes.
- Ophthalmic lenses: Low Sphere, High Sphere, Low Cyl, and High Cyl text boxes.
- Accessories, lens treatments and other products do not require size information.
- Type the wholesale cost and total product retail fee in the Prod Cost and Prod Fee text boxes.
The product cost and product fee significantly effect the general ledger and accounting. For more information on recording product costs, see To maintain product cost information.
- Type an even-numbered product code in the Product Code text box.
- Type the UPC code in the UPC Code text box.
- Must be 6–12 digits
- Must contain only numbers
- Must be an even number of digits. Enter leading zeros as needed to ensure an even number
- Must be unique among the products in your system
- Type or select a color from the Color drop-down menu, if applicable.
- If the product is an ophthalmic lens, select a code from the Prod. CPT/HCPCS Code drop-down menu.
The code that you select will only be used if do not use Rx orders. If you use Rx orders, the CPT code will automatically be populated on the fee slip according to the prescription in the Rx order.
- Repeat steps 6–15 for each new product detail that you want to add.
- Click Save and select one of the following options:
- Save to save the information and keep the Products window open.
- Save and New to save the information and create a new product.
- Save and Exit to close the Products window.
Due to limitations in barcode printing and scanning systems, ensure your Product Code and UPC Code meet the following requirements:
Maui Jim and other clients must include the Mfg Assigned SKU in lab orders. To enable this, FrameMate imports a frame’s SKU number when it’s available. In OfficeMate Administration, the SKU is mapped to the UPC code, which is stored here:
-
Open OfficeMate Administration, click the Products icon, and then select Products and Services.
-
In the Products window, select Frames from the Product Type drop-down list.
-
(Optional) Select other search criteria.
-
Click F2-Find or press Enter to search for frames that match your criteria.
-
In the search results, double-click the appropriate frame.
-
In the Products window, click the Product Details tab.
The UPC Code field is located in the middle section of the tab.
You can view and edit the SKU in the UPC Code field. Because some SKUs contain more characters than the field can display, a pop-up window enables you to see the entire number.
For more information about FrameMate, see Using FrameMate.
- Inactive products are not regularly kept in inventory at the store locations, nor are they ordered from a vendor when units are sold. Items marked as inactive do not appear in product order search results.
- Only users in distribution centers and the administrative location can activate and deactivate products in the Products window.
- Open the Products window. For more information, see Opening the Products Window.
- Select a product from the Product Type drop-down menu.
Frame and lens add-ons are included in the Other and Lens Treatment product types.
- Enter additional search criteria and click F2 - Find or press Enter to search for and find an existing product. For more information, see Finding Products and Services.
- Click the Product Details tab.
- Select an existing line.
-
Select the Inactive radio button if you want to deactivate the product; deselect the Inactive radio button and select one of the other available radio buttons if you want to activate the product.
Inactive products will only appear in product search results when you select the Include Inactive Items check box prior to performing the search.
- Click Save and select one of the following options:
Save to save the information and keep the Products window open.
- Save and New to save the information and create a new product.
- Save and Exit to close the Products window.
Attributes are inherent characteristics of a product. For example, you could describe an ophthalmic lens as polycarbonate, polarized, and with scratch coat and antireflective coat, and each of those attributes translates into a billable code (V-code) on the insurance claim.
OfficeMate allows you assign multiple attributes to a product, which enables you to find products by attribute, assign a cost to each attribute, and add billable codes to each attribute.
Attributes are only those characteristics that are inherent to a product as it is manufactured. Add-ons are not attributes. For example, a scratch coat that is added to the lens at the lab is not an attribute.
Product attributes are used in inventory counting, insurance claims, retail and third-party pricing, and reporting. Once your products are assigned attributes, it is possible to update the costs and fees of many products at once based on their attributes.
To help understand attributes, let’s put them into perspective. If you were selling cars instead of eyewear, you might be inclined to describe and sort your products by means other than make and model. For example, you might sort your cars by such attributes as two-door or four-door, convertible or hardtop, color, and engine type. Think of all the terms you might use to describe the details of a car, and each of those terms could be considered an attribute.
This same principle applies to the lenses, frames, and other products that you sell in OfficeMate.
Set up the product attributes in the Products window. The attribute information in the Products window is later matched against the insurance plan’s allowable benefit when the fee slip is created. Each attribute associated with a product that falls within the plan’s allowable benefits translates into increased revenue for your practice.
- Open the Products window. For more information, see Opening the Products Window.
- Select a product from the Product Type drop-down menu.
Frame and lens add-ons are included in the Other and Lens Treatment product types.
- Complete one of the following tasks:
- Click New Product to add a new product. For more information, see Recording Product Information.
- or press Enter to search for and find an existing product. For more information, see Finding Products and Services.
Click Copy to copy the product details and then make changes to them to record a new product.
- Click Next and Previous to add or modify the previous or next product in your database.
- Click the Product Details tab.
- Select a product from the list.
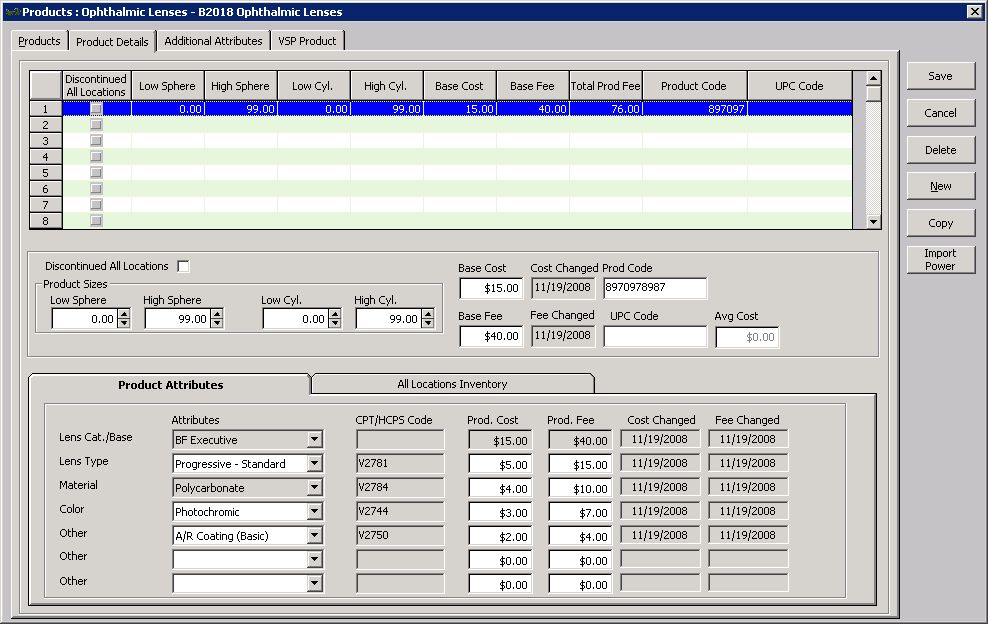
- Select the product’s attributes from the Attributes drop-down menus.
The CPT/HCPCS Code, Product Cost, and Product Fee fields automatically populate based on the attribute selected. For information on associating procedure codes, costs, and fees with attributes, see To add & modify attributes.
- Some product attributes, such as Lens Cat./Base and Material, may already be assigned based on selections made on the Products tab of the Product window. For information on changing these attributes, see Recording Product Information.
- The list of attributes that is available in each drop-down menu is maintained in the Third Party Setup window in OfficeMate Administration. For more information about adding and modifying attributes (if you have the proper access), see To add & modify attributes.
- Repeat steps 5 and 6 to apply attributes to each of the products listed at the top of the window.
- Click Save and select one of the following options:
- Save to save the information and keep the Products window open.
- Save and New to save the information and create a new product.
- Save and Exit to close the Products window.
In addition to the procedure above, watch this video.
If you are not maintaining inventory and you want to itemize the size and color of frames or lenses with the same name, complete the instructions below (if you have the proper access). If you are maintaining inventory, see Recording Product Inventory Details to add product details.
- Open the Products window. For more information, see Opening the Products Window.
- Select a product from the Product Type drop-down menu.
Frame and lens add-ons are included in the Other and Lens Treatment product types.
- Complete one of the following tasks:
- Click New Product to add a new product. For more information, see Recording Product Information.
- Enter additional search criteria and click F2 - Find or press Enter to search for and find an existing product. For more information, see Finding Products and Services.
Click Copy to copy the product details and then make changes to them to record a new product.
- Click Next and Previous to add or modify the previous or next product in your database.
- Click the Product Details tab.
- Click the All Locations Inventory tab.
- For each product, enter the following information as needed for each location:
- Type the Board Location as needed.
- Type the Prod Cost (wholesale amount) for each location if it varies from the Prod Cost on the Product Details tab.
- Type the Prod Fee (total product retail fee) for each location if it varies from the Prod Fee on the Product Details tab.
- Type the quantity the location should have on hand in the Stock Level field.
- Type the quantity on hand that triggers the product to be reordered in the Min Reorder Point field.
- Type the quantity to reorder in the Min Reorder Qty field.
- Type the number of display or sample items each location has on hand in the Min Display Qty field.
- When the quantity on hand drops below the minimum reorder point, OfficeMate adds the product to a purchase order when the purchase order is created from the quantity on hand. For information on creating purchase orders based on quantity on hand, refer to Creating and Maintaining Purchase Orders from Quantity on Hand.
- The Avg Cost field is informational only and displays the average cost of the product. The average cost is weighted, based on the cost of the product at the time each unit was received into inventory.
- The Qty on Order field represents the quantity on order when a purchase order is created. Compare the Qty on Order to the Qty Committed to know what is available as stock and is not already committed.
- The Qty Committed field represents the quantity of a product sold that was not on hand, is currently on order, and is still owed to a patient. This eliminates the previous quantity going negative. The only way to clear this quantity is to mark the product as Dispensed on the Order window.
- The Qty In Process field represents items that have not been dispensed to the patient. The only way to clear this quantity is to mark the product as Dispensed on the Order window.
- Select the Discontinued check box to discontinue the product at the individual location.
- Click Save and select one of the following options:
- Save to save the information and keep the Products window open.
- Save and New to save the information and create a new product.
- Save and Exit to close the Products window.
The product cost and product fee significantly effect the general ledger and accounting.
- Open the Products window. For more information, see Opening the Products Window.
- Select a product from the Product Type drop-down menu.
Frame and lens add-ons are included in the Other and Lens Treatment product types.
- Complete one of the following tasks:
- Click New Product to add a new product. For more information, see Recording Product Information.
- Enter additional search criteria and click F2 - Find or press Enter to search for and find an existing product. For more information, see Finding Products and Services.
Click Copy to copy the product details and then make changes to them to record a new product.
- Click Next and Previous to add or modify the previous or next product in your database.
- Click the Product Details tab.
- Select a product from the list.
- Type the cost of the product in the Prod Cost text box.
- Type the product fee in the Prod Fee text box.
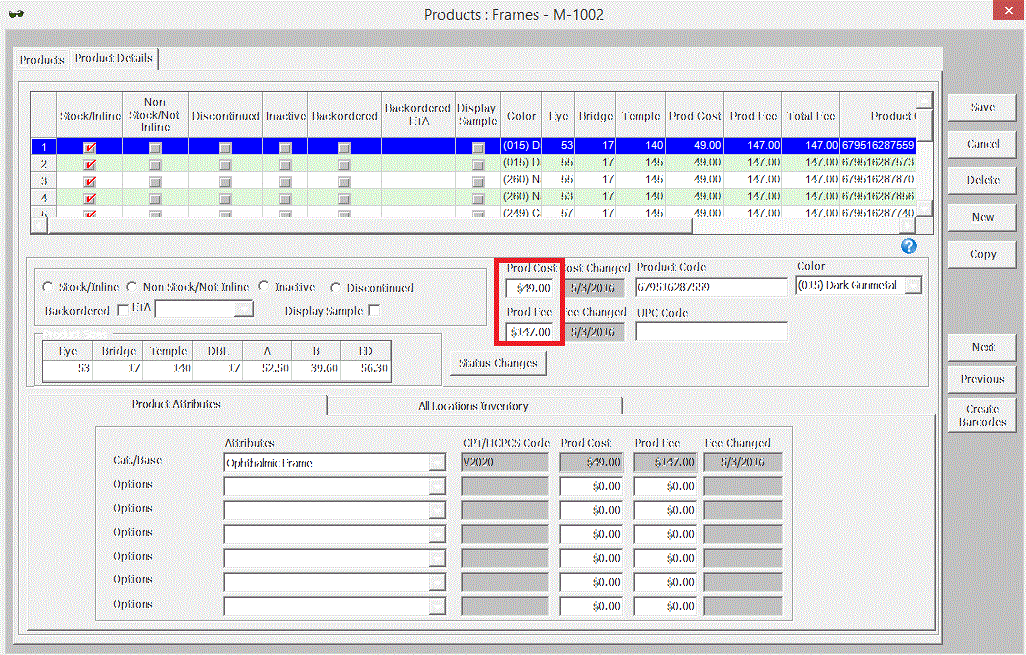
The Prod Cost and Prod Fee entered here automatically populates the attribute product cost and product fee on the Product Attributes tab.
To record product costs and fees by location, perform the following steps:
- Click the All Locations Inventory tab.
- Type the cost and fee information in the Prod Cost and Prod Fee fields for each location, as needed.
If the Prod Cost and Prod Fee information is blank or set to zero on the All Locations Inventory tab, OfficeMate looks to the Product Details tab for product cost and fee information.
The Avg Cost field is a read-only field that displays the average cost of the product throughout its lifetime.
- Adjust the Prod Cost and Prod Fee fields on the Product Attributes tab as needed.
- Adjust the Prod Cost and Prod Fee fields on the All Locations Inventory tab as needed.
- Repeat steps 5–9 to apply costs and fees to each of the products listed at the top of the window.
- Click Save and select one of the following options:
- Save to save the information and keep the Products window open.
- Save and New to save the information and create a new product.
- Save and Exit to close the Products window.
Often, there are additional material or lab costs for high-power lenses, oversized lenses, and other prescription needs that need to be calculated into the patient’s fee slip. By recording additional attribute information, you ensure that OfficeMate automatically includes those fees on fee slips and insurance claims when they are applicable.
If you have OfficeMate Administration access, you can update the additional attributes for all ophthalmic lenses in the Third Party Setup window. Changes made in Third Party Setup overwrite any changes made in the Products window. For more information about maintaining additional attributes for all ophthalmic lenses, see To add & modify additional attributes.
- Open the Products window. For more information, see Opening the Products Window.
- Select Ophthalmic Lenses from the Product Type drop-down menu.
- Complete one of the following tasks:
- Click New Product to add a new product. For more information, see Recording Product Information.
- Enter additional search criteria and click F2 - Find or press Enter to search for and find an existing product. For more information, see Finding Products and Services.
Click Copy to copy the product details and then make changes to them to record a new product.
- Click Next and Previous to add or modify the previous or next product in your database.
- Click the Additional Attributes tab.
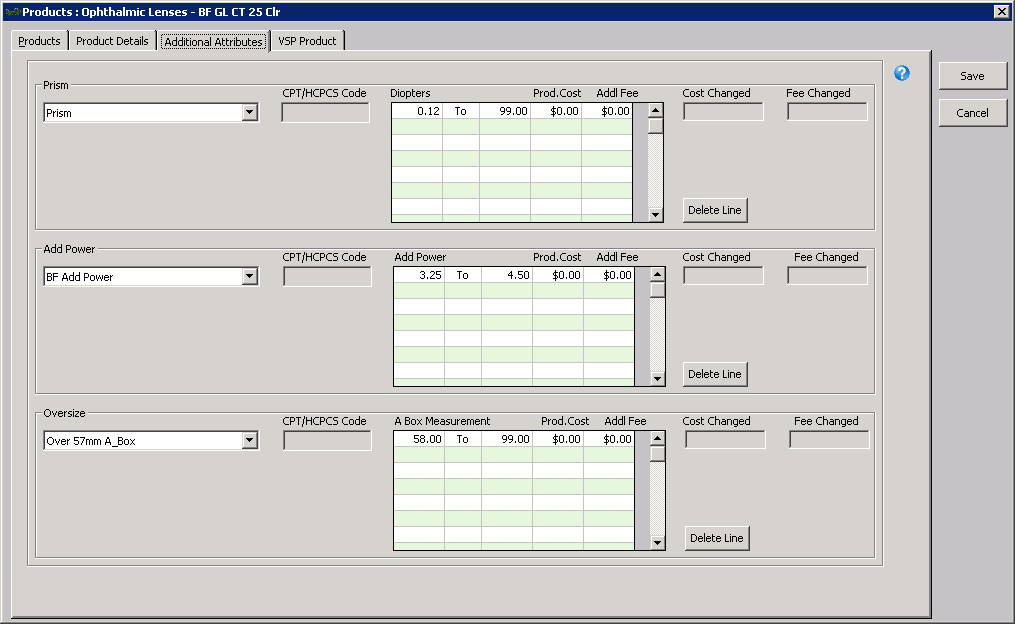
- In the Prism group, enter the measurement range for each cost or fee point.
- Type the Prod Cost and Addl Fee information for each measurement range per lens.
- Repeat steps 5 and 6 for the Add Power and Oversize groups. Enter cost and fee information per pair.
- Click Save and select one of the following options:
- Save to save the information and keep the Products window open.
- Save and New to save the information and create a new product.
- Save and Exit to close the Products window.
In addition to the procedure above, watch this video.
- Open the Products window. For more information, see Opening the Products Window.
- Select Ophthalmic Lenses from the Product Type drop-down menu.
- Complete one of the following tasks:
- Click New Product to add a new product. For more information, see Recording Product Information.
- Enter additional search criteria and click F2 - Find or press Enter to search for and find an existing product. For more information, see Finding Products and Services.
Click Copy to copy the product details and then make changes to them to record a new product.
- Click Next and Previous to add or modify the previous or next product in your database.
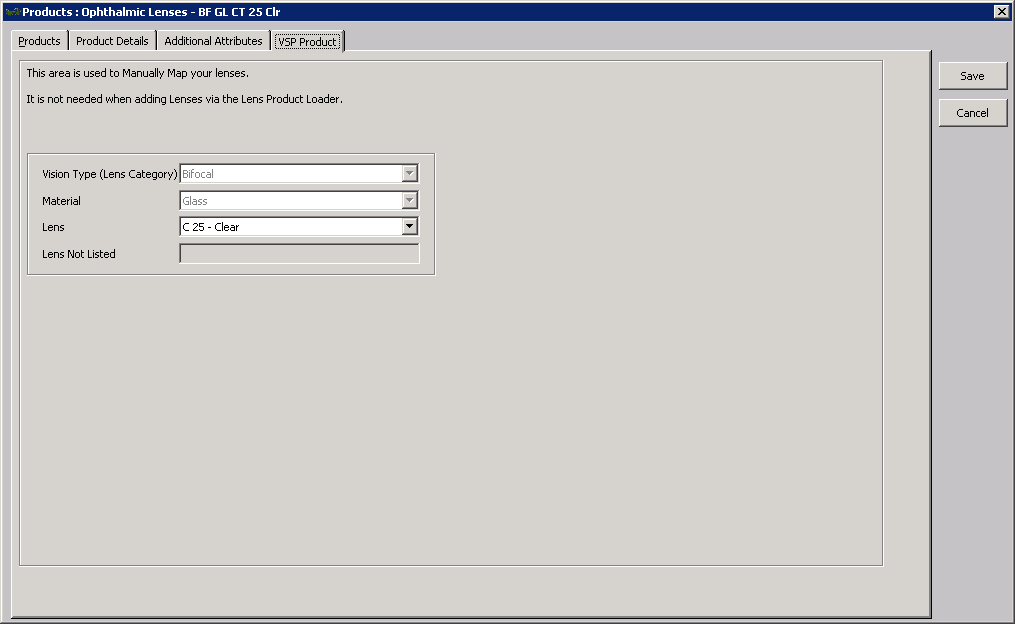
- Click the VSP Product tab.
- Select options that apply to the lens from the Vision Type, Material, and Lens drop-down menus.
Options may already be selected based on information recorded on the Products tab.
- Click Save and select one of the following options:
- Save to save the information and keep the Products window open.
- Save and New to save the information and create a new product.
- Save and Exit to close the Products window.