Setting Up the SATO WS4 and WS408TT Label Printer
This section explains how to set up and use the SATO WS4 and WS408TT label printer with an Apple Mac computer and a Windows PC.
You need to have a wired connection to the printer to set it up. Wireless (ethernet, wifi, Bluetooth, etc.) configuration is not available.
- Aligning the Reflective Media Sensor on the SATO WS4 and WS408TT Label Printer
- Setting Up the SATO WS4 and WS408TT Label Printer on a Mac
- Setting Up the SATO WS4 and WS408TT Label Printer on a Windows PC
-
Eyefinity recommends that you purchase frame labels and ribbon from Think Smart for all barcode printing in Encompass. Order these labels directly from Think Smart at 800.941.4913, option 2.
-
Labels not printing correctly? See Troubleshooting the SATO WS4 and WS408TT Label Printer.
Aligning the Reflective Media Sensor on the SATO WS4 and WS408TT Label Printer
Before setting up the SATO WS4 and WS408TT printer, verify that the printer's reflective media sensor is properly aligned.
- Open the printer and locate the reflective sensor, which runs under the labels.
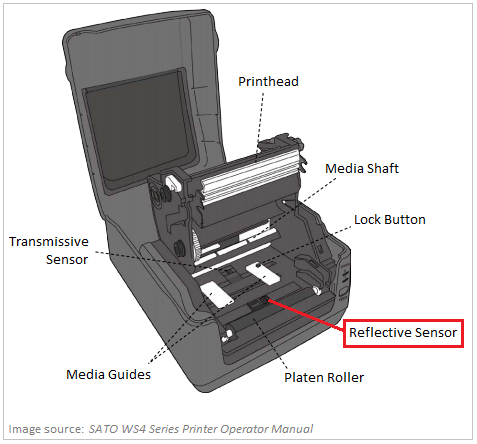
- If the arrow on the sensor is not aligned with the arrow on the printer pointing toward the sensor, manually slide the sensor to align the arrows:
- Close the printer.
Setting Up the SATO WS4 and WS408TT Label Printer on a Mac
To print labels on the SATO WS4 and WS408TT label printer with an Apple Mac computer, perform these tasks:
- Installing the SATO CUPS Driver
- Connecting the Printer to the Mac
- Setting Up Labels to Print from Encompass Front Office
Installing the SATO CUPS Driver
- In your web browser, go to the SATO CUPS Driver page.
- Click the SATO CUPS driver for Mac OS X link to download the installation package.
- Locate the downloaded installation package ZIP file or folder.
Downloads are usually saved in the Downloads folder, but the actual location depends on your browser’s settings.
If the download is a ZIP file, double-click the ZIP file to decompress the folder. The folder is decompressed and saved in the same location as the ZIP file. Locate the decompressed folder and double-click it.
- Double-click satodriver.pkg.
- If an “unidentified developer” security warning appears, do the following:
- Click OK to close the warning window.
- Open System Preferences.
- Click the Security & Privacy icon.
- Click the Open Anyway button.
- If prompted, enter your administrator User Name and Password and click Modify Settings.
- Close the Security & Privacy window.
The Install SATO Driver wizard opens in the background. You may need to close the System Preferences window to see it.
- Click Continue to begin the installation.
- Proceed through the installation wizard without changing any of the default settings.
- When the driver is installed successfully, click Close.
You may now connect the printer to your Mac.
Connecting the Printer to the Mac
- To connect the SATO WS4 or WS408TT label printer to your Apple Mac computer, use a USB 2.0-compatible cable.
- In the Mac, open System Preferences.
- Click Printers & Scanners.
The Mac OS automatically detects and adds the printer.
- If SATO <printer number> does not appear in the Printers list, click the plus sign (+) in the lower-left corner of the list to search for and add the SATO label printer.
If the printer is not automatically displayed in the Printers list and you can’t find it in the Add Printer window, ensure the printer is set to use the USB port:
- Disconnect the USB cable from the back of the printer.
- Press and hold the Feed button.
- While holding the Feed button, press and release the Power button.
The power light flashes green, and the printer beeps three times.
- Release the Feed button after the third beep.
- Press and release the Feed button four times.
- Press the Feed button a fifth time and hold.
The printer beeps one time.
- After the beep, release the Feed button.
The printer beeps three times.
- Press the Power button to turn off the printer.
- Press the Power button again to turn on the printer.
- Reconnect the USB cable to the back of the printer.
- Reopen the System Preferences on the Mac.
The printer should now be detected.
For printer programming and troubleshooting instructions, refer to the SATO WS4 Series Printer Operator Manual.
Setting Up Labels to Print from Encompass Front Office
- In Encompass Front Office, select the labels you want to print.
For more information, see Printing Frame Labels and Printing Accessory Labels.
- Click Print.
The browser's PDF viewer opens and provides a preview of the labels you selected:
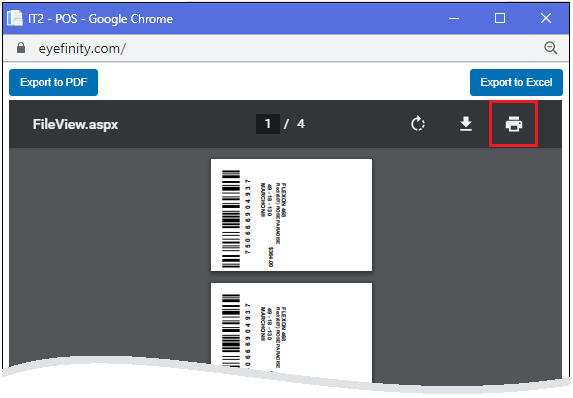
- Display the system Print dialog box as follows:
- Click the Print icon in the upper-right corner of the browser window.
- (Chrome only) Near the bottom of the browser's print options, click the Print using system dialog link.
You may need to scroll down to see the link.
- If option details are hidden, click Show Details.
- Click the Paper Size drop-down list, and select Manage Custom Sizes.
A dialog box for managing custom sizes appears.
- Click the plus sign (+) under the list on the left to add a paper size.
Untitled is added to the list.
- Double-click Untitled, and enter a name for your paper size (for example, SATO Frame Labels).
- Enter the following Paper Size values:
- Width: 2.1 in
- Height: 1.47 in
- Non-Printable Area: User Defined, "0 in" on all sides
- Click OK.
- For Orientation, select the Portrait icon.
- For Scale, enter 92.
- Select the Reverse Page Orientation check box.
- (Optional) Save these settings as a preset to easily restore them if anyone tries to change them:
- From the Presets drop-down list, select Save Current Settings as Preset.
- In the Preset Name field, enter a name for the preset (for example, SATO Frame Label Settings).
- In Preset Available For, select the Only this printer option.
- Click Print.
The system Print dialog box opens.
If Manage Custom Sizes is not selectable, try uninstalling and reinstalling the printer.
Setting Up the SATO WS4 and WS408TT Label Printer on a Windows PC
- Use a USB 2.0-compatible cable to connect the label printer to your Windows PC.
- Turn the printer's power on.
Windows automatically downloads the printer driver ZIP file for your version of Windows.
If the printer driver ZIP file is not automatically downloaded:
- Go to SATO Windows Printer Drivers.
- Scroll down to find the Supported Printers list that contains the WS408/WS412 printer models.
- Click the download arrow at the end of that list to download the printer driver ZIP file:

- Extract the contents of the downloaded ZIP file, and run the PrnInst.exe file.
The SATO Printer Installation wizard opens.
- Click Next to begin the installation.
- Follow the wizard to install the printer driver, selecting the following values:
- Printer: WS408
- Mode: USB
For more information about the wizard, see SATO Printer Driver Installation Manual.
- To verify that the driver is installed, open the Control Panel, and click Devices and Printers.
If the driver is installed, the SATO WS408 printer icon appears in the Devices and Printers window.
- Open the Control Panel.
- Click Devices and Printers.
- Right-click the SATO WS408TT icon, and select Printing preferences.
The Printing Preferences window opens.
- Click the Printer Settings tab.
- Click Page Setup in the left panel, and specify the following settings:
- Stock: Custom
- Copies: 1
- Width: 2.295"
- Height: 1.303"
- Media type: Labels with gaps
- Rotation: 90" - Landscape
- Click Print Options in the left panel, and specify the following settings:
- Speed: 2.0”/s
- Darkness: 3
You can increase or decrease darkness per your preference. 2 or 3 is usually recommended. - Top Offset: 0”
- Left Offset: 0.08”
To position your labels correctly, you may need to adjust the offsets slightly (+/- 0.01) . - Format number: 1
- Click Print Mode in the left panel, and specify the following settings:
- Operation mode: Continuous
- Pitch offset: 0”
- Type: Off
- Click International in the left panel, and specify the following settings:
- Units: inch
- Click OK to save your settings.
- Open the Control Panel again.
- Click Devices and Printers.
- Right-click the SATO WS408TT icon, and select Printer properties.
The Properties window opens.
- Click the Driver Settings tab.
- Click Driver Settings in the left panel, and select the following settings:
- Always use driver settings
- Backward compatible font names
-
Click OK to save your settings.
You are now ready to print labels in Encompass. For more information, see Printing Frame Labels and Printing Accessory Labels.
When you print labels, set the Scale option in your browser's print options to Fit to printable area.
Troubleshooting the SATO WS4 and WS408TT Label Printer
If the printer does not print or prints on the gap instead of within the specified label boundaries, troubleshoot the problem as follows:
- Check the printer's operation manual to make sure your labels are correctly loaded.
- If they are correctly loaded, reset your printer.
- If the printer reset does not fix the problem, recalibrate the printer's media sensor.
- Labels still not printing correctly? See Troubleshooting Label Printer Problems.
- For printer reset and recalibration instructions, see the SATO WS4 Series Printer Operator Manual (PDF).
- For additional driver and printer troubleshooting and support, go to the SATO web site.