Setting Up Eyefinity EncompassPay
To begin using Eyefinity EncompassPay, you need the correct security permissions. Only providers and staff members with the Credit Card Processing security permission can access the Credit Card Processing screen. Only an administrator can set up security permissions. See Setting Up Provider Security Settings and Setting Up Staff Security Settings.
You also need your terminals to capture credit card data.
The terminals are secure card readers that accept payments from EMV-enabled chip credit cards, magnetic strip credit cards, or NFC/contactless cards or mobile wallets such as Apple Pay or Google Pay. You must set up and configure the terminals before you can add them in Encompass to process credit card transactions. For information on setting up and configuring a terminal, refer to the documentation provided with the terminal.
EncompassPay requires one of the following terminal devices:
-
Ingenico iSMP4 (wireless)
-
Ingenico iPP 320 (wired)
-
Ingenico Lane/3000 (wired)
-
Ingenico Link/2500 (wired or wireless)
-
Ingenico Lane/3600 (wired)
-
Ingenico Lane/2500 CL3 (wireless)
If ordering a new terminal, the Lane 3600 and Lane 2500 CL3 are the only two available. The other devices are no longer sold and are being slowly phased out to meet enhanced encryption requirements from the PCI council. See Ingenico EOL Notices for more information.
With your permissions in place and terminals ready, follow the steps below to set up the integration and add your terminal.
Setting up the EncompassPay Integration
You can access the Credit Card Processing screen to set up the integration from Admin or Front Office.
- In Admin: From the Office Config.drop-down, select the office. From the office screen, click Integrations and then click Credit Card Processing.
- In Front Office: Click Store Operations in the upper-right corner of any screen and select Credit Card Processing.
- From the Credit Card Processing screen, click Edit.
A warning message displays, asking you to confirm you understand that changing the integration information may break your integration.
- Click I Understand the Risk.
- Under Credit Card Processing, select EncompassPay.
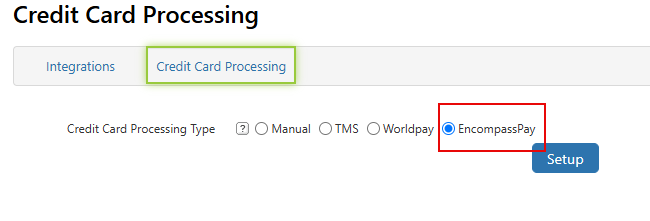
-
Click Setup. The setup panel opens.
-
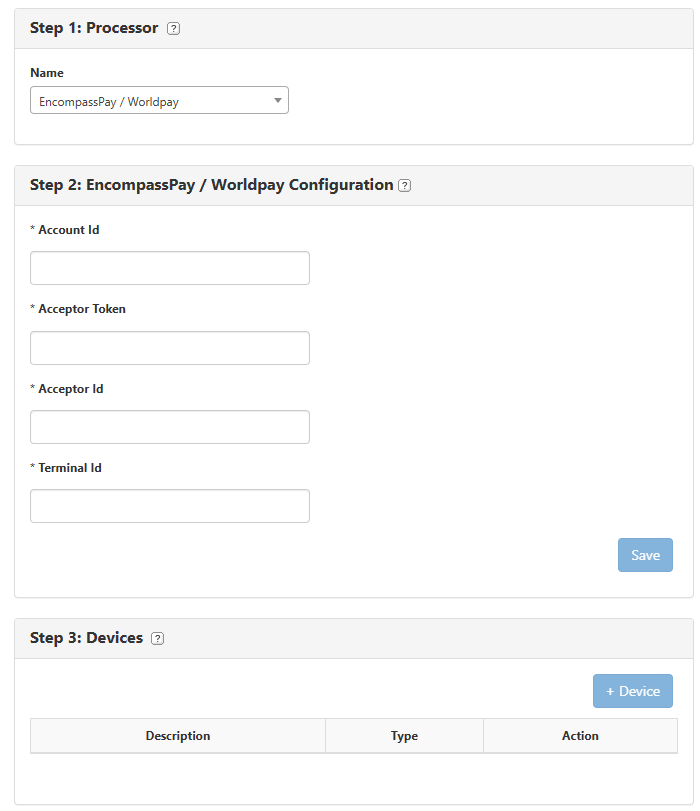
In Step 1, select your Processor. Choose EncompassPay/Worldpay from the Name drop-down.
- In the Step 2: EncompassPay/Worldpay Configuration section, enter your credentials:
-
Account ID
-
Acceptor Token
-
Acceptor ID
-
Terminal ID
-
Click Save. Now, you can add your terminal. The device must be powered on and connected to the internet.
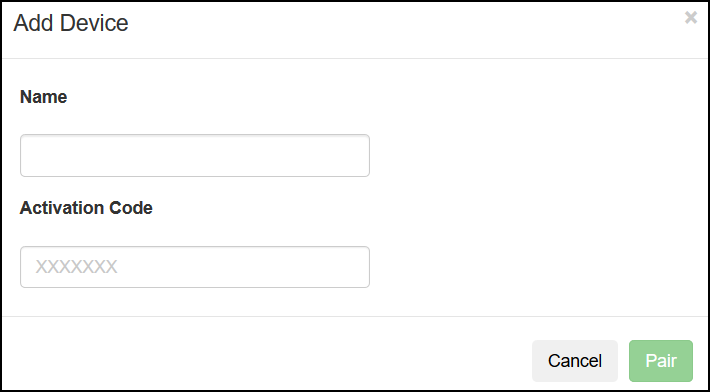
- In the Step 3: Devices section, click + Device.
- In the Add Device window, enter a unique Name for the terminal.
Choose terminal names carefully so your staff can easily identify each device when invoicing credit card payments. Once the device is added and paired, the name appears on the terminal's screen. -
Enter the Activation Code. The activation code appears on the device payment screen.
- Click Pair.
- In the confirmation message, click OK. Encompass adds the device to the list.
- The device restarts after you add it. When the device restarts, the name displays. If the device does not restart, turn the device off and on manually.
- To remove a device, click Remove in the Action column. In the confirmation message, click Yes.
-
If needed, repeat steps 8-11 to add additional devices.
The information on this screen is saved automatically and the integration is now set up and ready to use for credit card processing. For instructions, see Using Eyefinity EncompassPay
You can retrieve your credentials from the EncompassPay Portal.