Using the New VSP Interface

This topic applies only to practices that have been transitioned to the new VSP interface. If you have questions about the status of your practice, contact Eyefinity Customer Care at epmsupport@eyefinity.com.

We’ve continued to make improvements to update our systems and technology to address the changing dynamics of patient care, and better serve you. As part of these efforts, we are introducing a new VSP interface. The new interface looks a lot like the interface you're used to, but the underlying technologies have changed.

This section assumes you're already using the Eyefinity Practice Management VSP interface and describes only the tasks you will need to complete prior to migrating to the new VSP interface and the changes you'll need to be aware of as you pull authorizations and submit orders and claims through the new interface.

This section includes the following topics:

Prior to obtaining an authorization through the new interface:

For patients who currently have VSP insurance, you must access the Insurance screen and click + Check for VSP Insurance to update the patient's plan information with their VSP Consumer ID. Once you have completed this process, do not edit the Insured ID field in the Add/Edit Insurance window. The system automatically updates the Insured ID field and changing the value will cause claims to go on hold.

Migrating to the New VSP Interface

Eyefinity will notify you of the date your practice will be migrated to the New VSP Interface. Before the start of business on your migration date, you must complete the following steps:

  1. Process any on-hold VSP claims, using either Eyefinity Practice Management or Classic eClaim on eyefinity.com.
  2. Delete all outstanding VSP authorizations that have been pulled from Eyefinity Practice Management or Classic eClaim. Authorizations pulled from the existing systems may not process properly in the New VSP Interface or through the Modern eClaim form on eyefinity.com.

  3. Process all on-hold VSP and electronic lab orders in Eyefinity Practice Management, or by using the eLab tab at eyefinity.com.
Once you are migrated to the New VSP Interface, you may visit Classic eClaim to correct orders and claims that you completed prior to your migration. Do not place any new orders through Classic eClaim. Instead, pull authorizations, submit orders, and submit claims through Eyefinity Practice Management and correct any errors in the Modern eClaim and eLab. For information on using the Modern eClaim functionality, see the Using Modern eClaim Guide.

Understanding Error and Warning Messages

While submitting VSP orders and claims through the VSP interface, you may encounter two types of messages: errors and warnings. This section explains the difference between these two types of messages. For a list of all the error and warning messages, along with explanations and examples, see Warnings and Errors in the VSP Interface.

This section includes the following topics:

To watch a video about the error and warning messages, see Understanding Claim Errors and Warnings [video]. For information on how to view the messages, see Viewing Error and Warning Messages.

Errors

Errors are distinguished by the word Error. Errors reflect conditions that must be corrected before the order or claim can be submitted. You must correct the error or the message will display again when you attempt to retransmit the order or claim.

Warnings

Warnings are distinguished by the word Warning in the message. For warnings, you have the option to edit the order or claim, or acknowledge the issue and continue with the order or claim as it is. For instructions on how to acknowledge a warning and submit the claim without making any changes to the order or claim, see Acknowledging Warnings in Claims Management.

Viewing Error and Warning Messages

Error and warning messages are displayed in the Order Status window in Material Orders and the Claim Note window in Claim Detail.

Viewing Error and Warning Messages in Material Orders

In Material Orders, VSP orders on hold due to errors or warnings are indicated with the words "Lab Order Failed" in red, displayed in the Integration Status column in the Invoiced Orders grid.

  1. In Material Orders, click the Invoiced tab, if it is not already displayed.

    The Invoiced Orders grid lists the patient’s invoiced orders. The Integration Status column displays a message for each order that was submitted electronically.

    • Lab Order Submitted means the order was successfully transmitted to the lab and the claim was successfully submitted to VSP.
    • Lab Order Failed means there is a problem with the order or the integration and the order was not transmitted to the lab and the claim was also not submitted to VSP.

  2. Locate an order in the list and click the green arrow next to the order number.
  3. Click the VSP Integration Status tab. The tab shows the Job ID, Updated On date, Status, Ship Date, Source, and Lab Station information. If the order failed, the panel shows the failure error or warning message instead of the Status. See Errors and Warnings for more information on the messages.

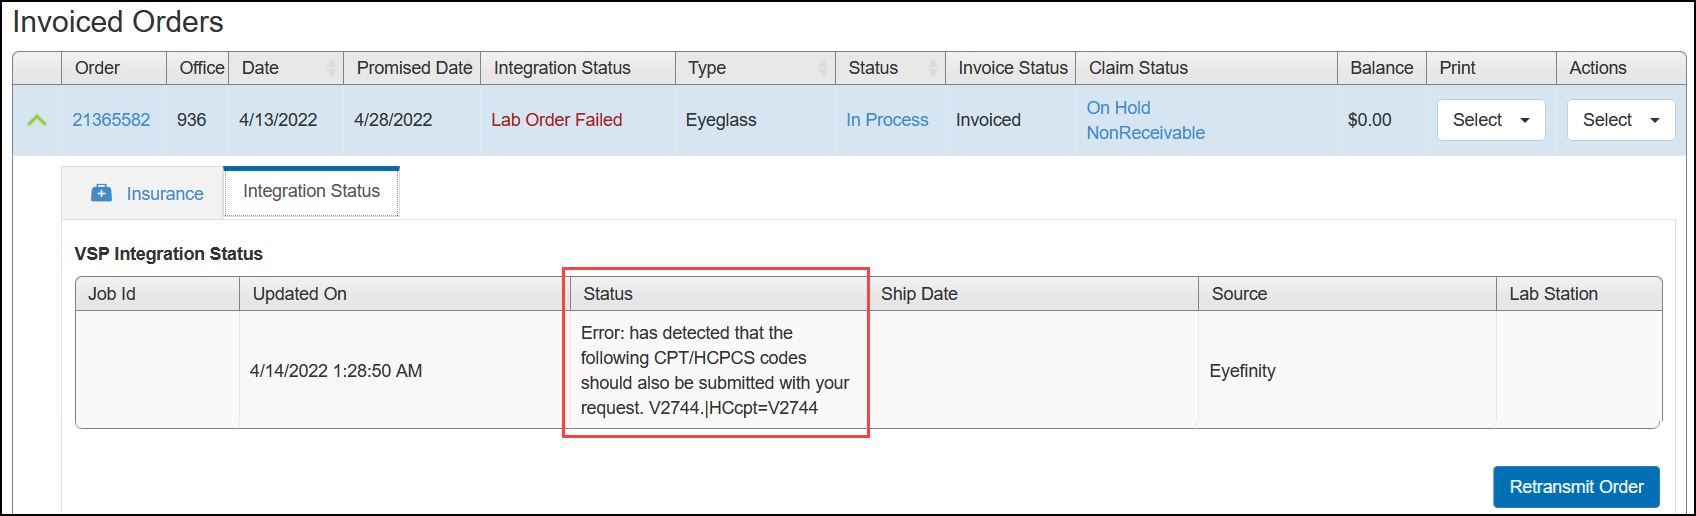
  4. To try sending the order again, click Retransmit Order.
    If the order has an error preventing it from being sent, you should fix the error before retransmitting.

Viewing Error and Warning Messages in Claims Management

You can view errors and warnings affecting a claim in the Claim Detail screen.

  1. In Material Orders, locate the invoiced order associated with the claim that contains the error or warning and copy the order number.
  2. Go to Claim Management, and use the order number to search for the claim.
  3. Click the Claim # link to open the Claim Detail screen.

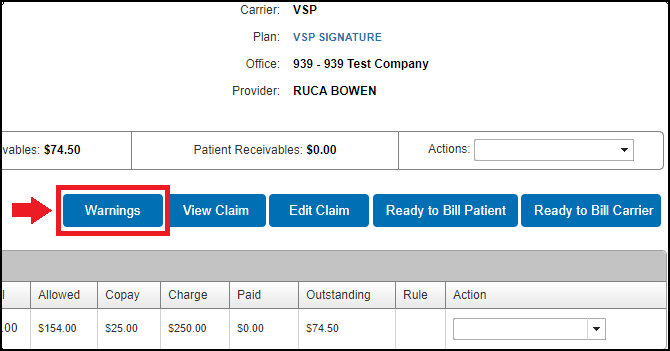
    If the claim has warnings, the new Warnings button appears in the Claim Detail screen. For more information on the Warnings button, see Acknowledging Warnings in Claims Management.

  4. In the Claim History list, locate the Placed on Hold line item and click the icon in the Notes column.

    The Claim Note window opens, and displays any errors and/or warnings that are causing the claim to be on hold. See Errors and Warnings for more information on the messages.

Acknowledging Warnings in Claims Management

Ideally, you should fix all problems with a claim before submitting it. However, if a claim is on hold due to warnings, you can simply acknowledge them and take the claim off hold so it can be submitted.

  1. Open the Claim Detail window for the claim and check to see if it has warnings:
    • If the claim is on hold because of a warning, the new Warnings button appears.
    • In the Claim Note window, warnings are indicated by the word Warning in the Note field.
  2. Click the Warnings button.

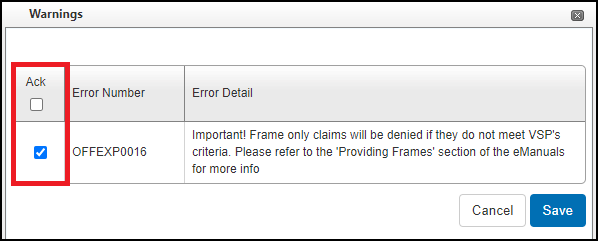
    The Warnings window opens.

  3. In the Ack column, select the check box(es) of the warning(s) that you want to acknowledge but not resolve, and then click Save.

  4. If you acknowledge warnings, the Warnings button in the Claim Detail window remains visible. If you resolve all the warnings, the Warnings button disappears.

  5. Click Ready to Bill Carrier.

    The next time the billing integration runs, the claim will be billed.

Other Changes Related to the New VSP Interface

This section includes the following topics:

Update Patient Insurance Information with VSP Consumer ID Prior to Authorization

  • For patients who currently have VSP insurance, you must access the Insurance screen and click + Check for VSP Insurance to update the patient's plan information with their VSP Consumer ID prior to obtaining an authorization through the new interface.
  • Once you have completed this process, do not edit the Insured ID field in the Add/Edit Insurance window. The system automatically updates the Insured ID field and changing the value will cause claims to go on hold.
  1. On the left side of the Demographics screen, click Insurance.
  2. Click + Check for VSP Insurance.

    The system searches for the patient's VSP record and updates their plan information in Eyefinity Practice Management. Their Consumer ID is added, along with any other new information obtained from VSP.

    You can now go to the Insurance: Eligibliity/Authorization screen and pull a VSP authorization for the patient.

Insurance: Eligibility/Authorization Screen Changes

The Insurance: Eligibility/Authorization screen has been changed in the following ways:

  • The plan information grids have been updated to better organize the information. Eligibility, Benefits, Authorization and Actions columns have been added, with relevant sub-columns underneath each.
  • The Benefits column for each plan displays only the eligibilities available for the plan's benefit type.
  • The VSP Patient Record Report no longer includes the Patient Savings Statement or VSP Lens Options Chart.

Support for VSP Vision Therapy Plans

  • Vision Therapy Evaluation and Vision Therapy Sessions eligibilities are now displayed in the Insurance: Eligibility/Authorization screen for vision therapy plans.
  • When you select insurance for an order in the Current Pricing screen, the Select Insurance window now indicates vision therapy exam and session eligibilities for VSP vision therapy plans, and allows you to calculate benefits for those plans.

Pre-Diabetes Added to Patient Conditions

A new Pre-Diabetes check box has been added to the Patient Condition(s) section of the New Exam screen, enabling you to indicate when a patient has pre-diabetes.

Social Security Number Option Removed from Add/Edit Insurance for VSP

The Insured ID field in the Add Insurance and Edit Insurance windows has been updated to remove the Use Patient SSN check box when the insurance is VSP.

VSP Doctor Service Report Changes

The layout of the VSP Doctor Service Report has been reformatted to increase legibility. The following changes have also been made to the content of the report:

  • The Claim Format will display CLEARING_HOUSE_WEB
  • The Order Status now indicates if the claim had been submitted.

VSP Well Vision Saving Statement

You can now view and print the VSP Well Vision Saving Statement for invoiced VSP orders, when applicable.

  1. On the Invoiced Orders tab, locate the order for which you want to view the VSP Well Vision Savings Statement.
  2. In the Print column, select Well Vision Saving Report from the drop-down menu.

    The statement opens.

VSP Coordination of Benefits (COB) Changes

VSP Secondary COB Claim Processing Changes

Eyefinity Practice Management 10.34 added these changes to the new VSP interface.

Coordination of Benefits claims where the primary insurance is medical and the secondary insurance is VSP are no longer automatically submitted to VSP upon invoicing, and the primary claim must be paid prior to submitting the VSP secondary claim. The VSP secondary claim status is set to On Hold and you must manually edit the claim before it can be submitted.

  1. Create and invoice the order, as described in Applying VSP Insurance as Secondary Insurance on Exam Orders.

    The VSP secondary claim is created and the status is set to On Hold.

  2. Go to Claim Management and search for the claim.

    The Claims Processing screen displays a list of your search results.

  3. Locate the VSP secondary claim in the list and select Edit Claim from the Action drop-down list.

    The claim opens.

  4. Under Patient Health Condition, locate Box 19. For VSP Coordination of Benefits claims, the field displays "Secondary COB Claim".

  5. Type the following in the Box 19 field, entering the amount(s) paid by the patient in place of $XX.XX.

    secondary COB claim patient resp exam $XX.XX retinal screening $XX.XX

  6. Under Services Rendered, enter information from the primary insurance claim in the following fields:

    • Other Ins Allowed - Enter the allowed amount for the primary insurance

    • Other Ins Paid - Enter the amount the primary insurance paid on the claim

    • Other Ins Patient Resp - Enter the Patient Responsibility amount from the primary insurance claim

    • Denied or Paid Reason - Enter the reason provided by the primary insurance carrier for denying or paying the claim

  7. Click Save.

    The change is saved and the Process Claims window returns to your search results.

  8. Set the claim status to Ready to Bill. See Setting the Claim Status to Ready to Bill for instructions.

VSP Secondary COB Electronic Remittance Advice (ERA) Processing Changes

Eyefinity Practice Management 10.34 added these changes to the new VSP interface.

A new Paid field displays at the bottom of the ERA Claim Adjustments window for secondary COB claims being sent to VSP. The new field corresponds to Box 19 on the eyefinity.com and CMS 1500 claim forms. Its value should equal the total amount of the Other Insurance Paid fields in the Claim Adjustments.

You must enter the value; the field is not automatically populated.
  1. Open the Remittance Details window for a remittance. For more information, go to Opening and Navigating the Remittance Details Window

  2. In the Claim Number column, click the link for a claim to open the Claim Adjustments window.

  3. In the Paid field, enter an amount equal to the total amount of the Other Insurance Paid fields.

  4. Click Save or Save and Continue.

VSP Tertiary COB Order and Claim Processing Changes

Eyefinity Practice Management 10.37 added these changes to the new VSP interface.

When VSP is the secondary insurance in a Coordination of Benefits (COB) order, a Select Authorization drop-down list now appears on the VSP Calculation window to offer “tertiary” (third-level) insurance for the order.

The Select Authorization list contains active VSP authorizations that can be added to the order (excluding the current authorization applied to the order as the secondary insurance). Plan name, authorization number, expiration date, and item eligibilities are included in the list:

After you select a plan, the plan is listed as the Tertiary Insurance in the window, and its patient record report icon is displayed:

To add a tertiary VSP authorization for COB:

  1. Enter the eligibility/authorization for the patient's primary medical insurance.

  2. Obtain an authorization for only an exam under the VSP Well-Vision plan.

  3. Obtain an authorization for only materials under the VSP Well-Vision plan.


    It is important to split the VSP Well-Vision plan authorization into an exam-only authorization and a materials-only authorization because the secondary VSP claim must go on hold and cannot be processed until payment is received from the primary carrier. If you bundle the materials with the exam, the material order will also be stuck on hold and delayed.

  4. Obtain an authorization for only an exam under the VSP medical plan (PEC or DEP Plus).

  5. Enter an order for the medical exam, refraction, and any procedures.

  6. Apply the primary medical insurance.

  7. Apply the secondary VSP authorization.

  8. In the Select Authorization drop-down list, the VSP medical authorization (PEC or DEP Plus) appears, and the user can select the tertiary authorization to add to the order. It does not affect pricing because the order was priced when the secondary insurance was applied.

  9. In the VSP Calculation window, click Override.

  10. In the confirmation message, click OK to override the VSP calculation.

  11. Manually calculate the coverage between the secondary and tertiary VSP plans.

  12. Save and invoice the order. The invoice will display the plan name for the tertiary insurance.

To process the Tertiary COB Claim:

  1. Claim Management submits the primary claim to the primary medical insurance, and the secondary VSP COB claim stays on hold until the Explanation of Payment (EOP) is received from the primary carrier.

  2. Once the EOP is received, edit the secondary VSP claim and populate the COB values.

  3. With this information filled out, set the claim status to Ready to Bill and submit in the next VSP claim submission integration cycle.

Additional Resources

The following Eyefinity Practice Management training videos have been updated to reflect the new VSP interface: