Using the Quick List in ExamWRITER
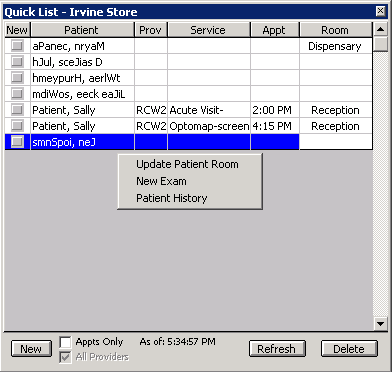
You can use the Quick List to view and access patient demographic and exam information. Patients are added to the Quick List each time you open their exams, when their appointments are scheduled on the current day, or when you modify their information in the Patient Information Center or Patient Demographics window on the current day. The Quick List can be very beneficial to network users because every time a patient’s record is accessed at one computer, it is added to the Quick List and can be accessed at other computers in the network.
This section tells you how
Open the Quick List window using one of the following methods:
- Click the QuickList icon on the ExamWRITER chart window.
- Click Tools on the ExamWRITER main window toolbar and select Show Patient Quick List.
The Quick List window opens.
The Quick List that is visible on the ExamWRITER chart window is for viewing purposes only; you cannot modify patient demographic information or create new exams from the Quick List in the ExamWRITER chart window.
- If you want the Quick List to display automatically when you open ExamWRITER, select the Yes radio button next to the Show Patient Quick List default system preference. For more information on modifying default ExamWRITER preferences, go to To set up default preferences.
- To sort the list by patient, phone number, or appointment, click on the column headings.
- When a patient’s exam has been closed or finalized, the Room column automatically displays the text “CLOSED.”
- The Prov column displays the provider’s initials and provider ID (which is also displayed in the ID # box next to the provider’s name on the Provider/Staff tab on the Business Names window).
- Although the Quick List automatically refreshes, you can click Refresh to refresh the Quick List manually.
- To display patients with appointments only, select the Appts Only check box and click Refresh.
- To display patients who are assigned to all providers, select the All Providers check box. To display patients who are assigned only to the provider logged into OfficeMate, deselect the All Providers check box. The All Providers check box is only active when a provider is logged into OfficeMate. Staff members logged into OfficeMate will see all providers displayed in the Quick List.
- Click Tools on the ExamWRITER main window toolbar and select Show Patient Quick List.
The Quick List window opens.
- Click New.
The Patient Demographic window opens.
- Use the instructions in To add new patient demographic information to add a new patient record.
The patient appears in the Quick List after you click OK on the Patient Demographic window.
Use the Quick List in one of the following ways:
- Click on a patient’s name in the Quick List window and drag and drop the patient on the F2 - Find button, Last Name text box, or First text box on the ExamWRITER Control Center to populate the ExamWRITER Control Center with the patient’s information.
- Drag and drop the patient on the Patient Hx icon on the ExamWRITER Control Center to open the Patient Information Center.
- Right-click on a patient’s name and select Patient History to open the Patient Information Center and modify the patient’s information.
- Right-click on a patient’s name and select New Exam to begin creating a new exam record for the patient.
- Right-click on a patient’s name and select Room to open the Patient Room window, select the room in the office where the patient is currently located, and click Save to denote the patient’s location on the Quick List.To maintain a list of office room locations, open the Customization window in OfficeMate (or go to To add and maintain list box selections (F12) if you are a standalone ExamWRITER user), click the List Box Selections tab, and modify the Room Entry Field Name.

- Click Tools on the ExamWRITER main window toolbar and select Show Patient Quick List.
The Quick List window opens.
- Select the patient and click Delete.
The Remove Patient window opens.
- Click Yes to delete the patient from the Quick List.
For more information on using the Quick List, watch this video.