Modifying Payments by Using the Receipt History Window
OfficeMate assigns each payment a receipt number. The payments from a patient or insurance company can be viewed in the Receipt History window.
This topic tells you how to modify payments using the Receipt History window. For more information, see To pay open items with credit amounts.
This topic describes how
- Open a patient’s receipts and adjustments. For more information, see Opening a Patient’s Receipts and Adjustments.
- Click History.
The Receipt History window opens.
- Right-click on an item for which you want to refund an unapplied patient credit and select Refund Patient Credit.

The Refund Patient Credit window opens.
- Complete the fields in the Patient Refund section.
- Click Refund and follow the instructions below to record the refund and print a receipt.
- Click Printer Setup to set up the printer or select a printer other than the default printer. For more information on setting up the printer, see Setting Up the Printer.
- Click Close to close the Patient Refund Credit Receipt window.
To view a list of patient credit refunds, print the Patient Refund of Unapplied Amounts report. For more information, see Patient Refund of Unapplied Payments.
-
In the Receipt History window, right-click the original credit refund.
-
Select the Print Refund Receipt item in the pop-up menu:

The transaction description must be Patient Credit Refund. This feature does not work with returns or reversals.
For more information, watch this video.
- Open a patient’s receipts and adjustments. For more information, see Opening a Patient’s Receipts and Adjustments.
- Click History.
The Receipt History window opens.
- Select the payment receipt you want to modify, click Select, and select Load Summary View or Load Detail View.
The receipt information and fee slip charges paid by the receipt appear in the Receipts & Adjustments window.
- Modify the amount paid, method of payment, the way the payment was applied; or, adjust the charges on the receipt. For more information, see To apply payments to patient receivables and Adjusting Charges.
For more information, watch these videos.
The posting date for a payment correction or reversal must be the same as or later than the posting date of the deposit.
- Open a patient’s receipts and adjustments. See Opening a Patient’s Receipts and Adjustments.
- Click History.
The Receipt History window opens.
- In the Receipt History window, click the + next to the appropriate receipt to display the correction or reversal you want to change.
- Left-click the correction or reversal line item to highlight it.
- Right-click the highlighted item, and then click the Change Reversal/Correction Posting Date pop-up window.
The Posting Date window opens.
-
Click the down arrow next to the Posting Date drop-down list.
A calendar tool appears.
-
Use the tool to reset the correction or reversal item’s posting date.
-
Click OK and OK.
When you make a payment correction, the system automatically generates a payment reversal before completing the correction. Therefore, if you change the date of the payment correction, you should also change the date of the system-generated payment reversal to maintain accuracy in your reporting.
This feature archives old deposits so that unapplied or over-applied credits that are calculating incorrectly due to old data will no longer affect receipts in the
Receipt History window.
When a deposit is archived,
-
The fee slip and deposit adjustments are not deleted; however, they are no longer included in calculations for the Unapplied amount shown in yellow.
-
The unapplied amount of insurance deposits changes to reflect the removal of the deposit from the Unapplied amount shown in yellow.
-
On the Apply to Insurance tab in the Receipts & Adjustments window, select the insurance carrier that has the unapplied or over-applied credit.
Make sure you have a current database backup before using this feature. -
Click History.
-
In the Deposit Date dialog box, specify a date range that includes one or more of the deposits you want to archive.
The Receipt History window opens. It lists all the deposits in the receiptthat fall within the specified date range.
-
Choose one of the following actions:
-
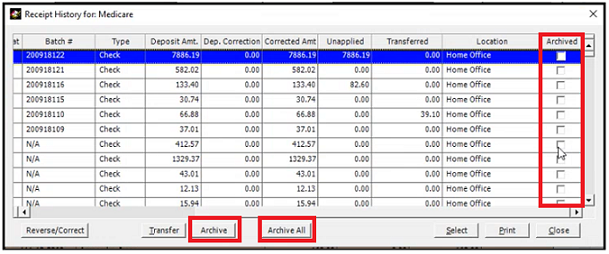
To archive a single deposit, select the deposit, and click Archive. A check mark appears in the Archived column of the selected deposit. This column shows the status of the deposit.
-
To archive all the deposits in the Receipt History window at once, click Archive All, and then click OK in the Archive All Deposits message. This archives all deposits in the date range specified in the Deposit Date dialog box in step 3.
A check mark appears in the Archived column of all the selected deposits.
-
To remove a deposit from the archive, select the deposit, and click Restore.

-
