Adjusting Charges
This topic tells you how to adjust charges. To adjust previous payments and charges, see Modifying Payments by Using the Receipt History Window.
This topic describes how
If you have Administration access, you can complete the following procedure.
You can add and modify adjustment types from the Customization window. For more information on adding and modifying adjustment types from the Customization window, see To add list box selections and To modify list box selections.
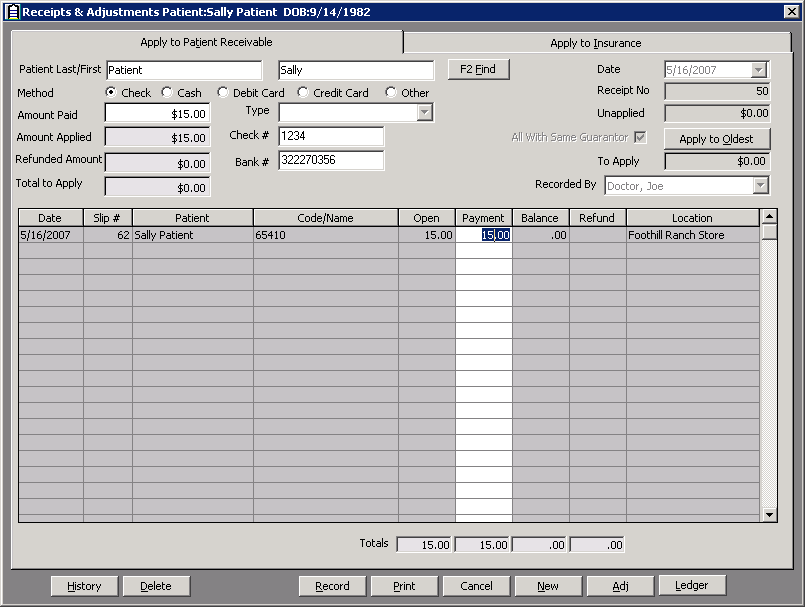
- Open the Receipts & Adjustments window. For more information on opening the Receipts & Adjustments window, see Opening a Patient’s Receipts and Adjustments.
- Enter information into the Apply to Patient Receivable or Apply to Insurance tabs.
- Click Adj.
The Fee Slip Item Adjustment window opens.
- Press F12.
The Maintain Adjustment Types window opens.
- Add or edit text in the Description text boxes.
If you enter a new adjustment type with a name that is already recorded, a message displays to prompt you to change the name.
- Highlight an adjustment type and click Default to select the adjustment type as the default type; or, click UnDefault to deselect the adjustment type as the default type.
- Click OK.
- Open a patient’s receipts and adjustments and select one of the following payment method radio buttons:
- Check
- Cash
- Debit Card
- Credit Card
- Other
- Type the payment amount in the Amount Paid text box.
- Apply the payment amount using one of the following methods:
- If you are applying a check payment, type the check number for your deposit ticket in the Check # text box.
- If you are applying a cash payment, type the cash amount tendered in the Tendered text box. The change amount (if applicable) appears in the Change text box.
- If you are applying debit card payment, select the card type from the Type drop-down menu.
- If you are applying a credit card payment, select the card type from the Type drop-down menu.
- If you are applying another type of payment, select the payment type from the Type drop-down menu.
- Select the person recording the transaction from the Recorded By drop-down menu, if this field is not locked.
- Click in the Payment text box for the item that you want to adjust and click Adj.

The Fee Slip Item Adjustment window opens.
- Select an adjustment type from the Adj. Type drop-down menu. For more information on adding and modifying adjustment types, see To add and modify adjustment types.
- Select the Increase or Decrease Balance Effect radio button.To correct a negative balance, select the Decrease radio button.
- Type the amount that you want to increase or decrease the item in the Amount text box.
- Type a reason for the adjustment in the Reason text box, if necessary.
- Select the person recording the transaction from the Recorded By drop-down menu, if this field is not locked.
- If applicable, select the Do not print on patient statement check box if you do not want the adjustment to print on the Statements report and then select a line item already on the Patient Ledger to exactly offset the amount of the adjustment that you do not want to print on the Statements report. The offset Patient Ledger line item will not print on the Statements report either.
If you select the Do not print on patient statement check box without also selecting items that exactly offset the original adjustment, then the balance on the Statements report will not be correct.
You must select the Yes radio button in the System Preferences window’s Statements tab to select the Do not print on patient statement check box in the Fee Slip Item Adjustment window. For more information on selecting Statements system preferences, see To set up statement preferences.
- Click Record.After you record an adjustment, the adjustment is assigned a receipt number. To view adjustments, click Ledger.
- Click Record on the Receipts & Adjustments window.
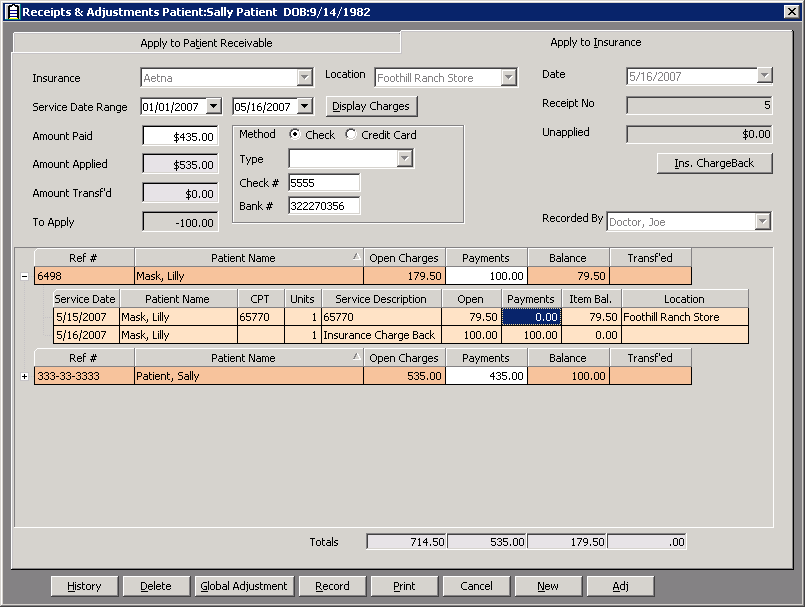
- Open the Receipts & Adjustments window and click the Apply to Insurance tab.
- Select an insurance company from the Insurance drop-down menu.
- Type or select dates in the Date Range boxes if you want to view patients that are reflected on date-specific EOBs.
- Click Display Charges and select Display Detail View.
- Select one of the following payment Method radio buttons:
- Check
- Credit Card
- Type the payment amount in the Amount Paid text box.
- Apply the payment amount using one of the following methods:
- If you are applying a check payment, type the check number for your deposit ticket in the Check # text box.
- If you are applying a credit card payment, select the card type from the Type drop-down menu.
- Select the person recording the transaction from the Recorded By drop-down menu, if this field is not locked.
- Click in the Payment text box for the item that you want to adjust and click Adj.

The Fee Slip Item Adjustment window opens.
- Select an adjustment type from the Adj. Type drop-down menu. For more information on adding and modifying adjustment types, see To add and modify adjustment types.
- Select the Increase or Decrease Balance Effect radio button.
- Type the amount that you want to increase or decrease the item in the Amount text box.
- Type a reason for the adjustment in the Reason text box, if necessary.
- Select the person recording the transaction from the Recorded By drop-down menu, if this field is not locked.
- If applicable, select the Do not print on patient statement check box if you do not want the adjustment to print on the Statements report and then select a line item already on the Patient Ledger to exactly offset the amount of the adjustment that you do not want to print on the Statements report. The offset Patient Ledger line item will not print on the Statements report either.
If you select the Do not print on patient statement check box without also selecting items that exactly offset the original adjustment, then the balance on the Statements report will not be correct.
You must select the Yes radio button in the System Preferences window’s Statements tab to select the Do not print on patient statement check box in the Fee Slip Item Adjustment window. For more information on selecting Statements system preferences, see To set up statement preferences.
- Click Record.
- Click Record on the Receipts & Adjustments window.
Follow the instructions below to adjust an item that has already been paid:
- Open a patient’s receipts and adjustments and click History.
The Receipt History window opens.
- Click on the payment receipt that you want to adjust, click Select, and select Load Summary View or Load Detail View.
- Select the person recording the transaction from the Recorded By drop-down menu, if this field is not locked. For more information on locking and unlocking this menu, see Setting Up Security.
- Click in the Payment text box for the item that you want to adjust and click Adj.
The Fee Slip Item Adjustment window opens.
- Select an adjustment type from the Adj. Type drop-down menu. For more information on adding, deleting, or modifying adjustment types, see To add and modify adjustment types.
- Select the Increase or Decrease Balance Effect radio button.
- Type the amount that you want to increase or decrease the item in the Amount text box.
- Type a reason for the adjustment in the Reason text box, if necessary.
- Select the person recording the transaction from the Recorded By drop-down menu, if this field is not locked. For more information on locking and unlocking this menu, see Setting Up Security.
- If applicable, select the Do not print on patient statement check box if you do not want the adjustment to print on the Statements report and then select a line item already on the Patient Ledger to exactly offset the amount of the adjustment that you do not want to print on the Statements report. The offset Patient Ledger line item will not print on the Statements report either.
If you select the Do not print on patient statement check box without also selecting items that exactly offset the original adjustment, then the balance on the Statements report will not be correct.
You must select the Yes radio button in the System Preferences window’s Statements tab to select the Do not print on patient statement check box in the Fee Slip Item Adjustment window. For more information on selecting Statements system preferences, see To set up statement preferences.
- Click Record.
- Click Record on the Receipts & Adjustments window.
- Open the Receipts & Adjustments window and click the Apply to Insurance tab.
- Select an insurance company from the Insurance drop-down menu.
- Type or select dates in the Date Range boxes if you want to view patients that are reflected on date-specific EOBs.
- Click Display Charges and select Display Detail View.
- Select one of the following payment Method radio buttons:
- Check
- Credit Card
- Type the payment amount in the Amount Paid text box.
- Apply the payment amount using one of the following methods:
- If you are applying a check payment, type the check number for your deposit ticket in the Check # text box.
- If you are applying a credit card payment, select the card type from the Type drop-down menu.
- Select the person recording the transaction from the Recorded By drop-down menu, if this field is not locked.
- Click in the Payment text box for the item that you want to adjust and click Adj.

The Fee Slip Item Adjustment window opens.
- Select Insurance Denial from the Adj. Type drop-down menu.
- Type an amount in the Amount text box, or leave the text box blank.
- Type a reason for the denial in the Reason text box, if necessary.If the Print reason for Ins denial statements selection criteria check box is selected, the reason will print on the patient’s statement. For more information on printing statements, see Statements.
- Select the person recording the transaction from the Recorded By drop-down menu, if this field is not locked.
- If applicable, select the Do not print on patient statement check box if you do not want the adjustment to print on the Statements report and then select a line item already on the Patient Ledger to exactly offset the amount of the adjustment that you do not want to print on the Statements report. The offset Patient Ledger line item will not print on the Statements report either.
If you select the Do not print on patient statement check box without also selecting items that exactly offset the original adjustment, then the balance on the Statements report will not be correct.
You must select the Yes radio button in the System Preferences window’s Statements tab to select the Do not print on patient statement check box in the Fee Slip Item Adjustment window. For more information on selecting Statements system preferences, see To set up statement preferences.
- Click Record.
- Click Record on the Receipts & Adjustments window.After you record an insurance denial, a line item note is displayed on the Patient/Insurance tab in the Patient Ledger window. This note states why the claim was rejected by the insurance carrier.