Uploading Contact Lenses
You can upload contact lenses to AcuityLogic from the XML files provided to you by your contact lens supplier. Before you can upload contact lenses, Eyefinity must set up two AcuityLogic X-Link integrations and a target directory on an FTP server or network files location. After Eyefinity completes the setup, the XML files you place in the target directory are processed at a scheduled time as part of the first integration. You can then search for the contact lenses from the processed files in AcuityLogic Admin and add them to the queue for upload at a scheduled time as part of the second integration.
- Contact your AcuityLogic account manager if you are interested in using the contact lens upload functionality.
- Eyefinity will set up the following AcuityLogic X-Link integrations for the contact lens upload functionality:
- ImportabbContactLensCatalog — The integration processes the XML files added to the target directory.
- LoadAbbContactLensCataglog — The integration uploads contact lenses added to the queue.
The integrations are configured to run daily at a scheduled time. If necessary, you can modify the integration schedule in AcuityLogic X-Link. See Maintaining Integrations in AcuityLogic X-Link.
This section explains how to upload contact lenses in AcuityLogic Admin.
Topics include the following:
- In AcuityLogic Admin, click Product, select Contact Lenses, and then select Load Contact Lenses.
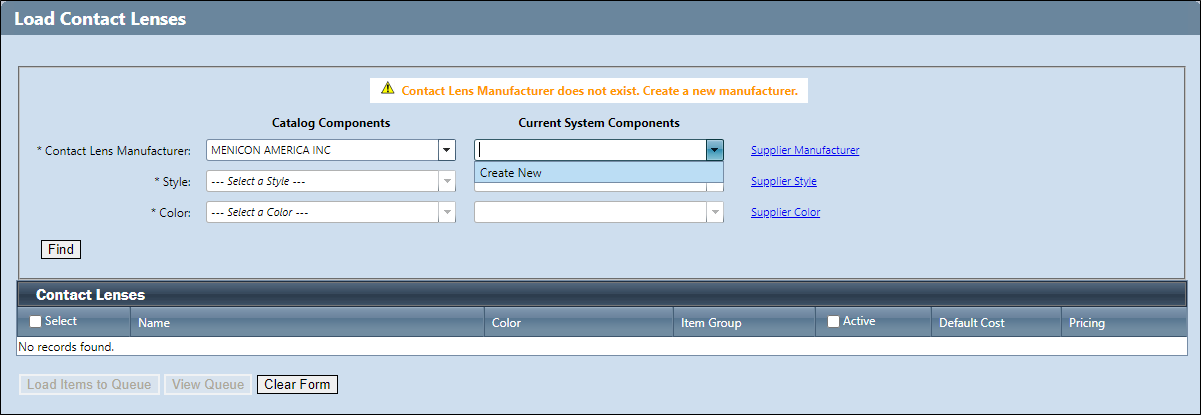
The Load Contact Lenses window opens.
- From the Contact Lens Manufacturer drop-down list under Catalog Components, select the manufacturer of the contact lenses.
- Only the manufacturers included in the processed XML files are available in the drop-down list.
- If the manufacturer you select matches an existing manufacturer in AcuityLogic, the manufacturer is automatically populated in the drop-down list.
- If a message appears indicating the manufacturer does not exist, select Create New in the Contact Lens Manufacturer drop-down list under Current System Components and click the green check mark icon.

- (Optional) To view or update the supplier mapped to the manufacturer, click the Supplier Manufacturer link. See Adding a Contact Lens Manufacturer.
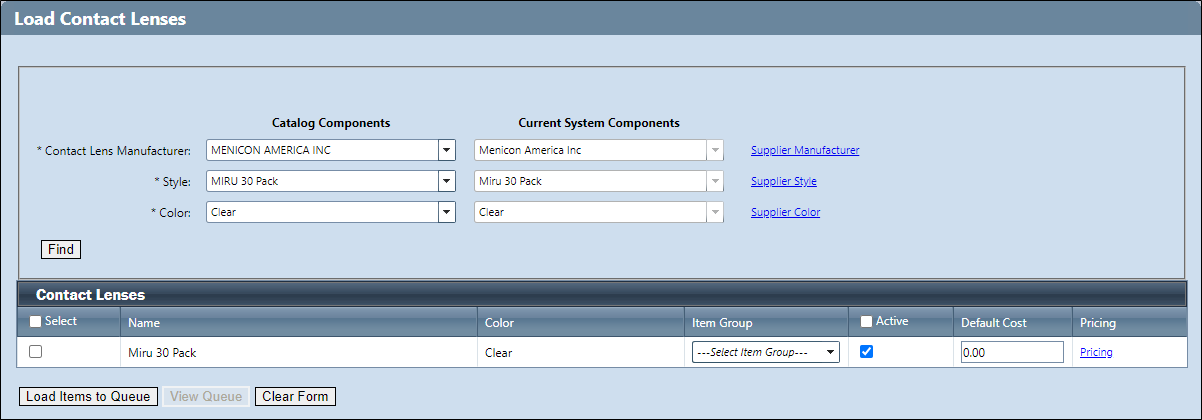
- From the Style drop-down list under Catalog Components, select the contact lens style.
- Only the styles for the selected manufacturer included in the processed XML files are available in the drop-down list.
- If the style you select matches an existing style in AcuityLogic, the style is automatically populated in the drop-down list.
- If a message appears indicating the style does not exist, perform one of the following actions:
- To create a new style, select Create New in the Style drop-down list under Current System Components and click the green check mark icon.
- To map the style to an existing style, select the existing style in the Style drop-down list under Current System Components.
- (Optional) To view or update the style details or the supplier mapped to the style, click the Supplier Style link. See Creating a Contact Lens Style.
- From the Color drop-down list under Catalog Components, select the contact lens color.
- Only the color for the selected style included in the processed XML files are available in the drop-down list.
- If the color you select matches an existing color in AcuityLogic, the color is automatically populated in the drop-down list.
- If a message appears indicating the color does not exist, perform one of the following actions:
- To create a new color, select Create New in the Color drop-down list under Current System Components and click the green check mark icon.
- To map the color to an existing color, select the existing color in the Color drop-down list under Current System Components.
- (Optional) To view or update the supplier mapped to the color, click the Supplier Color link. See Adding a Contact Lens Color.
- Click Find to add the contact lens to the grid.To remove contact lenses from the grid, click Clear Form.

- In the grid, select the check box in the Select column for the contact lens you want to add to the upload queue.
- (Optional) From the drop-down list in the Item Group column, select the item group to which the contact lens should belong.
- (Optional) Deselect the check box in the Active column to upload the contact lens as inactive. By default, contact lenses are uploaded as Active and allows them to be added to orders in AcuityLogic POS.
- (Optional) In the field in the Default Cost column, enter the cost of the contact lens.
- (Optional) To price the contact lens, click the Pricing link and enter a price for each price list. See Adding and Changing Pricing for Contact Lenses.
- Click Load Items to Queue and click OK in the confirmation message windows.
The contact lenses added to the queue are uploaded to AcuityLogic at a scheduled time as part of an AcuityLogic X-Link integration. If a contact lens added to the upload queue includes less than 1,000 items, you have the option to upload them from AcuityLogic Admin immediately.
- In AcuityLogic Admin, click Product, select Contact Lenses, and then select Load Contact Lenses.
The Load Contact Lenses window opens.
- Click View Queue.
The View Queue button is available only if contact lenses have been added to the queue.
The Contact Lens Queue window opens and shows the contact lenses in the upload queue.
- To remove a contact lens from the upload queue, click the trash can icon and click OK in the confirmation message window.
- To upload a contact lens immediately, select the check box in the Load Now column, click Save and Exit, and click OK in the confirmation message window.
