Encompass 10.52 Release Notes
Release Date: November 4, 2025
Eyefinity announces the newest version of Eyefinity Encompass. This updated version improves upon your system's robust attributes and offers new features and expanded practice management functionality.
Watch the What's New video below to see highlighted features in action.
Release Highlights
With this release, we've added some innovative features and two add-on products to make it easier to communicate with your patients, accept payments, and track your practice's financial performance.
-
Gain Insight into Your Revenue with the New Net Collections Dashboard
-
Offer Your Patients Payment Flexibility - Accept ATM/Debit Cards
Improve Patient Engagement with Two New Add-On Products
Eyefinity is proud to introduce EncompassMessage and EncompassPay, two add-on products that can make your practice more flexible and help you meet your patients' needs.
-
EncompassMessage aims to make it easier for you to keep patients informed and on schedule and help your staff to stay organized while keeping your schedule full. EncompassMessage bridges the communication gap with secure and reliable two-way messaging via text, voice, and email. For more information, see Introducing EncompassMessage
-
EncompassPay simplifies patient payments. With EncompassPay, you can integrate your credit card devices and collect payments and issue refunds from within Encompass. It's a seamless way to simplify your workflow and deliver the modern, convenient experience your patients expect. For more information, see Introducing EncompassPay.
Add-on products require additional fees and setup by Eyefinity. For more information on what's offered, pricing and how to get started see:
EncompassMessage
EncompassPay
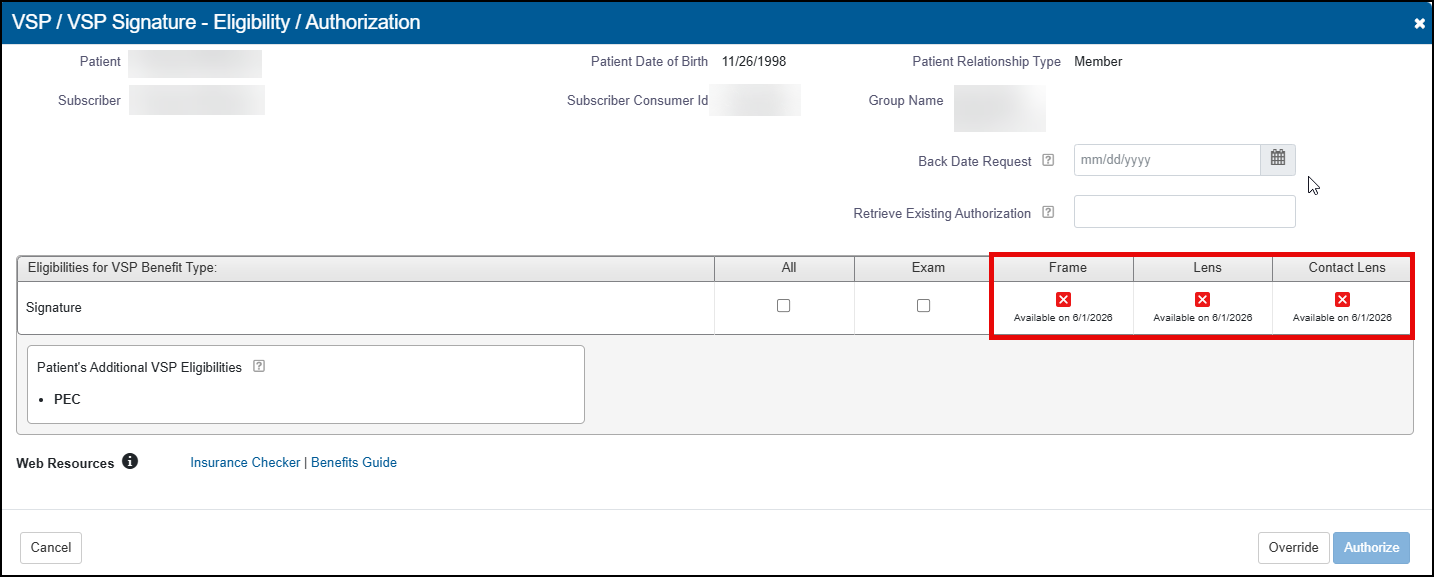
See Next Eligible Date When Pulling VSP Authorizations
If your office is a VSP in-network office, you'll now see a Next Eligible Date for any unavailable VSP eligibilities in the Eligibility/Authorization screen. This update makes it easy to see when your patients' benefits renew, saving you time and helping you provide a great patient experience. The date displays for all eligibility types.
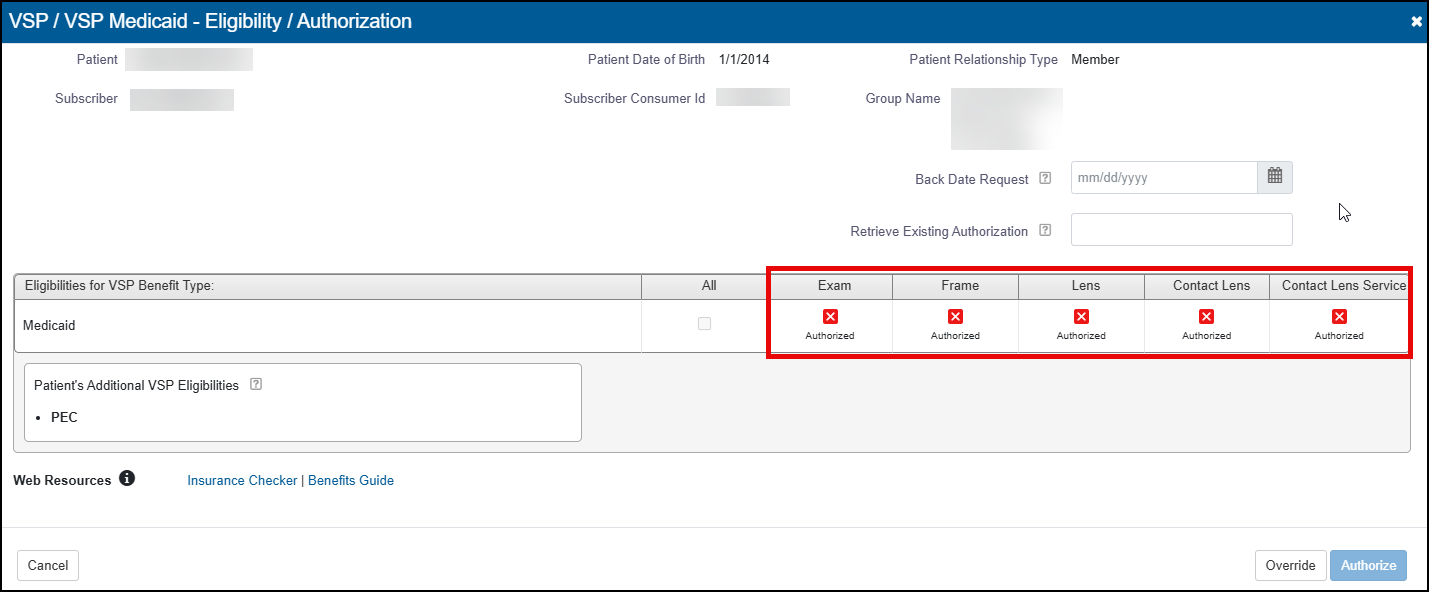
VSP in-network offices will also see a notification if the patient has an outstanding authorization that has either expired at your office or was pulled by another office in your company. In these cases, the word "Authorized" displays for each affected benefit type in the Eligibility/Authorization screen, helping you understand what is happening with the eligibilities. Previously, Encompass would show an "unavailable" error message.
Gain Insight into Your Revenue with the New Net Collections Dashboard
The Net Collections dashboard offers comprehensive insights into the actual revenue collected by a practice, spanning both the Billing and Point of Sale (POS) modules. It’s a powerful tool for accounting teams, practice managers, and leadership to support financial tracking, commission calculations, and performance analysis. To try out the new dashboard: Navigate to Reports, and select Analytics & Insights. Then, select Net Collections. For more information on the dashboard, see Net Collections Dashboard.
Connect with Your Patients Using a QR Code
Connect your patients to your website, their order status or even your payment application with a small and simple QR Code. You can now upload your QR Code and then print the QR Code on your receipts.
Create your QR Code using one of many applications available via an Internet search. Eyefinity does not recommend a particular app; however, we do encourage you to research options and select an app that fits your QR code and security needs.
-
From Administration, select Preferences and then Material Orders. The Preferences screen displays.
-
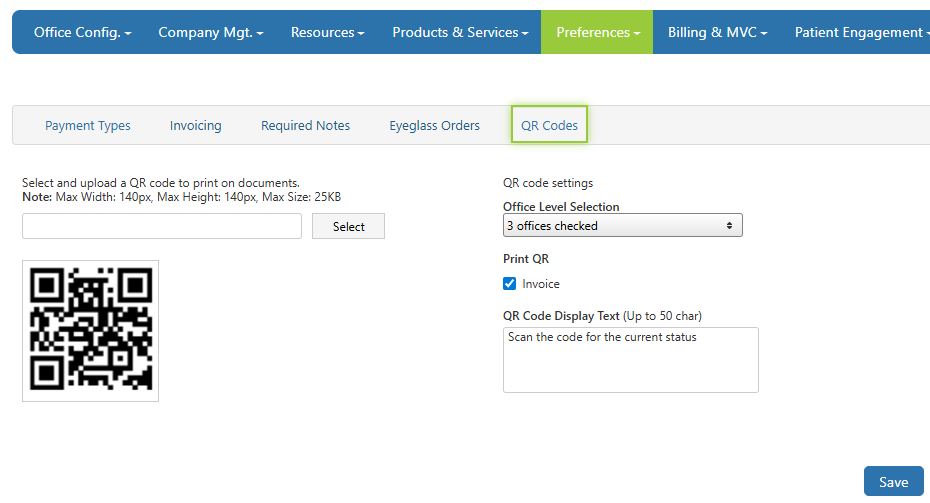
From the links, select QR Codes. The QR Codes tab displays.
-
Supported formats include .PNG, TIF, BMP and .JPG.
Your QR Code cannot exceed 140 px in width, 140 px in height and 25KB in size. -
Once you upload your QR code, you then choose your settings.
-
From the Office Level Selection drop-down, select the checkbox for each office you want to be able to print the QR Code.
-
For the QR code to print, you also need to select the Print QR Invoice checkbox. With this option, you can turn on and off the QR Code easily for all locations.
-
Finally, to add a text message that displays with the QR Code, enter the message in the QR Code Display Text field. The message can be up to 50 characters.
-
-
To save your changes, click Save. The QR Code will now print on the receipt for the offices selected.
To turn off the QR Code for a specific office, clear the box for that office. To turn off for all offices, clear the Print QR Invoice box.
To change the QR code, select a new image. The new code replaces the old QR code.
Offer Your Patients Payment Flexibility - Accept ATM/Debit Cards
If using the WorldPay integration or EncompassPay, you can now accept ATM/Debit cards and issue returns for orders paid with a ATM/Debit card. To begin, your Admin needs to activate the payment type: ATM/Debit.
Once the payment type is enabled, when invoicing the order, select ATM/Debit as the payment method, the system automatically enters the amount and click Authorize. A message displays on the screen saying the transaction cannot be canceled.
Once an ATM/Debit card transaction is authorized, it cannot be canceled. If the patient changes their mind or you close the invoice screen, a credit is created on the patient's account for the amount authorized. You can then use that credit to invoice and complete the order or, if necessary, provide a refund (the card must be present).
You then complete the order as you would for a credit card -- select the device and click proceed. When the credit card device asks credit or debit, ask the patient to select debit and enter their PIN.
If authorized, the Authorization Success message displays and indicates the sale has been approved and the amount approved.
For returns, the return order screen displays the ATM/Debit field with the last four numbers of the card and displays the max refund amount.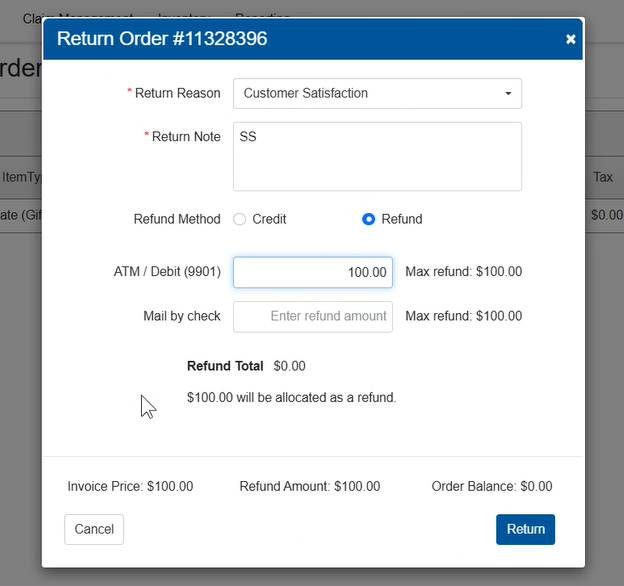
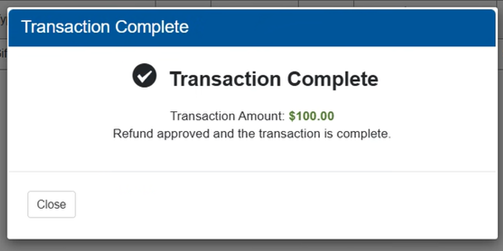
When you click Return, the system prompts you to select the device. When the device prompts for the card, ask the patient to insert the card. The system displays a Transaction Complete message.
Other Enhancements
This release also includes enhancements to the following areas:
Front Office Enhancements
This release includes the following Front Office enhancements:
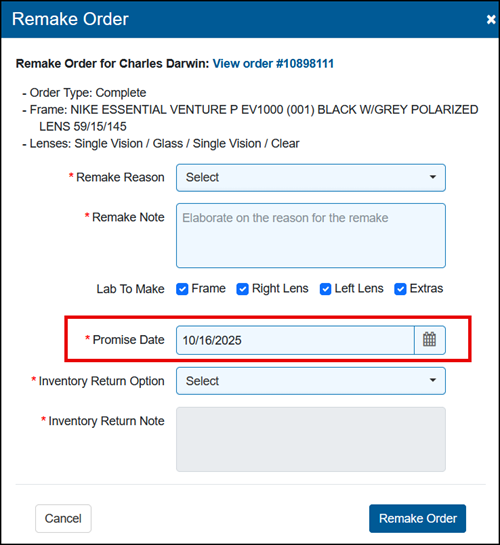
Set Promise Date in the Remake Order Window
We've updated the Remake Order window to include a Promise Date field. This allows you to set the promise date even when the product doesn't change (1-click remake). This new field defaults to the promise date set in Admin, but can be changed. The date you enter is saved and then shown in the pricing screen and printed on the order. You can change the date in the pricing screen, if necessary.
Insurance Reimbursement Warning in Pricing
A message now displays when pricing an insurance order to warn you when one or more items in the Calculation window have an Insurance Reimbursement amount of $0.00. This update helps prevent failed claims, non-receivable line items, and negative balances when orders are returned.
Improved Handling of Contact Lens Orders based on Supplier
We've improved the contact lens order process to detect when there is a supplier and automatically check the Parts to Supply box for you in select situations. Specifically:
-
If no supplier is selected for either eye and the quantity of the order for each eye is greater than 0, then both the right and left Parts to Supply boxes are checked. You can clear one or both boxes based on what you supply to the patient.
-
If a supplier is designated for one eye but not the other, the Parts to Supply box for that eye is checked but can be unchecked, while the box for other eye is not selected and is disabled.
-
For hard contact lenses, the Parts to Supply boxes are both checked but you can clear the boxes as needed.
-
Finally, only contact lens orders with a supplier are sent to a stock order to be picked up by the contact lens integration.
Claim Management Enhancements
This release includes the following Claim Management enhancements:
-
Improved Carrier Payment and Patient Payment Editing Windows
-
Option to Change Transaction Date Filter Criteria on the Billing Transaction Report
Retry Failed Claims Up to 12 Months Old
The Retry Claims feature now works for failed claims that are up to 12 months old. Previously, you could only retry claims that were older than 90 days.
Claim Detail Loads Faster
We've improved the Claim Search screen so that it loads Claim Detail information more quickly, eliminating extended "hangs."
Fewer Failed Claims
We've improved the claim generation process to prevent claims failing due to missing Insured ID or SSN information. Previously, claims would sometimes fail to generate because the system was expecting a SSN instead of the provided Insured ID, or vice versa.
Faster Report Generation
The Aged Claims Report and the Monthly Aged Balancing Report now generate quicker, saving you time.
Improved Carrier Payment and Patient Payment Editing Windows
We've made the following updates to the carrier payment and patient payment editing windows:
-
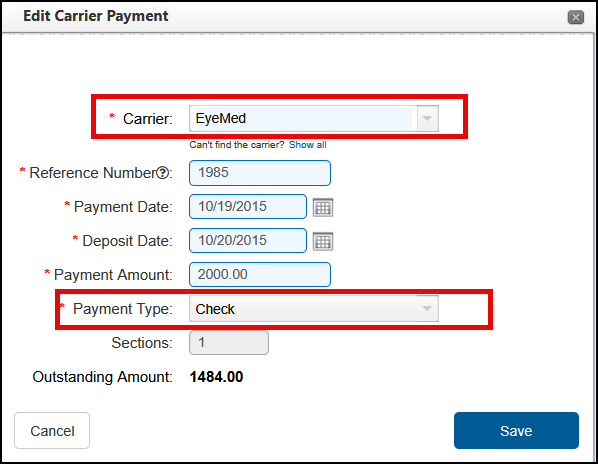
The windows have been renamed Edit Carrier Payment and Edit Patient Payment to correctly reflect that you are editing a payment, not entering a new one.
In the Edit Carrier Payment window, if any amounts have been applied to claims, the Carrier and Payment Type fields are no longer editable. This change prevents errors due to incorrect or mismatched information.
Option to Change Transaction Date Filter Criteria on the Billing Transaction Report
To provide flexibility for practices that do not use Monthly Close, we've added the option to change the way the Transaction Date filter for generating the Billing Transaction Report works. Currently, the From Transaction Date and To Transaction Date filter uses the associated payment's deposit date for carrier payment, patient payment, and external claim adjustment transactions.
If your practice would prefer to use the transaction date for all transaction types, you can now reach out to Eyefinity Customer Care to have your system setting changed. The setting will be applied to all offices in your company.
![]()
Administration Enhancements
This release includes the following Administration enhancements:
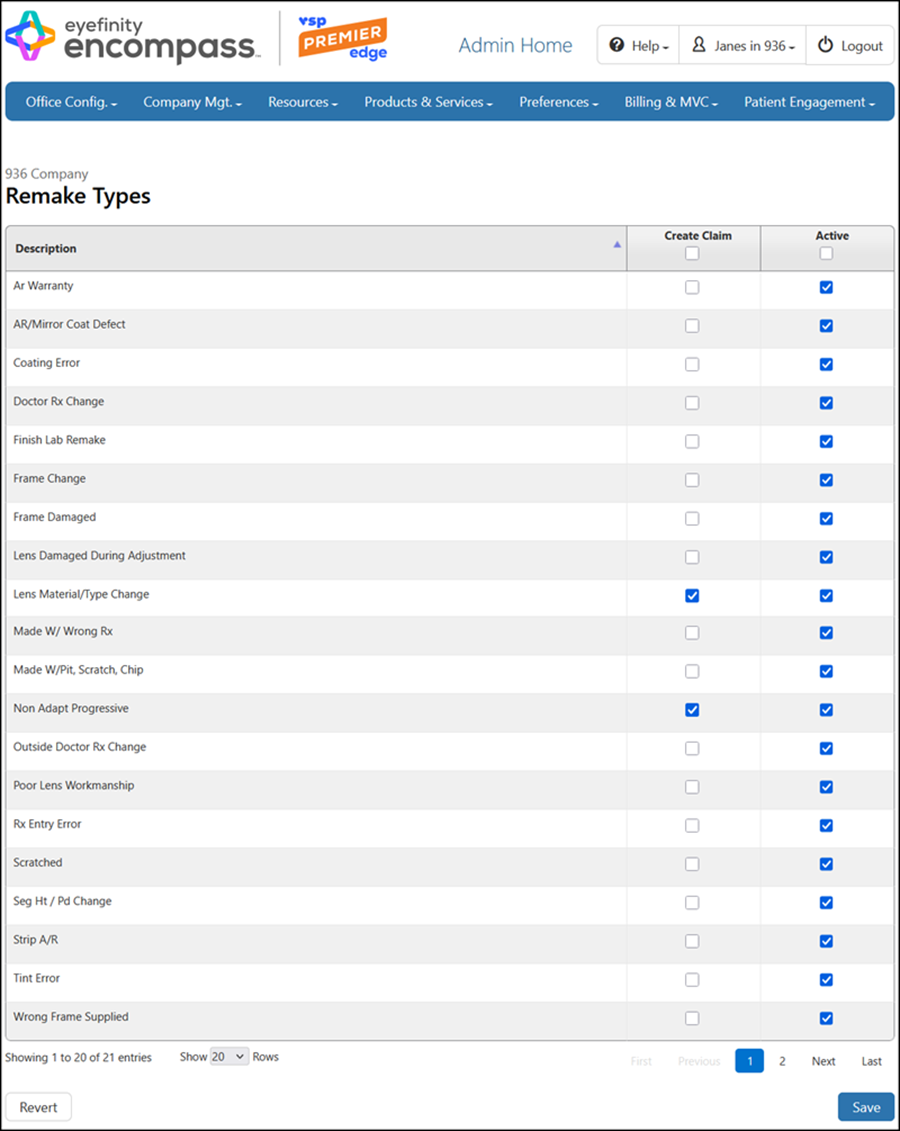
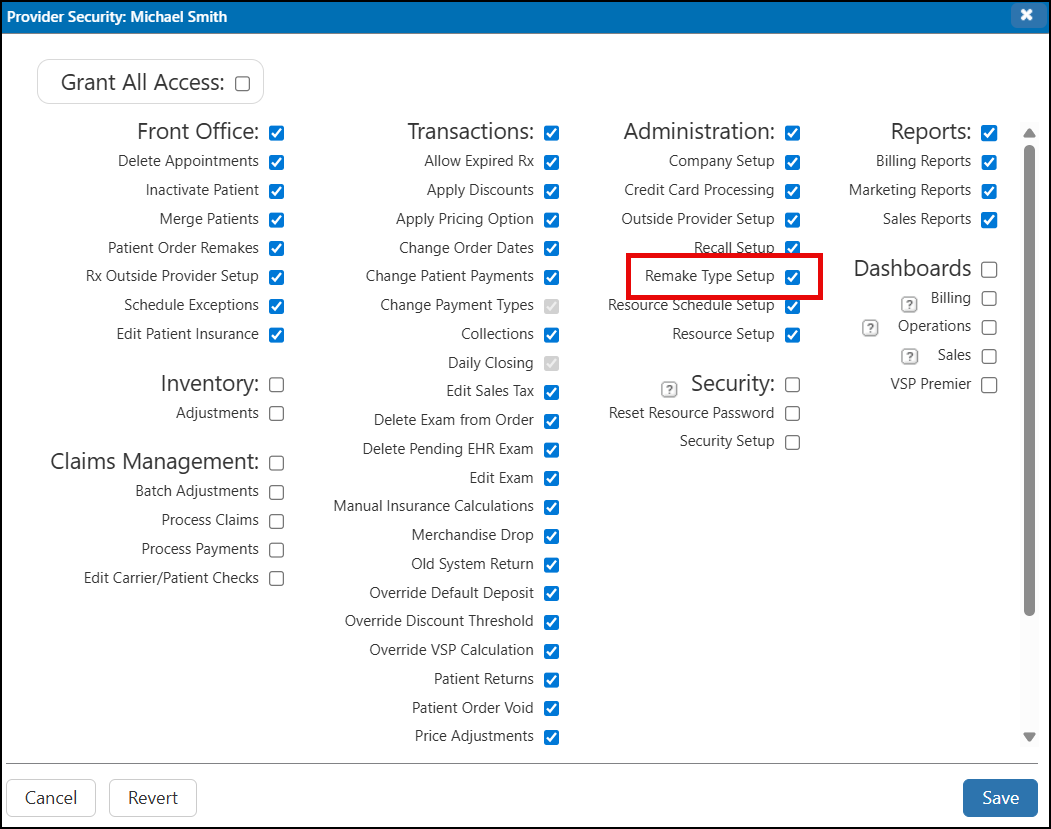
New Remake Type Setup
You can now select which Remake Types are available in Material Orders and specify which ones automatically create claims when the original order had insurance applied.
-
In Company Setup, click Preferences and select Remake Type.

-
Locate a Remake Type in the list.
-
Select the Active check box to make the Remake Type available in Front Office. Deselect the check box to hide it.
-
Select the Create Claim check box if you want a claim to be created automatically for remake orders with this Remake Type. A claim will be created only if the original order had insurance applied.
-
Repeat steps 2-4 for each Remake Type you want to set up.
-
Click Save.
We've also added a new security permission for providers and staff that enables you to control who has access to the Remake Types setup screen. The new check box defaults to selected. We recommend reviewing your security settings and deselecting the check box for any providers or staff who you do not want to have access.
API Enhancement
This release includes the following API enhancement:
Online Scheduler Respects Online Schedule Setting
We have updated the Schedule Manager API to look at the Online Schedule setting in the resource/provider information and if the option is selected, return appointment slots for that provider/resource. If the Online Schedule box is not checked, no appointment slots for that provider/resource are returned.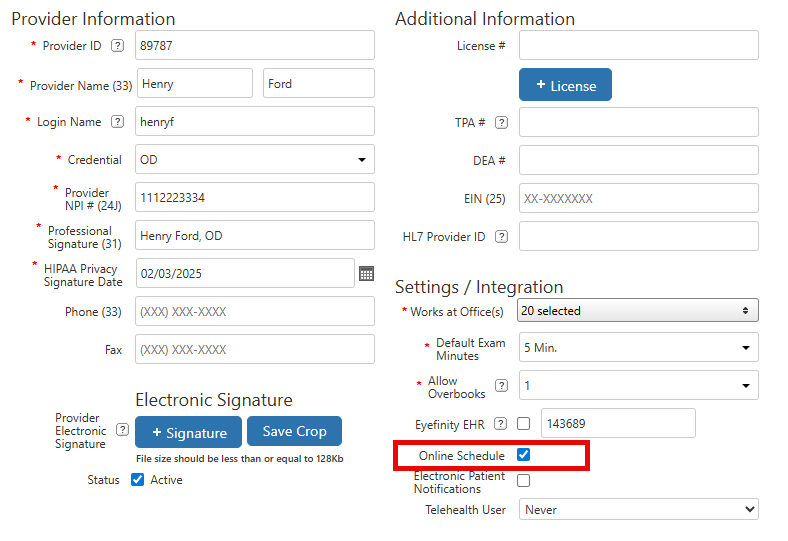
We recommend you review your providers and resources to ensure the individuals you want patients to be able to schedule an appointment with online have the Online Schedule checkbox selected.
We are simultaneously informing our API partners of this change and have updated our tech specs to avoid disruptions in online scheduling.
Fixed Issues
This release includes fixed issues in the following areas:
Front Office
-
The patient's insurance information now correctly displays on the Insurance tab in the Patient Details window opened from the Appointment Calendar.
-
The Minor Consent Form now pulls the correct patient insurance information; previously, an error would display.
-
The correct Responsible Party is now shown on reprinted invoices for orders using Family Checkout. Previously, the dependent was incorrectly shown as the Responsible Party.
-
Incorrect insurance information is no longer added to a patient's record via the VSP integration when there is another (different) patient in the VSP system with the same name and date of birth. The VSP integration now correctly checks the patient's SSN and ZIP Code to confirm the match.
-
We fixed an issue that was preventing some offices from pulling contact lens exam authorizations using the VSP Authorizations feature.
-
VSP orders for medically necessary contact lenses now always include the patient's most recent eyeglass prescription, as required by VSP, even when the prescription includes a plano lens. Previously, prescriptions with plano lenses were being ignored and older prescriptions were being used instead.
-
On orders with multiple diagnostic codes, only the diagnostic codes you apply to the CPT codes are attached after invoicing; previously, all diagnostic codes were applied to all CPT codes.
-
We resolved the intermittent error that displayed when receiving product from the distribution center,
Reporting
-
The Contact Lens Replenishment Report now includes all contact lens orders that meet the report generation criteria. Previously, some orders were being left off the report.
Encompass 10.52.2
Release Date: November 11, 2025
The 10.52.2 release fixes the following issue
-
We fixed an issue that was causing VSP claims to be stuck in Pending status.
-
The Reimbursement column now displays correctly in the Insurance Calculation window for manual insurance plans.
-
VSP exam claims with CPT code S0620 or S0621 no longer go on hold due to the error "CH6001 = These HCPC code(s) are missing from this order: 92014, or 92004" when the VSP plan supports S codes.
-
Printed eyeglass and contact lens prescriptions now include the patient's date of birth.
Encompass 10.52.4
Release Date: December 10, 2025
The 10.52.4 release fixes the following issue
-
The total tax amount on the Pricing page now matches the amount in the Tool Tip and Invoicing page.
-
When creating an eyeglass order, if the order has a lens coating (such as anti-reflective coating) and you edit the order but not the lens style, the lens coating remains on the order. Previously, the coating was removed.
-
When a VSP order contains Eyeglasses and a Contact Lens Exam, we present a message indicating the VSP plan may not cover the Contact Lens Exam with eyeglass benefits.
You then click OK to include the exam in calculations (patient may owe fee). In some cases, the patient may receive a discount on the contact lens fitting fee, which must be applied manually.
Or you can click Cancel, and then remove the exam and continue with just eyeglass benefits. The message also reminds you to check the Patient Record Report for plan details. -
When an office is sharing information and the patient does not have a responsible party, Self displays without a warning. Previously, the Self option displayed with a warning icon and when you hovered over the icon, the message “Not a patient of this office” displayed.
Also, when you add a responsible party, the hyperlink displays without needing to refresh the page. -
We updated the message that displays when an order includes line items with no insurance reimbursement. The new message is:
This order contains one or more line items with no insurance reimbursement amount. These items will be added as non-receivable on the claim and will not be billed to insurance. Consider reviewing the order pricing for accuracy.
Click Cancel to review and recalculate. Click OK to proceed without reviewing. -
We corrected an issue causing unknown errors to occur when editing an insurance schedule.