Scheduling Appointments
You can schedule, move, change, and cancel appointments for patients using the Appointment Scheduler’s Daily and Work Week views. This topic tells you how to schedule appointments.
You must set up the Appointment Scheduler before you begin scheduling appointments. For more information on setting up the Appointment Scheduler, go to Setting Up the Appointment Scheduler.
Click Refresh to refresh the Appointment Scheduler with the most up-to-date appointment information.
This topic describes how
- Open the Appointment Scheduler. For more information on opening the Appointment Scheduler, go to Opening and Viewing the Appointment Scheduler.
- To find a patient for whom to schedule an appointment:
- Click Tools and select Search For Patient or click the F2 Find button in the bottom left corner of the Appointment Scheduler to open the Find Patient window.
- Enter search criteria and click F2 Find.
To add a new patient to OfficeMate, click New and go to Recording Patient Information to record the patient’s demographic and insurance information and record patient notes.
- Highlight a patient and click Select or double-click on the patient.
- After you select a patient, click on the following buttons in the bottom left corner of the Appointment Scheduler to complete other patient-related tasks:
- To view, open, or edit other appointments that have been scheduled for the patient, click Appt History, select an appointment, and click Edit.
- To edit the patient’s demographic information, click Pat. Demo. and go to Recording Patient Information to record the patient’s demographic and insurance information, record patient notes, and view the patient’s VSP history.
- To clear the patient’s information and select another patient, click Clear Patient.
- To select another patient, click F2 Find.
- Search for and select an available new appointment time. For more information on searching for available appointment times, go to To search for an available new appointment time
OR
Click and drag your mouse cursor over an available time slot on the time grid.
To quickly advance the Appointment Scheduler to a future month, type the number of months that you want to advance the Appointment Scheduler in the text box next to the Advance (Months) button in the Navigation Calendar and then click the Advance (Months) button.
To view today’s Appointment Scheduler, click the Today button in the Navigation Calendar. - Click File or right-click on the schedule and select Schedule Selected Patient (if you selected a patient in step 2) or New Appointment (if you did not select a patient in step 2)
OR
Click the New button on the Appointment Scheduler toolbar.
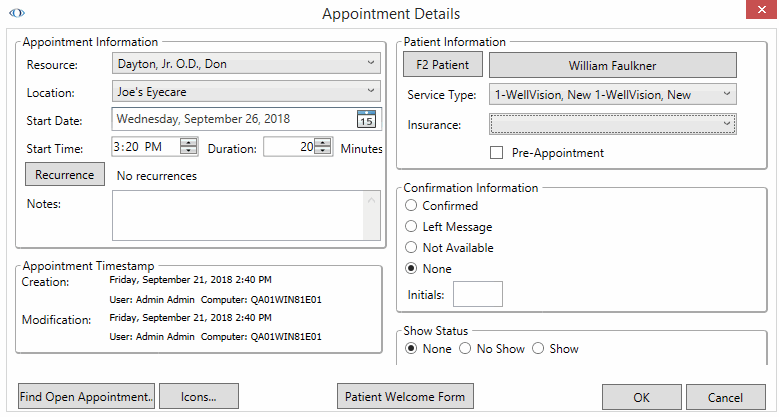
The Appointment Details window opens.
- Make selections from the drop-down menus and type in the fields in the Appointment Information box:
- Resource, if the correct resource is not already selected
- Location, if the correct location is not already selected
- Start Date
- Start Time
- Duration in minutes

- To record a recurrence of this appointment, click Recurrence, make selections in the Recurrence and Range of Recurrence boxes, and click OK.
- To add notes to the patient’s appointment, type text into the Notes text box.
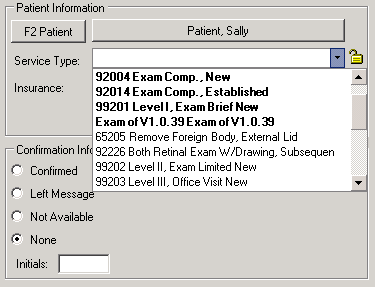
- Select a service from the Service Type drop-down menu.
To set up the services that you want to schedule, go to To set up services.
If not all services are available, a template may be applied to the provider’s or resource’s schedule that restricts the types of services available. If the service you want to select is not available, choose a different time or a different provider. If you must schedule a service that is unavailable, click the lock icon to select services outside of the prescribed service groups. A username and password with sufficient security access is required for each override.
Bold services listed in the Service Type drop-down menu are services that are recommended, but not required, by a template or they are services within the prescribed groups while an override is in place.
For information about creating and modifying appointment templates, go to To set up service templates. - If the patient has insurance, select the patient’s insurance provider from the Insurance drop-down menu.
To add insurance plans in OfficeMate, go to To modify or add appointment schedule resources.
If you selected Vision Service Plan from the Insurance drop-down menu, click the VSP button to obtain member information, eligibility information, and authorizations and view existing authorizations. For more information about obtaining and viewing VSP information, go to Getting Member Eligibility and VSP Authorization. - If you are pre-appointing an appointment, select the Pre-Appointment check box.
A (p) appears next to the patient’s name in the Appointment Scheduler and a check mark appears in the Pre Appt box on the Confirmation tab to notify you that this appointment has been pre-appointed.

- Click Icons to select icons for the appointment and click OK.
To add icons in OfficeMate, go to To set up appointment icons.
- Click Patient Welcome Form to print a form that displays basic the patient’s basic demographic and insurance information and click OK to save the new appointment details.
The patient’s name appears on the time grid in the Appointment Scheduler and in the Quick List window on the day the appointment is scheduled.
After you schedule an appointment, right-click on the appointment in the time grid and then click Edit to open the Appointment Details window and view information about the creation and modification of the appointment.
To schedule an appointment for an existing patient’s linked family member, click on an appointment that you have already scheduled in the time grid and then double-click on a family member’s name in the Family Members box or right-click on a family member’s name and select Select as Active Patient in the Family Members box.
- Open the Appointment Scheduler. For more information on opening the Appointment Scheduler, go to Opening and Viewing the Appointment Scheduler.
- Find an existing appointment. For more information on finding an existing appointment, go to To find an existing appointment time.
- Select the existing appointment that you want to edit and complete one of the following tasks:
- Click Edit and select Edit Selected Appointment.
- Click Edit on the Appointment Scheduler toolbar.
- Right-click on the appointment and select Edit Selected Appointment.
The Appointment Details window opens.
- Edit appointment information using the instructions in steps 5–18 in To schedule a new appointment.
For more information on adding new patients to OfficeMate in the Appointment Scheduler, watch these videos.
For more information on adding new patients to OfficeMate in the Appointment Scheduler, watch these videos.