Correcting Errors in Insurance Claims
After you select ANSI insurance claims, you must correct any errors in the claims before you export them and file them electronically. Although correcting errors is not required for you to do before printing and mailing insurance claims and creating print images, it is highly recommended that you do so. This topic tells you how to correct errors in your insurance claims.
Some errors in insurance claims may be caused by using improper short dates. Ensure that your computer is using the MM/DD/YYYY short date format.
- Open the Third Party Processing window. For more information on opening this window, see Opening the Third Party Processing Window.
- Search for insurance claims. For more information on searching for insurance claims, see Searching for Insurance Claims.To find only claims with errors, search for claims with an Open status and select the Errors check box. For information on setting your search options, see Searching for Insurance Claims.
- Select a claim from the results list.
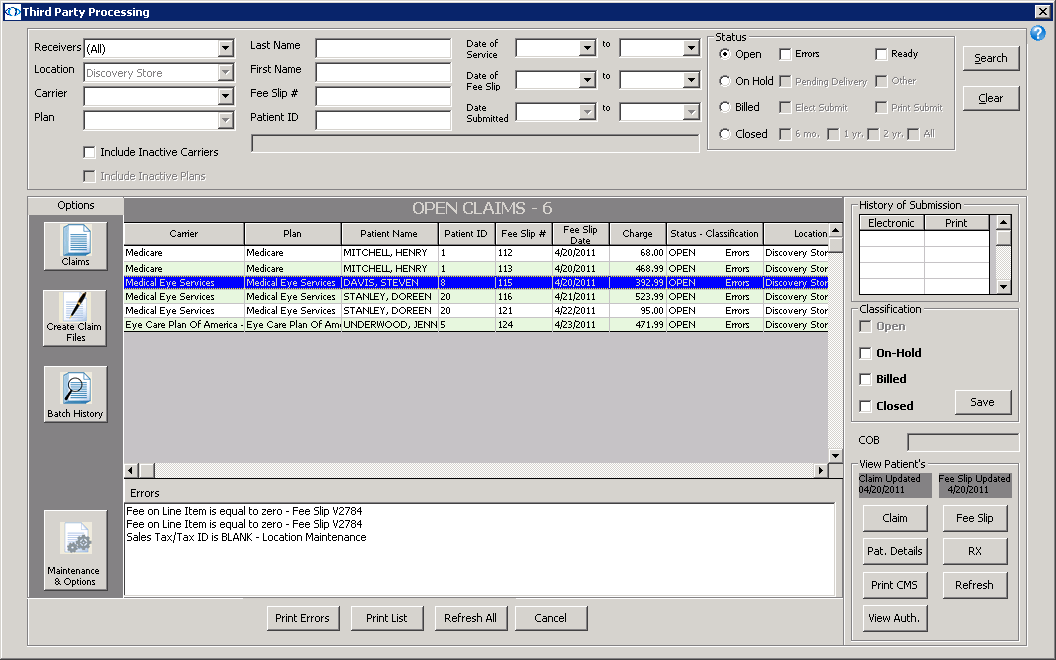
The claim errors are displayed in the Errors box that appears below the search results.

- Click Print Errors to print the list of errors for the selected claim, as needed.
- Perform one or more of the following tasks to correct the claim errors:
- Click Fee Slip to open the Fee Slip window and correct procedure or diagnosis code errors and add line item additional data on the fee slip. For more information on recording procedure and diagnosis codes on fee slips, see To add products to fee slips.
- Click Pat. Details to open the Patient Demographic window and correct demographic and insurance errors on the patient’s record. For more information on recording patient demographic information, see Recording Patient Information. For more information on recording insurance information, see Recording Patient Information.Ensure that the Last Name, First Name, Address, Sex, Date of Birth, Marital Status, and Emp. Status fields in the Patient Demographic window are correctly and completely recorded. Also, ensure that a provider is selected and recorded in the Fee Slip window.
- Click Rx to open the Eyewear Order, Soft Lens Order, or Hard Lens Order window and correct order errors. For more information on recording order information, see Viewing & Refilling Prescriptions.
- Click View Auth to open the Eligibility & Authorization window to view, add, and edit authorization information. Only users in store locations can add or edit authorizations. For more information about maintaining authorization information, see Recording Patient Information.
- Select the On-Hold check box and click Save if you do not want to correct the errors on the insurance claim right now and you want to put the claim on hold. For information on releasing or closing claims on hold, see Releasing and Closing Claims on Hold.
- Select the Billed check box to indicate that this claim has been billed and click Save.OfficeMate automatically selects the Billed check box when the claim is included in an electronic file. You will only manually select the Billed check box if the claim is individually printed or generated and submitted outside of OfficeMate.
- Select the Closed check box to indicate that the claim has been paid or that you no longer want to send or print the claim, and click Save.OfficeMate automatically selects the Closed check box when the payment is entered for the claim. You should never have to manually select the Closed check box.
- Once you have corrected the information causing the errors, select an insurance claim or a group of claims and select Refresh or Refresh All to refresh the CMS 1500 form(s) and clear the errors.Clicking Refresh forces the CMS 1500 to, once again, collect information from the various parts of OfficeMate and overwrites any information that you added, modified, or deleted manually on the CMS 1500 form.
- If you want to record additional information on a CMS 1500 form, see Recording Additional Information on the CMS 1500 Form and ANSI File; otherwise, go to Printing Insurance Claims or Exporting Insurance Claims.
In addition to the procedure above, watch this video for more information.