What's New in Encompass 7.6
Released June 28, 2024
Tentative Training Sandbox Release May 24, 2024
Encompass 7.6 will require iPadOS 17. You must install the latest iPadOS 17 updates prior to the release of Encompass 7.6. Apple does not support iPadOS 17 on the following iPad models:
- iPad 5th generation (released in 2017, discontinued 2018)
- iPad Pro 1st generation (released in 2015, discontinued 2017)
If you're running Encompass or Kiosk on either of these models, you will need to replace those iPads soon.
Watch the What's New video to see highlighted features in action.
This page describes the enhancements, fixes, and known issues in the latest Encompass release.
- iPad and Web Enhancements
- iPad-Only Enhancements
- Web-Only Enhancements
- Administration Enhancements
- ePrescribing Enhancements
- Regulatory Enhancements
- Medical Enhancements
- Known Issues
- Encompass 7.6.2.1 Update
- Encompass 7.6.3 App Update
- Encompass 7.6.2.6 Update
- Encompass 7.6.3 Update
- Encompass 7.6.4 Update
- Encompass 7.6.4.5 Update
- Encompass 7.6.5 Update
- Encompass 7.6.6 Update
- Encompass 7.6.6.1 Update
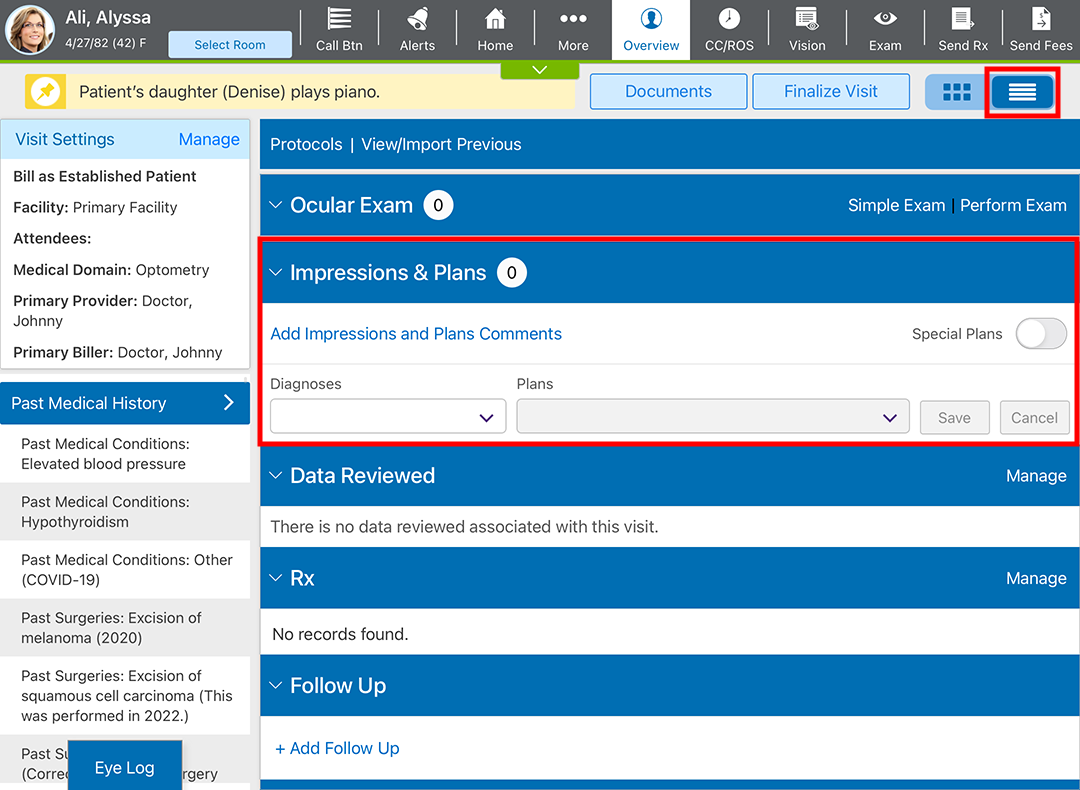
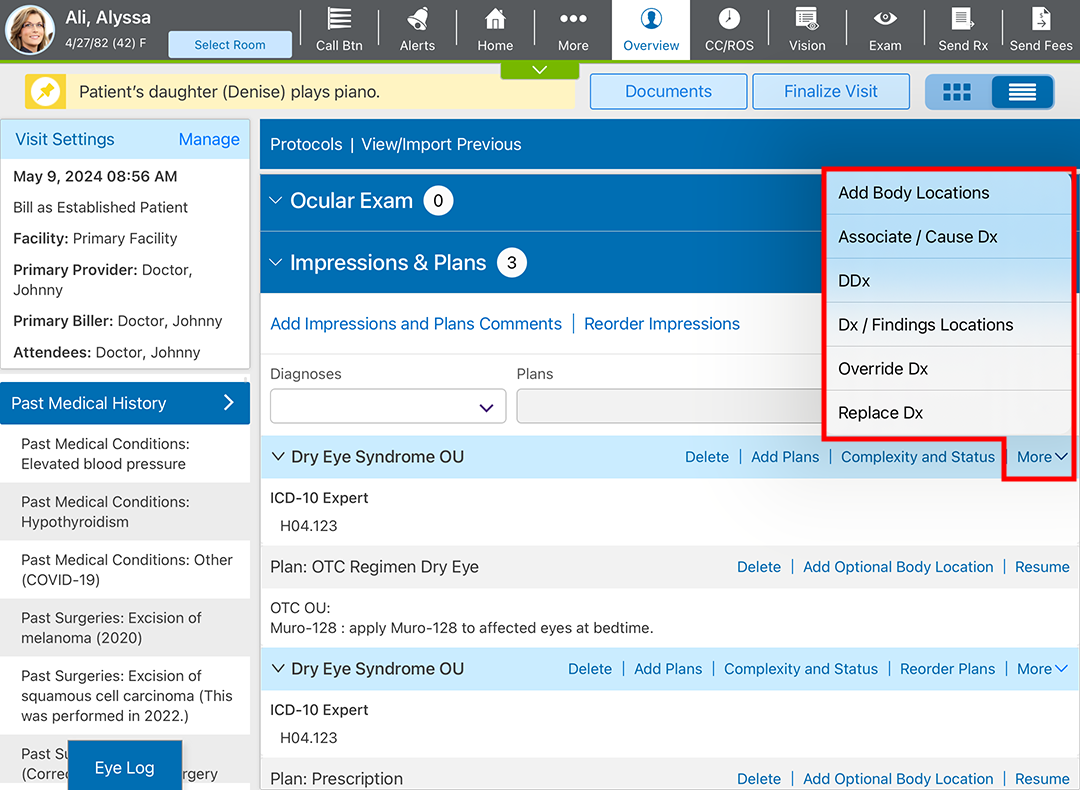
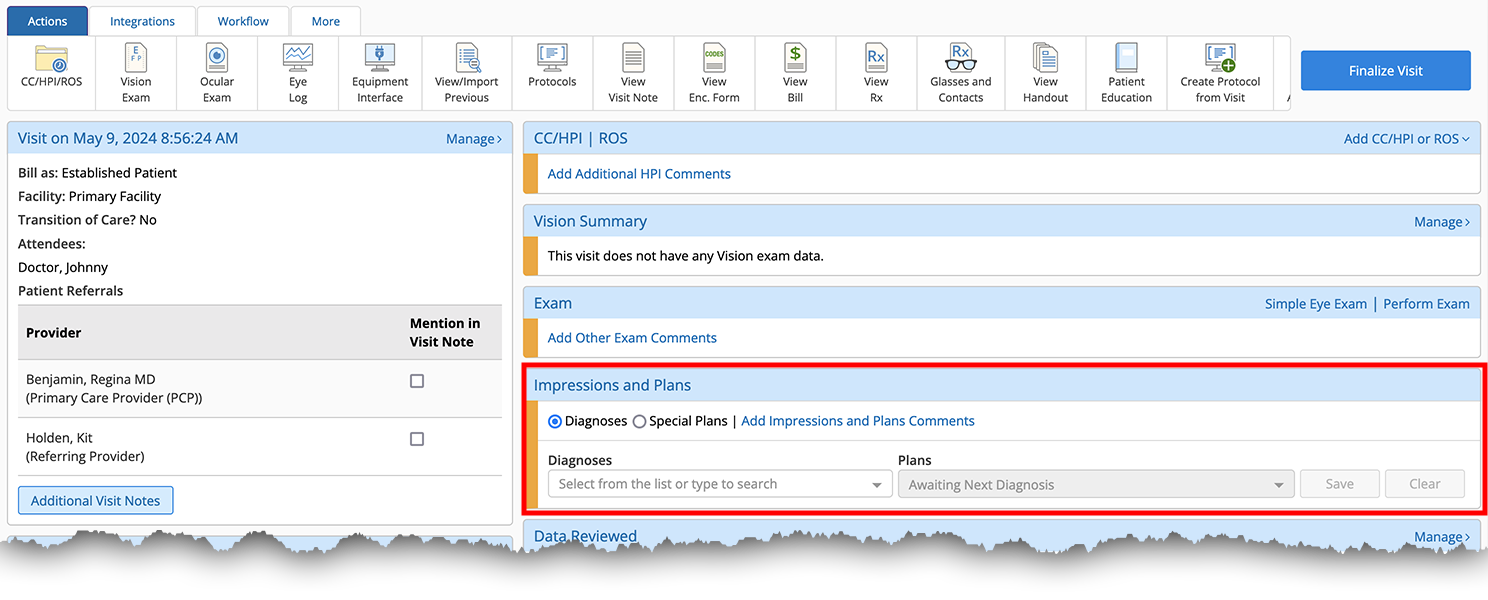
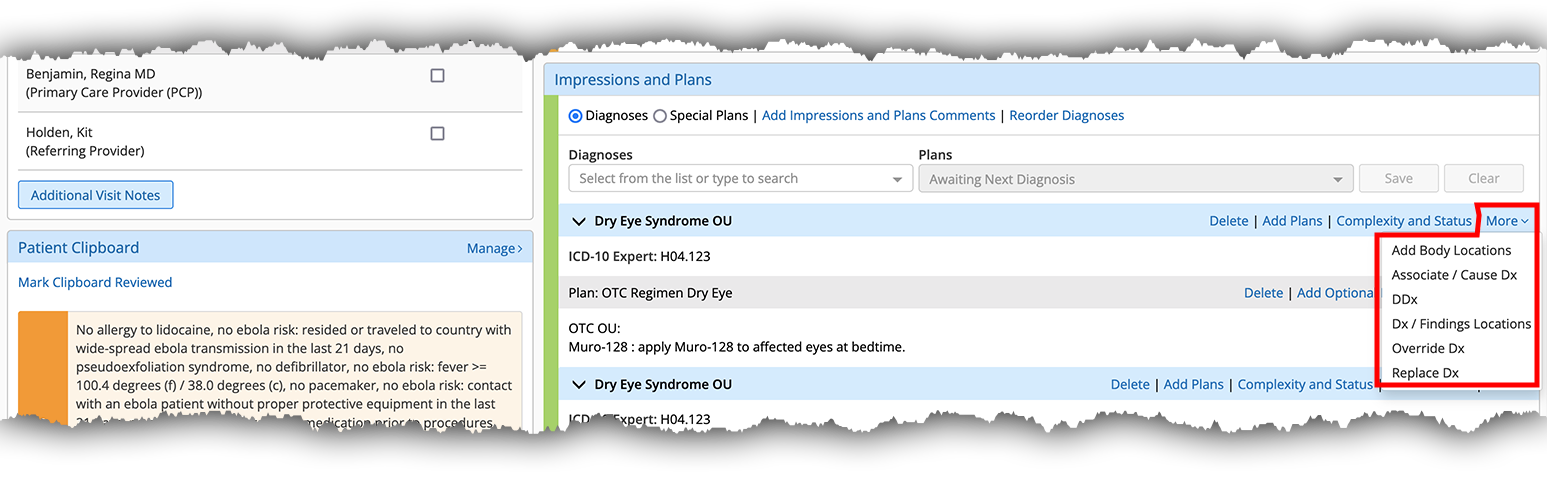
You can now document an entire exam from a single screen! Over the last several releases we've made it easier for you to document exams directly in the Visit Overview in the web application and the Detailed Visit Overview in the iPad app. Over the past several releases, we have been working hard to revamp the Vision Exam pages, we introduced the Simple Eye Exam, and now we're introducing input fields in the Impressions and Plans card.
We have several more enhancements coming over the next few releases to make documenting an exam from a single screen even easier.
iPad and Web Enhancements
- We added input fields to the Impressions and Plans card in the Visit Overview in the web application and the Detailed Visit Overview in the iPad app. This means you can document diagnoses and plans without having to enter the Ocular Exam. Learn more about documenting diagnoses and plans directly in the Visit Overview:iPad app
- Navigate to the Detailed Visit Overview.
- Navigate to the Visit Overview.
- Tap the Detailed Visit Overview toggle ( in the upper-right corner).
- Locate the Impressions and Plans card.
- Select a Diagnosis and as many Plans as needed, and tap Save.
Encompass prompts you to select a location for each plan that requires a location.
- Select the location(s) of the specified diagnosis and tap Done.
The diagnosis and plan are saved and appear in the Impressions and Plans card.
- Select a Complexity and Status or tap More to add an associated diagnosis as needed.
Tap the Special Plans toggle to document tests, follow-ups, MIPS, and more.
Tap More to override, replace, or associate diagnoses as needed.
Web application- Navigate to the Visit Overview.
- Locate the Impressions and Plans card.
- Select a Diagnosis and as many Plans as needed, and click Save.
Encompass prompts you to select a location.
- Select the location(s) of the specified diagnosis and click Save.
The diagnosis and plan are saved and appear in the Impressions and Plans card.
- Select a Complexity and Status or click More to add an associated diagnosis as needed.
Select the Special Plans radio button to document tests, follow-ups, MIPS, and more.
Click More to override, replace, or associate diagnoses as needed.
- Navigate to the Detailed Visit Overview.
- You can now easily import past CC
 The main reason for the patient’s visit to the doctor./HPI history of present illness. A detailed account of a patient's current health issue, including when it started and how it has changed over time. into the current visit. CC/HPI selections now appear in the View/Import Previous window when those elements were documented in the selected visit. Learn more about importing elements from previous exams in the browser application or iPad app.
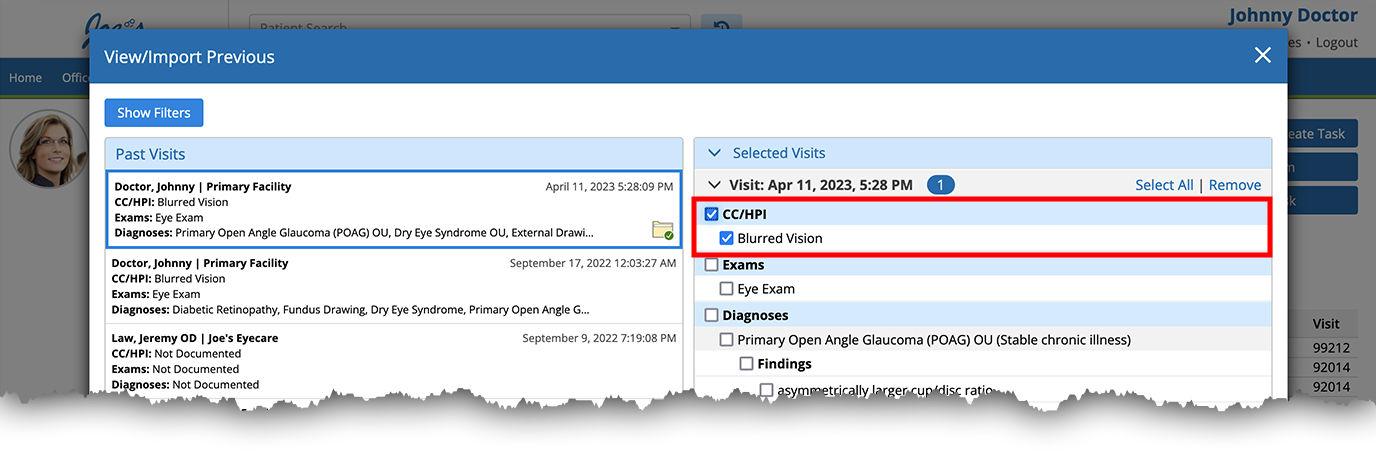
Historical summary and independent historian elements do not appear in the View/Import Previous screen.
- We made the following changes for New Jersey eyeglass and contact lens prescribers:
- You can now print glasses prescriptions on the same prescription blank as contact lenses. This change is intended to eliminate the need to change the paper in the printer depending on the type of prescription. A practice administrator must enable this setting.
- The generic or national brand contact lens name is now printed below the private label name.
- The pupillary distance is now printed on eyeglass prescriptions.
To learn more about enabling this feature, go to Administration Enhancements.
These changes are not visible to prescribers outside of New Jersey.
Individual users who experience misaligned form printing should refer to Configuring Your Print Settings for Blank Forms.
- You will now be prevented from finalizing a visit if a plan is missing required information. To quickly resolve the missing information, select the exams that were not able to be finalized, and click Review and Finalize. Learn more about reviewing exams in the browser application or iPad app.
- Encompass now displays an alert on the billing card when a modifier 59 code appears in billing to prompt you to review the code and remove it if necessary. Modifier 59 indicates that a procedure is separate and distinct from another procedure on the same date of service. The alert is intended to increase the accuracy of billing and reduce audit risk.
iPad-Only Enhancements
- You can now access protocols directly from the Visit Overview! This gives you access to these time-saving templates earlier in the visit and mirrors functionality already available in the Detailed Visit Overview. Here's how to access protocols from the Visit Overview:
- Tap the More action bar button.
- Select Protocols.

If you don't see Protocols listed in the More menu, tap Restore Hidden Buttons to add it.
- Get a clearer view of the diagnostic drops used. We replaced the long list of toggles for each drop with multiselect drop-downs. This redesigned screen mimics the functionality of the web application and eliminates the need to swipe up to see the complete list of drops selected. You can now clear all selections with one tap! The new Recorded On date and time automatically populates for you.
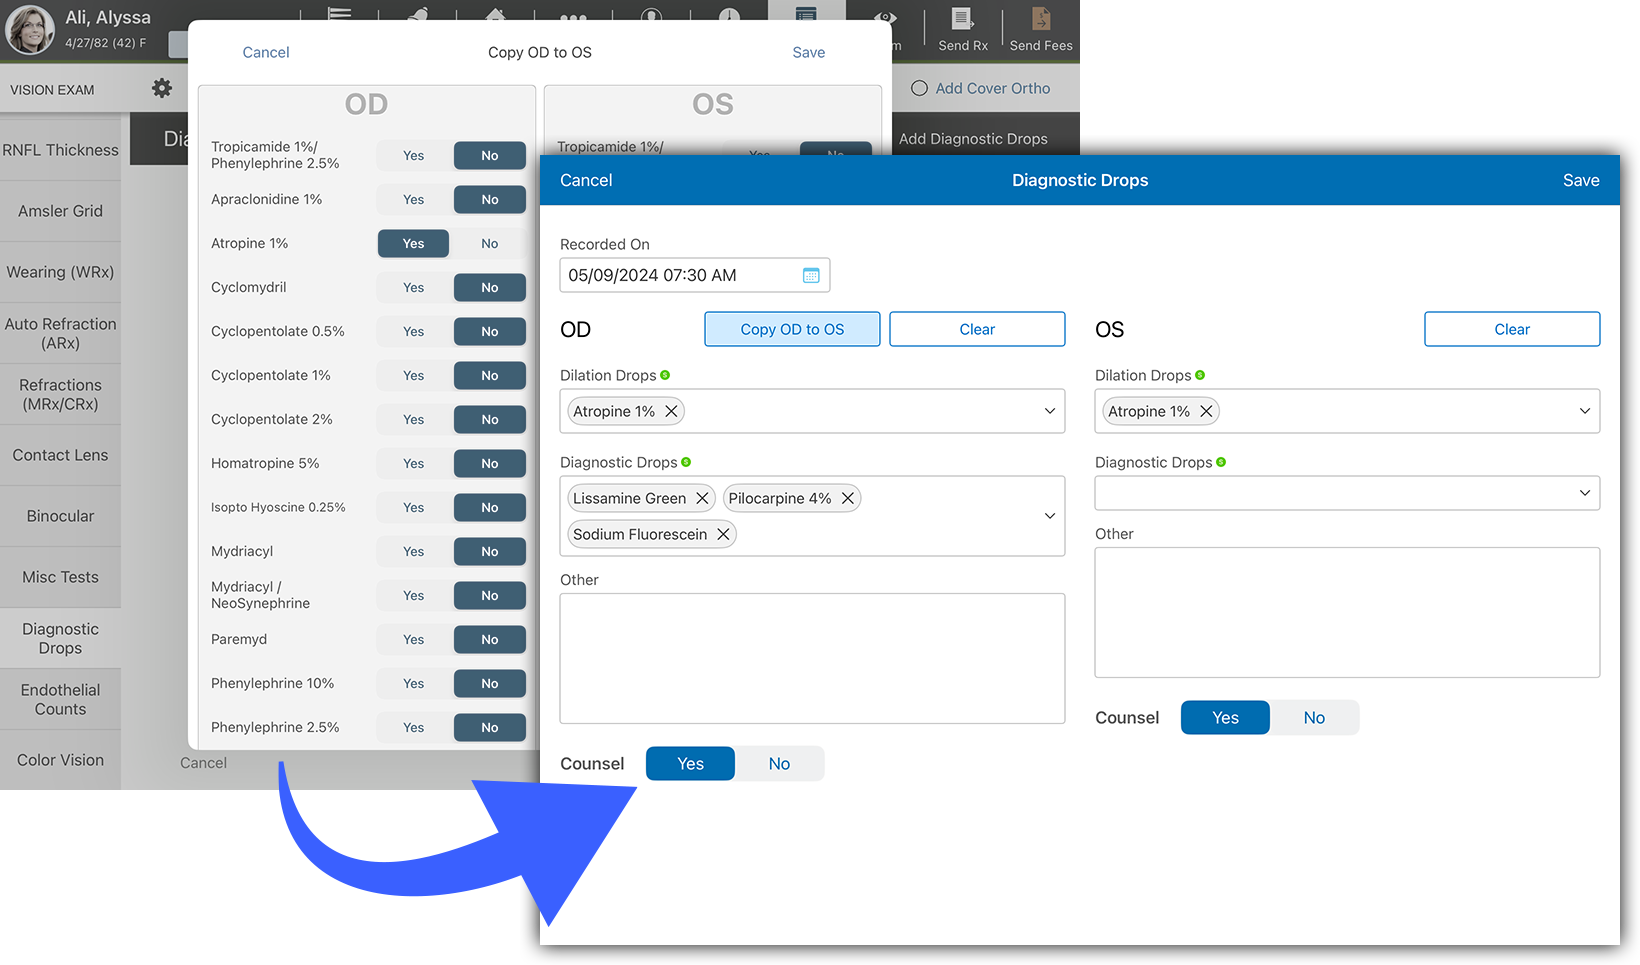
- Saved diagnostic drops group both right and left eyes under one date. Previously, OD Oculo dextra. Latin abbreviation for right eye. and OS Oculo sinestra. Latin abbreviation for left eye. were recorded separately. The header now displays the date, time, and staff member who recorded the diagnostic drops.
- You can now document binocular both eyes. findings more quickly. We moved the Eye Dominance selection to the top of the Binocular tab in the Vision Exam.
- We redesigned the Keratometry tab in the Vision Exam. The redesigned tab now displays Add Keratometry in full screen. The new Recorded On date and time automatically populates for you. We removed the auto-entry option because the drop-down menus proved to be too restrictive.
- Saved keratometry readings group both right and left eyes under one date. Previously, OD and OS were recorded separately. The header now displays the date, time, and staff member who recorded the keratometry readings.
- We made minor improvements to the design of the Binocular Tests tab to be more consistent with other areas of the Vision Exam. No changes were made to the functionality or the order of the fields.
- You can now select the following Presenting Problem Complexity diagnosis options:
- Stable Acute Illness
- Acute uncomplicated illness or injury requiring hospital inpatient or observation level of care
The American Medical Association (AMA) recently released these new low complexity options that count toward your MDM billing calculations. These options were added to the web application with the release of Encompass 7.5.4.
Web-Only Enhancements
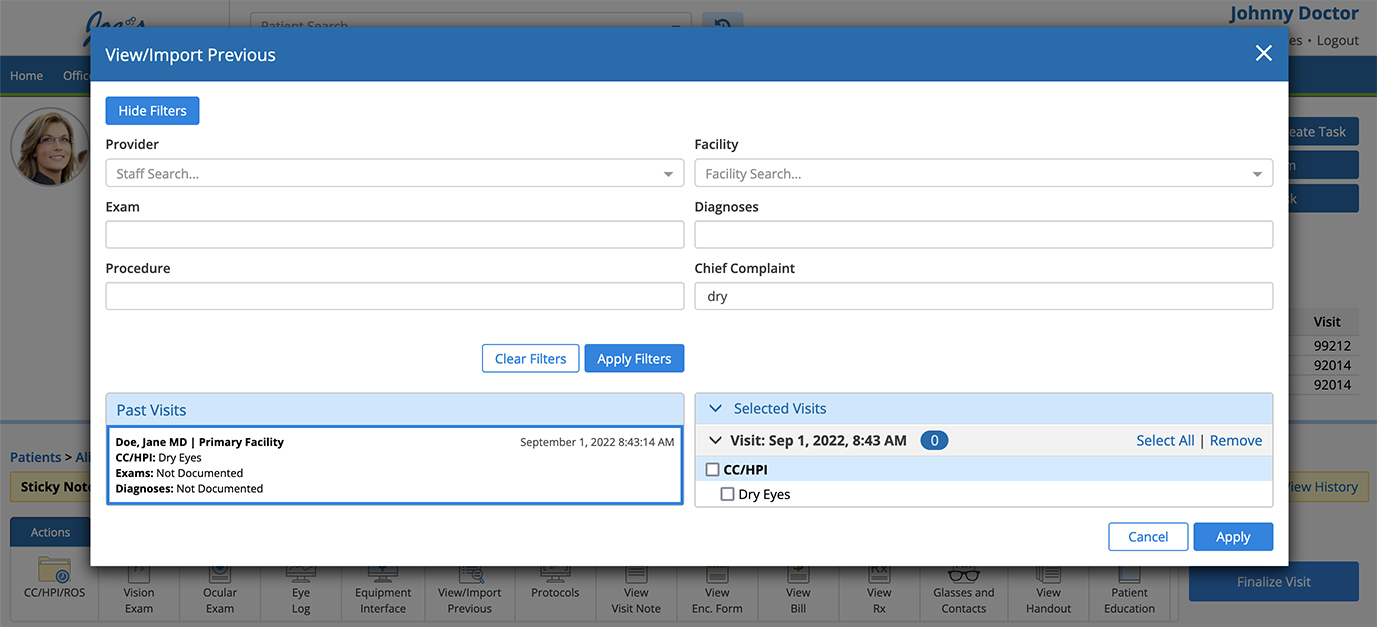
- While importing previous findings, you can now filter by words that may appear in historical CC The main reason for the patient’s visit to the doctor./HPI history of present illness. A detailed account of a patient's current health issue, including when it started and how it has changed over time. notes.
- The Save and Continue, Save, and Cancel buttons now float at the top of the viewable area within the remaining tabs in the Vision Exam:
- Binocular both eyes.
- Misc Tests
- Motility
- IOP intraocular pressure. Eye pressure, as determined by the amount of aqueous humor filling it. High IOP (ocular hypertension) can be a sign of glaucoma.
This means that as you scroll down long pages, these buttons are always accessible and appear in a consistent place no matter where you are on the page.

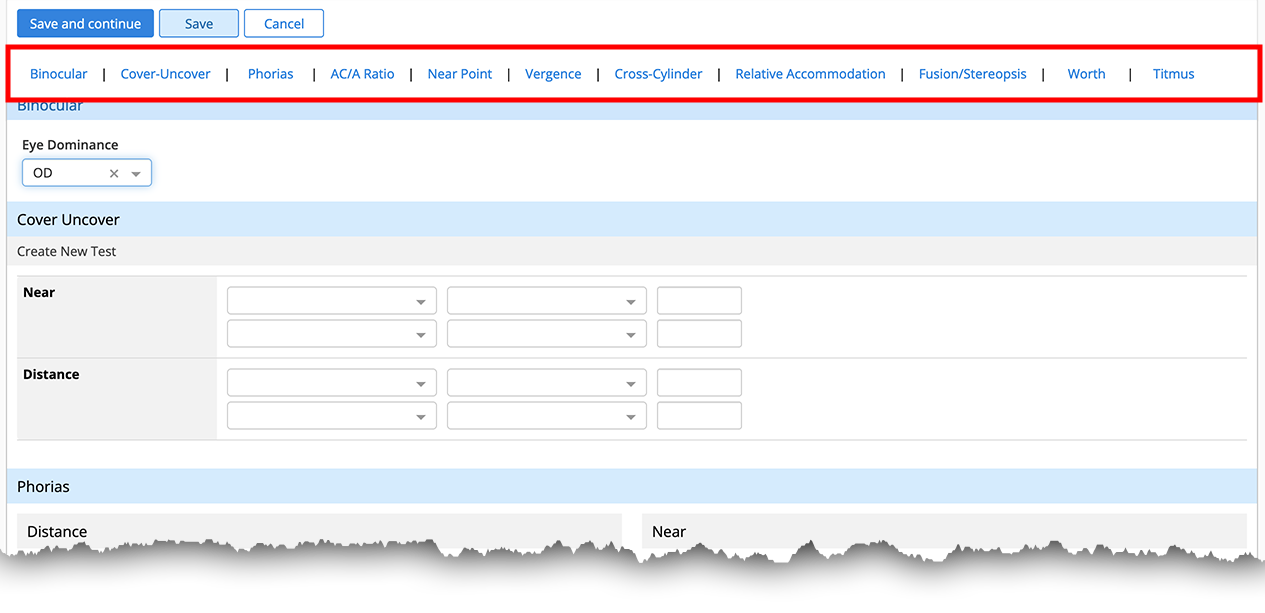
- Binocular
- We heard you! Based on clinical feedback, we redesigned the Binocular tab so you can scroll or click to navigate to the different sections:
- Eye Dominance is now located at the top of the page.
- All of the binocular sections now appear on one page so you can scroll to the section you want.
- The menu of sections is pinned beneath the Save and Continue button so it is always visible. Click a menu link to jump directly to that section of the page.
- The Misc Tests and Motility tabs have been improved with a more modern design. The functionality has not changed.
- The IOP intraocular pressure. Eye pressure, as determined by the amount of aqueous humor filling it. High IOP (ocular hypertension) can be a sign of glaucoma. tab has been improved with a more modern design and now displays saved IOP results at the top of the page. You no longer need to click Add New IOP Reading to add multiple IOP results per visit.
- You can now delete Amsler Grid A test for macular degeneration using small squares. This test can also be given as a home test to monitor the onset and progression of macula disease. results. Once you save an Amsler Grid test, a Delete button appears between Save and Cancel. Previously, you could not delete the Amsler Grid test—you could only record different values.
- You can now delete results from the following Vision Exam tabs:
- Pachymetry A technique used to measure corneal thickness.
- Endothelial Counts
- Retinal Thickness
- RNFL
- Pachymetry
- Once you save any of these tests, a Delete button appears between Save and Cancel. Previously, you could not delete these tests—you could only delete the values from each field manually.
Administration Enhancements
-
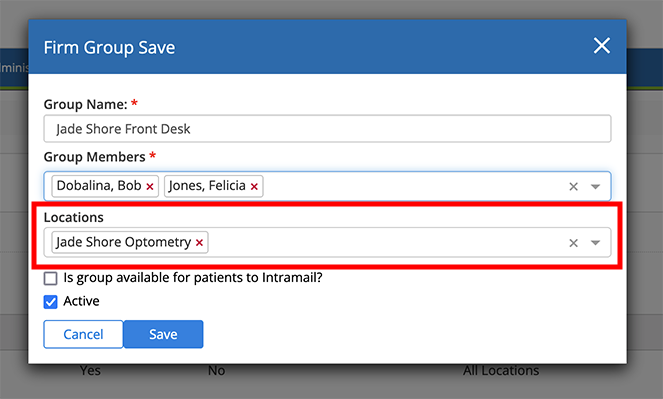
You can now direct patient portal messages to groups at specific practice locations. When these settings are enabled, patients will see only those groups that are associated with practice location where they have finalized exams.
Here's how to configure the location(s) associated with groups:
- Log in to the Encompass web application as an administrator.
- Locate the Staff Groups group and click Manage Staff Groups.
- Add one or more Locations and click Save.
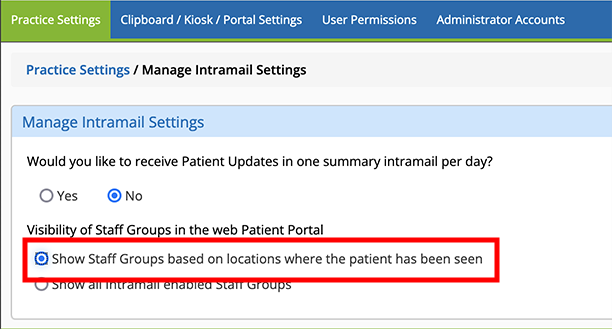
Here's how to set the visibility of staff groups to patients within the portal:
- Log in to the Encompass web application as an administrator.
- Locate the Manage Patient Portal Features group and click Manage Intramail Settings.
- For Visibility of Staff Groups in the web Patient Portal, select Show staff groups based on locations where the patient has been seen.
- We made the following changes to the Manage Contact Lenses section:
- We renamed the Manage Contact Lenses button to Manage Eyewear Prescriptions.
- We added a setting to enable users in the State of New Jersey to print glasses prescriptions on the same prescription blank as contact lenses. This change is intended to eliminate the need to change the paper in the printer depending on the type of eyewear prescription.
Here's how to set Encompass to use the same prescription blank:
- Log in to the Encompass web application as an administrator.
- Locate the Firm Settings group and click Manage Contact Lenses.
- Locate For state of New Jersey, print both glasses and contact lens Rx's in same prescription blank format and select Yes.
- Click Save.
To learn more about the feature, go to iPad and Web Enhancements.
ePrescribing Enhancements
- Refill unassociated medication prescriptions more quickly. We streamlined the process for managing refill requests for medications that were not originally prescribed through Encompass. Medications prescribed outside of Encompass are not associated with any medications within the system. Here's how to manage unassociated prescription refill requests:
- Click Associate Patient.
- Find the patient and click Associate to This Patient.
Encompass returns you to the Refill Queue.
- Click Deny and Recreate.
The Rx Details window opens with any information gathered from the refill request.
- Modify the prescription details as needed and click Save (or tap Save and eRx in the iPad app) .
Encompass sends the refill denial. If you click Cancel on the Rx Details window, you're returned to the Refill Queue and the denial is not sent.
- Click Send ePrescriptions.
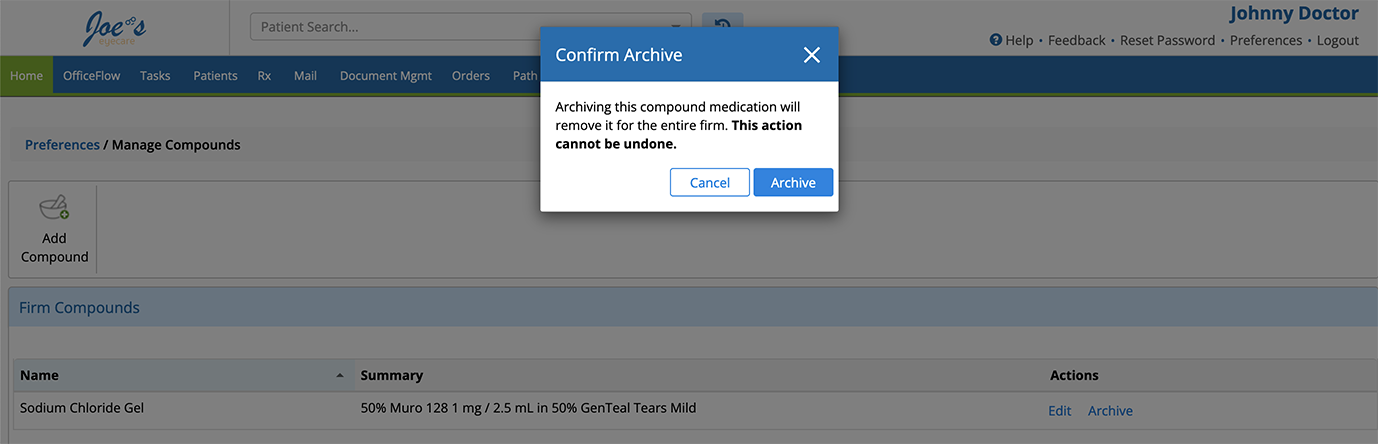
- When you manage compound medications within your user preferences on the web and you select Archive, a warning notifies you that you're removing the compound medication for the entire practice. There is no way to unarchive a compound medication.
Regulatory Enhancements
- We updated the MIPS Merit-based Incentive Payment System. A program that incentivizes healthcare providers to improve the quality of care they deliver to Medicare patients. dashboard to reflect the 2024 requirements:
- The required SAFER Guides measure is now indicated by a check box to confirm the review was completed.
- The minimum performance period for Promoting Interoperability is now 180 days.
- When the Bidirectional Health Information Exchange measure is selected, the Support Electronic Referral Loops by Sending Health Information and Support Electronic Referral Loops by Receiving and Reconciling Health Information measures no longer display points.
- You can now filter by facility when you drill down into individual Quality measures to view activity that contributes toward the measure.
- We updated population criteria to include patients 12 and up in Quality Measure 226. Preventive Care and Screening: Tobacco Use: Screening and Cessation Intervention. Any visits documented after the release will be measured against the new criteria. We will reprocess visits completed prior to this release in the coming weeks to account for the new measure requirements.
- We updated the IOP intraocular pressure. Eye pressure, as determined by the amount of aqueous humor filling it. High IOP (ocular hypertension) can be a sign of glaucoma. reduction threshold from 15% to 20% for Quality Measure 141. Primary Open-Angle Glaucoma (POAG): Reduction of Intraocular Pressure (IOP) by 20% or Documentation of a Plan of Care. Any visits documented after the release will be measured against the new criteria. We will reprocess visits completed prior to this release in the coming weeks to account for the new measure requirements.
Medical Enhancements
- We updated HCPCS codes to reflect the CMS quarterly update;
- Added G0136 to the Social Determinants of Health Assessment plan
- Added J7355 to the iDose TR plan
- Removed J9371 from the Intralesional Chemotherapy Injection plan
- We added the following options to Immunization plan > Details tab > Medications:
- Influenza vaccination (CPT 90637) - Quadrivalent (qIRV), mRNA, 30 mcg/0.5 mL dosage, for intramuscular use
- Influenza vaccination (CPT 90638) - Quadrivalent (qIRV), mRNA, 60 mcg/0.5 mL dosage, for intramuscular use
Known Issues
We're investigating these issues and working to resolve them as soon as possible.
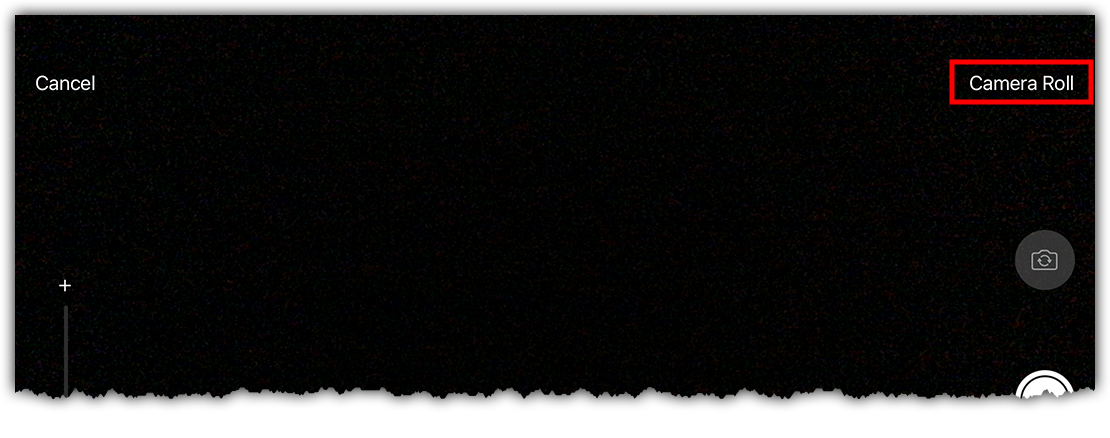
- Users have reported the app returns an error on some iPad models while taking a patient photo. We're investigating the issue, but in the meantime, try taking the patient's photo using the Camera app and then in the Encompass app, selecting Camera Roll to import the patient's photo.
Encompass 7.6.2.1 Update
Released July 2, 2024
This minor update includes the following enhancements and bug fixes:
- We corrected an issue that prevented a field within the Detailed Visit Overview from displaying correctly when the field's value was changed to zero or blank.
Encompass 7.6.2.4 Update
Released July 10, 2024
We added a Terms and Conditions and Privacy Policy prompt for patients accessing the portal for the first time.
Encompass 7.6.3 App Update
Released July 12, 2024
This optional update includes minor bug fixes and performance improvements.
Encompass 7.6.2.6 Update
Released July 17, 2024
This minor update includes the following enhancements and bug fixes:
- Visit notes associated with archived patients are once again accessible.
- We corrected an issue that allowed patients to bypass accepting the terms and conditions when accessing the patient portal for the first time.
- When you documenting the Order Interventional Pain Procedure plan within the iPad app, an order is once again created in the Orders Log.
Encompass 7.6.3 Update
Released July 19, 2024
This minor update includes the following medical updates:
- Added the following plans:
- Order for Procedure - Custom
- Custom Code Tracker- CLE No Laser
- Custom Code Tracker- CLE With Laser
- Custom Code Tracker- No Laser
- Custom Code Tracker- With Laser
- Counseling - Orbital Inflammation
- Conjunctivoplasty - No Path Req
- Counseling - Photophobia
- Added Treatment Options and Decision tabs for the following plans:
- Counseling - Corneal The clear part of the eye covering the iris and pupil; it lets light into the eye, permitting sight. abrasion plan
- Counseling - Commotio retinae
- Counseling - Ophthalmic migraine
- Counseling - HSV Ophthalmicus
- Counseling - Amaurosis Fugax
- Counseling - Corneal
- Updated the default MDM Risk Levels for the following options within the following plans:
- Minimal for Observation under the Decision OS Oculo sinestra. Latin abbreviation for left eye. and Decision OD Oculo dextra. Latin abbreviation for right eye. options for the Counseling - Mature Cataract Clouding of the natural lens of the eye, usually caused by aging in conjunction with such risk factors as exposure to the sun's UV rays, smoking, steroid intake, and diabetes. Symptoms include blurred vision, glare, halos around lights, colors that are less bright, a cloudy spot in vision, and temporary vision improvement. plan
- Moderate for Amniotic membrane transplant under the Decision RUL and Decision LUL options for the Counseling - Dry Eye plan
- Low for Lid scrubs under the Decision OD and Decision OS options for the Counseling - Blepharitis plan
- Minimal for Observation under the Decision OS
- Updated the following plans to render in the Clinical Summary Intravitreal Injection Log:
- Intravitreal Tap
- Injection and Intravitreal Tap
- Added the following tabs to the Counseling - Age Related Cataract plan:
- Complicated Cataracts
- Medical Necessity
- Added a Payment Type drop-down with the following options to the Screening Retinal Photos - Custom Code plan:
- Cash
- CPT Only
- Added the following special plan:
- Print Patient Label
- Added sticky functionality to the OCT Retinal plan > Billing tab > “If OCT and fundus photos were both ordered, which study contributed to the diagnosis and management of the patient most?” dropdown
- Added Local anesthesia as an Anesthesia option to the Excision Conjunctival Lesion Benign plan
- Updated verbiage from “Count Minor/Major Decisions toward MDM (Not Cosmetic)?” to “Count Minor/Major Decisions toward MDM (Cosmetic)?” in the Decision tab within applicable Counseling plans
- Added Vabysmo 6.0 mg Prefilled to the Inventory for the Intravitreal Vabysmo plan
- Added Iyuzeh 0.005 % Eye Drops as a Medication option for the Treatment Regimen Glaucoma A disease characterized by elevated intraocular pressure, which causes optic nerve damage and subsequent peripheral vision loss. Most people have no initial symptoms of chronic (open-angle) glaucoma, but you can develop peripheral vision loss, headaches, blurred vision, difficulty adapting to darkness, and halos around lights. Other forms of glaucoma (e.g., closed-angle glaucoma) may have additional symptoms such as eye pain, a pupil that does not respond to light, redness, nausea, and a bulging eye. plan
- Added Assessment OD and Assessment OS dropdowns under the Assessment and Plan tab within the Fluorescein Angiography plan
- Added a Decision OD section under the Decision tab within the Counseling - Glaucoma absolute plan
- Removed the following plan:
- Counseling - Absolute glaucoma
We fixed the following issues:
- We fixed an issue that caused the note output to renders the following fields even if they are not documented in the Cataract Operative Summary plan:
- Glaucoma Stage
- Number of Arcuate Incisions
- Custom codes manually selected
- We fixed an issue that caused unrelated plans from appearing while searching for the J0178 CPT code.
- The Contact Lens Fitting-Custom Code plan once again overrides the suggested billing code.
- Selecting " Only render **See separate procedure note**" for the ICL plan once again, the procedure notes from rendering.
- An NDC Code free text field once again appears for each medication documented in the Intravitreal Injection plan.
Encompass 7.6.4 Update
Released July 26, 2024
This minor update includes the following enhancements and bug fixes:
- We updated the applicable MIPS Merit-based Incentive Payment System. A program that incentivizes healthcare providers to improve the quality of care they deliver to Medicare patients. Quality measure to account for the Practice Size drop-down menu on the MIPS Overview page.
- We resolved the error that would appear when you documented a medication with an unspecified dispensable in the Patient Clipboard.
- We resolved an error that caused documentation entered in the Diagnosis Comment plan not to save after switching between 99xxx and 92xxx codes.
-
We resolved an error that prevented the Visit Overview from displaying data entered in the following Vision Exam ares:
- Binocular both eyes. > Titmus
- Binocular > Worth
- Keratometry
- Wearing
- Binocular
Encompass 7.6.4.5 Update
Released August 9, 2024
This minor update fixed an error that appeared while launching the equipment interface.
Encompass 7.6.5 Update
Released August 16, 2024
This minor update includes the following medical content:
- We added the following Intravitreal Injection of options for the Intravitreal Vabysmo plan:
- Vabysmo Prefilled
- Sample Vabysmo Prefilled
- Specialty Pharmacy Vabysmo Prefilled
- Genentech Supply Vabysmo Prefilled
- Charity Vabysmo Prefilled
- We added PRN as an Intravitreal Injection of option for applicable intravitreal injection plans.
- We added an Other Details free text field in the Laser Settings for the Laser Resurfacing plan.
Encompass 7.6.6 Update
Released August 30, 2024
This minor update includes the following medical content:
- In the Cataract Clouding of the natural lens of the eye, usually caused by aging in conjunction with such risk factors as exposure to the sun's UV rays, smoking, steroid intake, and diabetes. Symptoms include blurred vision, glare, halos around lights, colors that are less bright, a cloudy spot in vision, and temporary vision improvement. Operative Summary plan Details tab, we updated the IOL free-text fields so data entered there now renders on the visit note.
- We corrected the suggested units for J2779. Now, when you document a 2 mg dose for the Susvimo Refill Procedure plan, the suggested units for J2779 is 100.
- We fixed an issue that caused the Amplitudes OS drop-down to be duplicated in the ERG plan Findings - Retina tab. Now, the Latency OS drop-down menu should appear rather than a second Amplitudes OS drop-down.
- We added the following verbiage to the note output for the Susvimo Refill Procedure plan:
“I withdrew the entire contents of the Susvimo vial into a syringe to the 0.1 mL dose mark [...] the entire contents of the syringe (0.1 mL) were used to flush the medication and provide the appropriate continuous dosage of [...].”
Encompass 7.6.6.1 Update
Released September 6, 2024
This minor update resolves the following issues:
- We resolved an issue that prevented intramail messages sent to the patient from appearing in the patient portal inbox.
- In the Vision Exam > Refractions tab in the web application, we resolved an issue that caused the Save button to be disabled when you add a Sphere value without selecting a Usage. You can once again add a Sphere value without selecting a Usage.