Setting Up and Using the New VSP Interface
We’ve continued to make improvements to update our systems and technology to address the changing dynamics of patient care, and better serve you. As part of these efforts, we are introducing a new VSP interface. The new interface looks a lot like the interface you're used to, but the underlying technologies have changed and behave a little differently.
Eyefinity is rolling the new VSP interface out to groups of practices. Eyefinity will notify you in advance of the date your practice will be migrated to the new VSP Interface.
This page assumes you're already using the OfficeMate VSP interface and describes only the settings you'll need to update prior to pulling any authorizations or submitting any claims or orders. This page also describes the changes you'll need to be aware of as you pull authorizations and submit orders and claims.
Print the New VSP Interface User Checklist and check tasks off as you follow the setup instructions on this page.
Understanding the Migration Process
Read this section thoroughly. This section provides an overview of the actions required to ensure a smooth migration to the new VSP Interface. More detailed instructions may be found in the subsequent sections on this page. We've divided this overview into steps you need to start working on now and steps you need to complete right before your migration date.
Initiate these actions as soon as possible
The following tasks may require time, planning, or scheduling, and should be initiated as soon as possible:
- Install the latest OfficeMate/ExamWRITER. For more information, go to Upgrading OfficeMate/ExamWRITER for Existing Users.
- Verify and update your location information. For more information, go to Updating Location Information.
If you pull eligibility and authorizations through the VSP interface but submit claims through eyefinity.com, you only need to complete steps 1–2. Continue to Complete these actions the day or evening prior to your scheduled migration.
- Add provider signatures to OfficeMate. For more information, go to Adding Provider Signatures.
- Price lens product attributes. For more information, go to Pricing Lens Product Attributes.
- Retrieve the latest lens lists. For more information, go to Importing and Updating Lenses with the Lens Products Loader
- Make sure that all the VSP contract labs your practice uses are selected in Your Lab Listing on eyefinity.com:
- Log into eyefinity.com.
- Go to the eLab tab.
- In the Lab Account Setup section, click Add/Remove a Lab.
- In the Add/Remove A Lab window, under All Labs, click a lab’s [add] button to move the lab to Your Lab Listing.
- Verify that all the labs under Your Last Listing are marked as VSP contract labs (identified by blue circles).
-
Labs selected on eyefinity.com do not appear in the OfficeMate Administration Vendor Maintenance window unless they are also added as VSP-approved labs in OfficeMate Administration (click the VSP icon on the Administration toolbar, and then select VSP Approved Labs).
-
When you use the new VSP interface:
-
On VSP lab orders, the Approved Labs selection window displays Your Lab Listing from eyefinity.com.
-
On electronic lab orders, the Approved Labs selection window displays the labs that you selected from the VSP Approved Labs list in OfficeMate Administration.
-
Complete these actions the day or evening prior to your scheduled migration
Eyefinity will notify you in advance of the date your practice will be migrated to the new VSP Interface. Before the start of business on your migration date, you must complete the following steps:
- Process any on-hold VSP claims, using either OfficeMate or by visiting the classic eClaim form on eyefinity.com.
- If you pull authorizations in advance, delete all outstanding VSP authorizations that have been pulled from OfficeMate or the classic eClaim form. Authorizations pulled from the existing systems may not process properly in the New VSP Interface or on the new eClaim form.
- Process all on-hold VSP and electronic lab orders in OfficeMate, or by using the eLab tab at eyefinity.com.
Once you are migrated to the new VSP Interface, you may visit the classic eClaim form to correct orders and claims that you completed prior to your migration. Do not place any new orders through the classic eClaim form. Instead, pull authorizations, submit orders, and submit claims through OfficeMate and correct any errors in the modern eClaim form. For more information, refer to Familiarizing Yourself with the Modern eClaim Form.
Setting Up the New VSP Interface
Prior to using the new VSP interface, it is imperative that you upgrade to the latest version of OfficeMate (15.3.4033 or greater), and you must set or verify certain settings in OfficeMate Administration. See Upgrading OfficeMate/ExamWRITER for Existing Users.
The new VSP interface enforces more stringent requirements than the legacy VSP interface. For example under the legacy interface, managing products with the Lens Product Loader was strongly encouraged; however, under the new interface, you must import lenses from the Lens Product Loader or your lab orders will fail. Ensure you have completed every task outlined on this page prior to sending lab orders or claims. Print the New VSP Interface User Checklist and check tasks off as you follow the setup instructions on this page.
Ensure your Eyefinity login information is entered in the VSP Integration fields and OfficeMate provider names are mapped to VSP doctor names:
- Type the eyefinity.com User ID that Eyefinity Customer Care gave to you in the User ID text box. The user name is the same as your Eyefinity login ID.
- Type the eyefinity.com password that Eyefinity Customer Care gave to you in the Password text box.
- Click Get Office ID to automatically retrieve your office ID.
If the office ID cannot be found, type the office ID (Oid), including any spaces, that Eyefinity Customer Care gave to you in the Office Id text box.
- Map the OfficeMate Provider Name to the VSP Doctor Name by typing the providers' name exactly as they appear on the VSP remittance advice and click OK.
For more information on setting up the OfficeMate VSP Interface, go to Setting Up the VSP Interface.
If you pull eligibility and authorizations through the VSP interface but submit claims through eyefinity.com, you're finished with the setup. You can now proceed to Using the VSP Interface.
This is a new requirement. Ensure each provider has a scanned signature attached to his or her resource settings.
- Scan a copy of the provider's signature and save it as a JPEG (.jpg) file in the OfficeMate/DATA/eDocuments (or OMATE32/DATA/eDocuments folder) on your server.
If your OfficeMate/ExamWRITER environment is cloud hosted, you may need to contact your hosting provider to assist you with saving the signature file in your shared data folder.
- Open OfficeMate Administration, click Setup and select Resource Setup.
- Select a provider from the list.
- Click Browse next to the Signature Link field.
- Locate the provider's signature file and click OK.
- Click OK to save the provider's information.
To learn more about signature image requirements, go to Importing Provider Signatures into OfficeMate/ExamWRITER.
Prior to using the VSP interface, you must set up attribute pricing. If you have already priced product attributes, you may skip this section. Rather than pricing each variant of each lens, attribute pricing enables you to price the constituent components—or attributes—of all lenses.
-
Open Administration.
-
Click Setup and select Third Party Setup.
-
Click the Attributes tab.
-
Select a Product Type from the list and click the plus (+) sign to expand it.
-
Select an Attribute Category.
-
Select an attribute from the list on the right to price it.
-
Select a procedure code from the CPT drop-down menu.
You do not need to select a CPT code for the ophthalmic Lens Cat./Base attributes. CPT codes are assigned based on the prescription recorded on the Eyewear Order window.
-
In the Cost and Fee columns, type the additional cost and fee for the attribute.
-
The cost and fee associated with the attribute are added to the cost and fee of the product set up in the Products & Services window.
-
Ophthalmic lens attributes are priced per lens. Lens treatment attributes are priced per pair.
-
-
Click Save when you're finished.
For more information about pricing attributes, go to Setting Up Insurance Codes, Modifiers, and Attributes.
You must run the Lens Product Loader prior to using the new VSP interface to ensure correct calculations for the VSP patient out-of-pocket expenses.
- In Administration, click the Tasks menu and select Lens Product Loader.
- If this is your practice's first time using the Lens Product Loader, click Yes to deactivate your existing lens products. This prevents your opticians from accidentally selecting a lens product that may cause errors with your claims and lab orders.
- Download the latest lens lists.
- Click Retrieve Lens List to view the latest lens updates.
The updated list downloads This may take several minutes.
- Review the lists that pop up and select the lenses you want to add or discontinue.
- Click Retrieve Lens List to view the latest lens updates.
- Load the products from the lists into your products database.
- Select Lens Treatments or Ophthalmic Lenses from the Product Type drop-down list.
- Narrow your search results as needed, by entering a Product Name or selecting a Cat./Base, Material, or Color.
- Select the New Lenses option and click Find.
- Select the checkboxes in the Select column to select individual products or click Select All.
- Select the Use Default Attribute Pricing checkbox to import default costs and fees for ophthalmic lens attributes, including prism, add power, and oversize into the product database.
- Click Load.
-
Repeat step 4 until you load all the products you want to add to your product database.
For complete instructions, go to Using the Lens Product Loader.
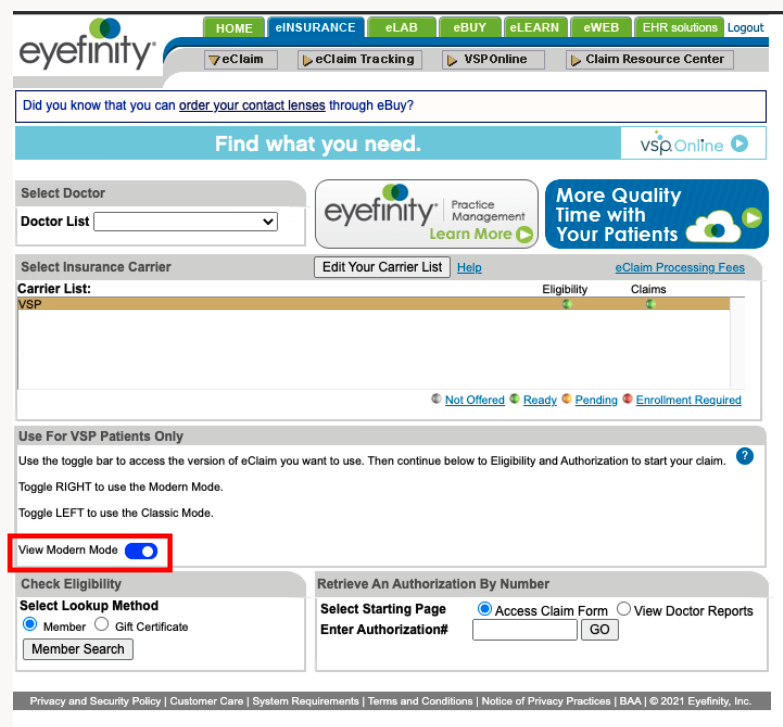
Although the eClaim form is not a new feature of eyefinity.com, you and your staff must familiarize yourselves with the modern eClaim form that is available within eyefinity.com.
The classic eClaim form will remain available within eyefinity.com for several months for historical purposes. It's important to understand when to visit the modern eClaim form versus the classic eClaim form:
- Go to the modern eClaim form to research, view, and troubleshoot VSP clams created on or after your practice goes live with the new VSP interface.
- Go to the classic eClaim form to research, view, and troubleshoot claims that were created prior to the date your practice goes live with the new VSP interface.
To switch between the two modes, click the View Modern Mode toggle.
Using the VSP Interface
If you've been using the VSP interface, you will notice very few changes. This section highlights the changes that you'll need to be aware of to continue pulling authorizations, ordering materials, and submitting claims through OfficeMate.
Once you are migrated to the New VSP Interface, you may visit the classic eClaim form to correct orders and claims that you completed prior to your migration. Do not place any new orders through the classic eClaim form. Instead, pull authorizations, submit orders, and submit claims through OfficeMate and correct any errors in the new eClaim and eLab. For more information, go to the Navigating eInsurance document.
The validate patient feature retrieves the patient's information using the patient's name and date of birth and does not require the Insured ID. While validating patients is not required, it's useful for discovering the patient's covered family members. Here's how to validate patients:
- In OfficeMate open the Demographics window.
You must log into an OfficeMate practice location. You cannot validate patients or pull authorizations through OfficeMate Administration.
- Ensure the patient's name and address are correct and current.
- Ensure the patient's date of birth is entered.
The date of birth is now required for patient matching.
- Click the Insurance tab.
- Select the patient's VSP insurance or add a new VSP plan.
- Click Validate Patient.
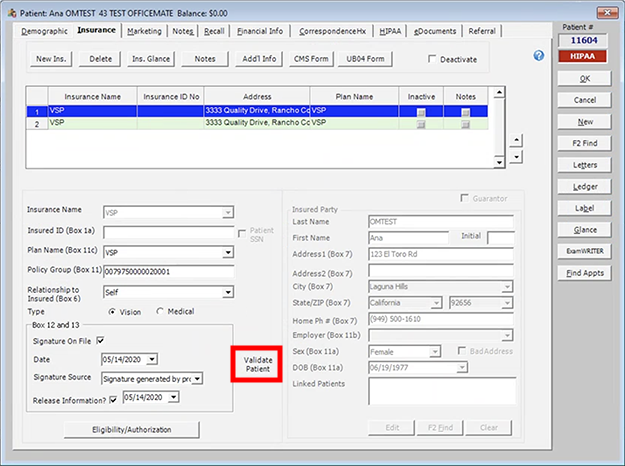
- Select the patient from the list presented and click OK.
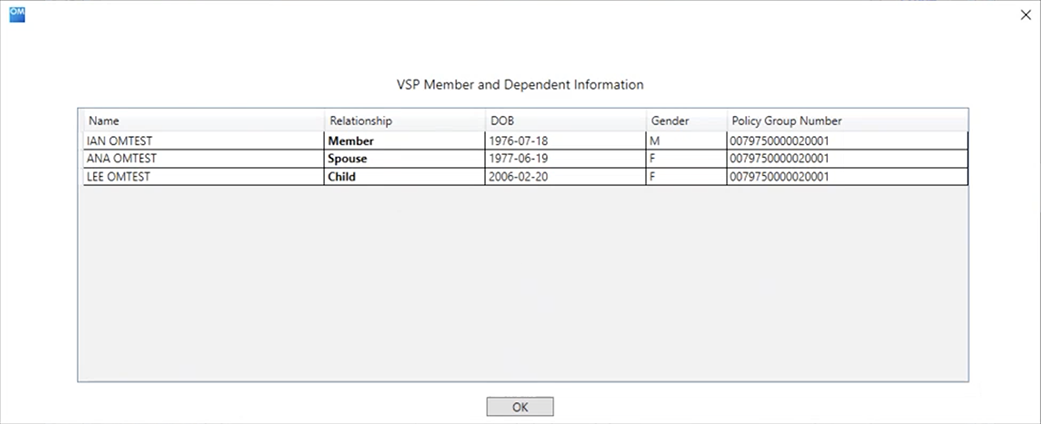
If the patient's name and date of birth match multiple VSP-covered patients, the list also displays addresses to help you select the correct patient.
If you accidentally select the wrong patient from the list, you will need to delete the entries in the Insurance ID and Policy Group text boxes on the Insurance tab in OfficeMate.
The patient is now validated with VSP, and you can now pull authorizations. The Policy Group text box on the Insurance tab is now populated.
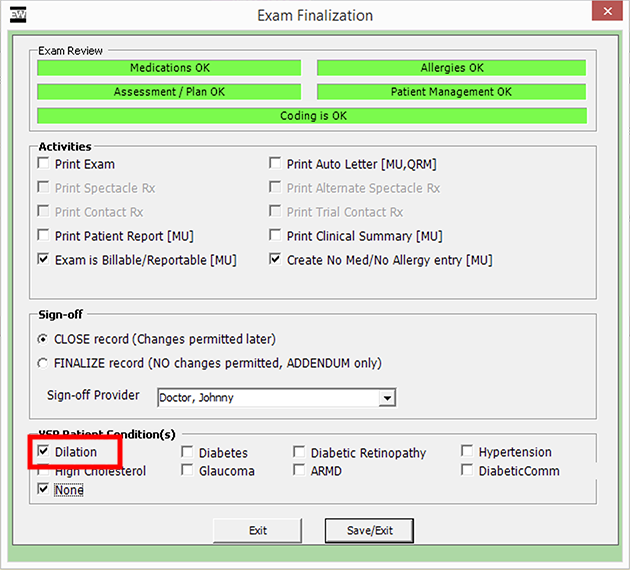
If you select the Dilation check box on the VSP Additional Information window, you must select at least one additional check box.
Reports do not display correctly in Internet Explorer. Change your default browser to Firefox or Chrome:
- Click the Windows Start button.
- Click the PC Settings icon.
- Click Search and Apps.
- Click Defaults.
- Locate the Web Browser section and select Firefox or Chrome.
- Close the PC Settings window.
Troubleshooting
While the outward appearance and general workflows have not changed, the VSP interface has undergone significant revision. Due to these changes, you may find the new VSP interface behaves differently. This section describes how to identify and troubleshoot new situations you may encounter.
If you receive an error while submitting an electronic lab order and you're not sure how to fix the order in OfficeMate, follow these steps to submit the order:
-
Go to eLab:
-
Open your web browser.
-
Go to eyefinity.com, and log in.
-
Click the eLab tab.
-
-
Click Saved Orders.
-
Locate the order by the patient's name and click the Order Number.
-
Resolve any errors and submit the order through eLab. Note the Order Number.
-
Return to OfficeMate Order window and select the None radio button (as opposed to the VSP Order or Electronic Lab Order radio buttons).
-
Click the Rx Notes button, document the eLab order number in the Internal Rx Notes field, and click Save.
Duplicate orders are subject to rejection, which means you want to avoid accidentally creating a duplicate order. Here are the most common situations where duplicate orders occur and advice on avoiding those situations:
-
OfficeMate fails to submit the order, and the user creates a new order on eyefinity.com. When OfficeMate fails to send the order, the order is usually saved. If OfficeMate, fails to send the order, check the Saved Orders on eyefinity.com before creating a new order. See Troubleshooting Electronic Lab Orders.
-
OfficeMate fails to submit the order, and the user attempts to fix the order and resubmit. If OfficeMate fails to send the order, check the Saved Orders on eyefinity.com before fixing order.
-
The VSP order returns errors, and the user deletes the authorization in an attempt to resolve the errors. If OfficeMate fails to send the order, check the Saved Orders on eyefinity.com before deleting the authorization.
Eyefinity is working to prevent duplicate orders from being created.
The VSP interface now enforces certain plan rules at the time of order and claim submission to prevent errors that might cause orders and claims to be delayed or rejected. Addressing these situations prior to submitting orders and claims reduces delays, improves patient satisfaction, and reduces the amount of time practice staff must spend troubleshooting errors.
- Certain CPT codes, like V2220, are not covered services. You will be prompted to edit or remove noncovered service codes.
- Claims with a 92014 code may also require a 92015. If you bill a 92014 alone, you will be prompted to indicate whether a refraction was performed.
- Frame-only orders must meet certain criteria. A message will warn you that the claim will be denied if it doesn't meet VSP's criteria. Refer to the "Providing Frames" section of the VSP manual.
- Glasses orders with two different types of lenses (e.g., one bifocal and the other trifocal) cannot be processed through the VSP interface. You must submit the order through eyefinity.com.
An error message currently appears directing you to call VSP for a special authorization. This is incorrect. Go to eyefinity.com to submit the order.
- If you select a plus and minus sphere, a message will ask you to verify these entries were intentional.
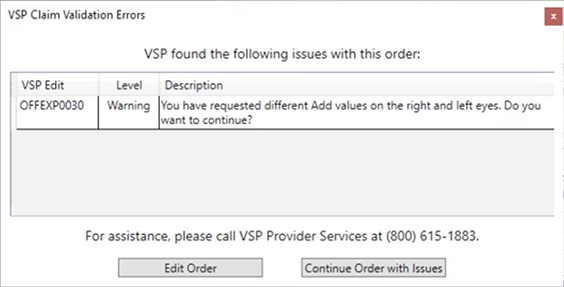
- If you select a different add power for each eye, a message will ask you to verify these entries were intentional.
- If the lab cannot acknowledge receipt of the order, they will need to check their new lab portal for the order.
If you're unable to send an order through the VSP interface, place the order through the eLab tab on eyefinity.com.
While submitting orders and claims, you may encounter two types of messages: errors and warnings. In either case, the message displays a description that explains how to proceed.
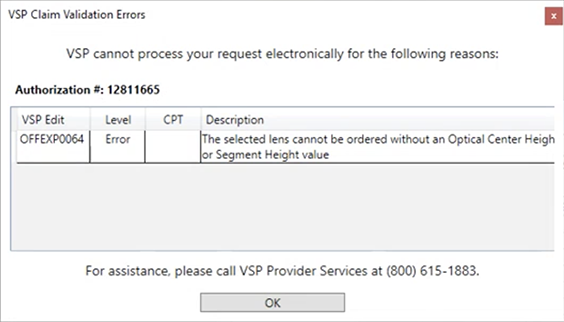
Errors
Errors are distinguished by the word Error in the Level column. Errors reflect conditions that must be corrected before the order or claim can be submitted. Click OK to close the message window. You must correct the error, or the message will display again when you attempt to submit the order or claim.
Warnings
Warnings are distinguished by the word Warning in the Level column and the option to edit the order or continue with the order as is. Click Edit Order to review and change the order and claim. Click Continue Order with Issues to acknowledge the warning and proceed without making any changes to the order or claim.
We are aware of an issue that causes warnings to display multiple times, even after the warning has been acknowledged. For example, the warning may be acknowledged by the optician when the order is saved, but then display again when the front desk staff records the fee slip. This issue will be corrected in a future release.
If you add a base curve (BC) value to a VSP Rx order for any lens, OfficeMate now automatically adds the following elements to the order:
-
New product: V2730 Special Base Curve Per Lens
-
Price: $0.00 (This can be changed but not removed. If the price is missing from the fee slip, an error occurs, and the order is not processed.)
- CPT code: V2730
- Category: Lens Treatment
-
- New attribute: Miscellaneous Special Base Curve
The new product is added to the Rx order’s Add-Ons box on two lines (one for the right lens and one for the left lens). Usually, add-on lens treatments are added on a single line.
The purpose of the new BC product is to prevent the errors that occur on orders with BC values that require the V2730 code. If you process such orders with the new VSP interface, only warnings about option codes and fee slips occur. Those are expected; you can acknowledge and then ignore them.
If the BC value is removed from the order, the new BC product is automatically removed from the Add-Ons box, too. If an order has a BC value without an associated product, attribute, or both, you will receive errors that prevent the order from going to Eyefinity when its fee slip is created.
Videos
The following videos have been updated to reflect the new VSP Interface.