Adding New Appointments in Book View
This topic explains how to schedule appointments in the Appointment Calendar's Book View setting. For information on scheduling appointments in Day or Week View, see Adding New Appointments in Day and Week View. For information on overbooking appointments, see Adding Overbook Appointments in Book View.
- On the top menu bar in Encompass, click Appointments and select Appointment Calendar.
The Appointment Calendar opens.
-
If Book View is not already displayed, select it from the drop-down list next to the date in the Appointment Calendar toolbar.
-
Do one of the following:
-
Locate the time slot you want and click the + button in the far left column. If the + button is white, the time slot already has an appointment scheduled but you can add an overbook appointment. For more information, see Adding Overbook Appointments in Book View.
-
Click Find Open, search for an open appointment, and select it. For more information, see Searching for Open Appointments.
The Add Appointment window opens.
-
- Search for and select the patient for whom you are scheduling the appointment. If no matches are found, click + Patient to add a new patient.When you add a new patient from the Add Appointment window, you're prompted to enter only the basic required demographic information. You will need to add additional demographic information later to complete the patient's record.
To see and edit the patient's demographics, insurance plan, and eligibility/authorization information, click the Patient Details button next to the patient's name in left-side patient information panel. For more information, see Reviewing and Modifying Patient Information from the Appointment Calendar
- In the Add Appointment window, select the Service Type.
- Select the patient's Vision Insurance and Medical Insurance. You are required to select at least one insurance plan.
An icon indicates whether the selected insurance plan has eligibilities. To add a new eligibility, select Add Eligibility/Authorization from the Insurance drop-down list. For more information, go to Adding Patient Insurance in Add Appointment.
To add a new insurance plan for the patient, select Add Insurance or Check for VSP Insurance from the drop-down list. For more information, go to Adding Patient Insurance in Add Appointment.
The Vision Insurance drop-down list displays only vision insurance plans or plans that are both vision and medical. The Medical Insurance drop-down list displays only medical insurance plans or plans that are both vision and medical. - Select Pre-Appointment to mark the appointment as a pre-appointment.A pre-appointment is a future appointment created at the time the patient checks out from their current appointment, instead of when the patient is recalled.
-
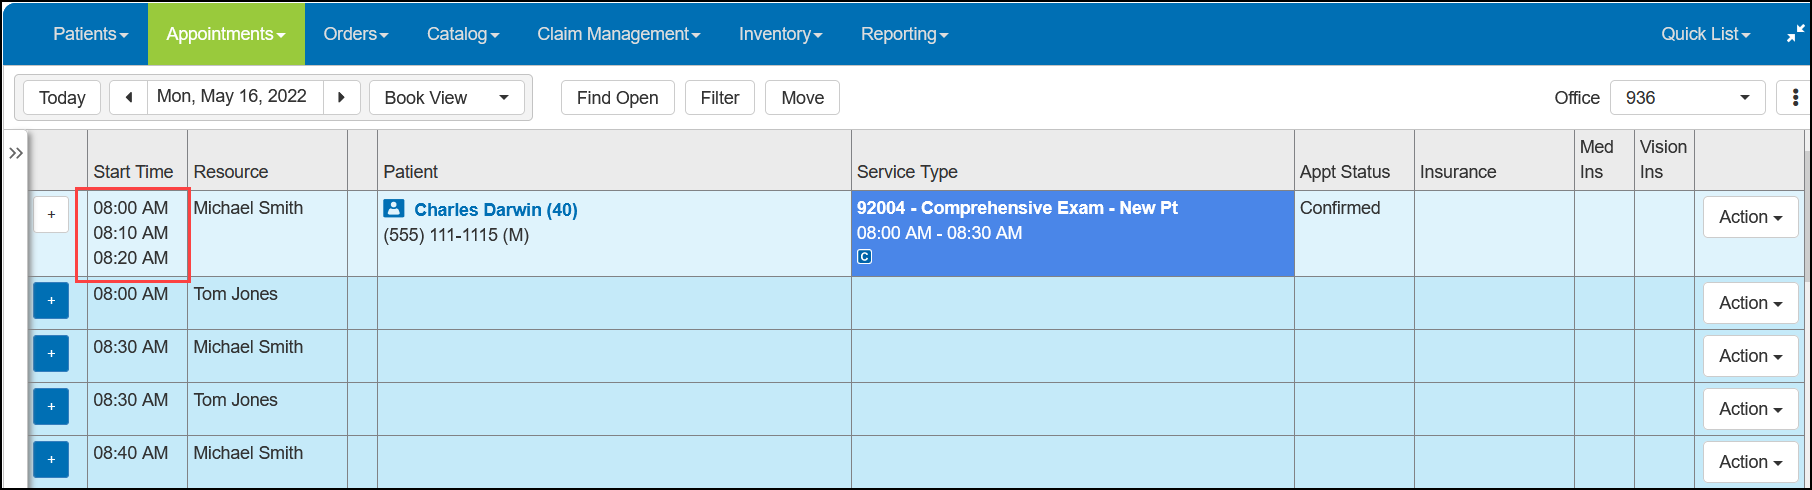
Change the Appointment Time and Appointment Duration, if necessary. The default duration time is the duration assigned to the service; if the service does not have a default duration, then the duration defaults to the resource’s exam minutes.
If the Appointment Duration is longer than the resource's default exam minutes, the appointment will span multiple time slots in the Book View. The Start Times for all included time slots are shown together in the Start Time column.
- To indicate whether the appointment has been confirmed, under Confirmation Status, select one of the following options:
- Not Confirmed
- Left Message
- Not Available
- ConfirmedMost new appointments default to Not Confirmed. An appointment will default to Confirmed if the current date falls within the Auto Confirm Appointment in Advance range set in Administration.
- To indicate the appointment status, under Appointment Status, select one of the following options:
- Scheduled
- No Show
- Checked In
- Checked Out
- Walk In
- Record any Appointment Notes.
In the Appointment Calendar, an icon indicates when an appointment has a note associated with it.
The note text appears in the patient information panel when you select an appointment. You can also view these notes in the Correspondence: Notes window. For more information, go to Search for a note.
You can include these notes on the Patient Audit Report. For more information, go to Generating the Patient Audit Report.
- If the note is urgent, select Urgent.
- If the note requires follow up, select Follow-Up.
- Click Save.If you use EHR in Encompass and the EyefinityEHR? check box is selected for the provider in Administration, the appointment appears in the EHR Quick List.
The appointment is added to the calendar. If the appointment uses more than one time slot, all the time slots are listed in the Start Time column.
Adding Overbook Appointments in Book View
You can add overbook appointments for resources that have them enabled
-
Locate the time slot with an existing appointment where you want to add the overbook appointment.
-
Click the white + button. If the time slot does not have a + button, no overbooks are allowed for that resource and/or time slot.
-
If the existing appointment is using only a single time slot, the Add Appointment window opens.
-
If the appointment spans multiple time slots, a list of start times displays. Select the start time you need for the overbook appointment to open the Add Appointment window.
-
-
Enter and save the appointment information following steps 4-14 above.
If the overbook limit for the resource has been exceeded, but your Administrator has enabled the override for overbooks, the Appointment Validation window opens. Click Yes.The overbook appointment is added to the calendar.