Recording Service Information
You can record as little or as much service information in OfficeMate as is necessary for your practice. This topic tells you how to record services in OfficeMate.
- Before you add services to OfficeMate, set up your insurance fee schedule information and procedure codes in OfficeMate Administration. To set up insurance information, see To modify or add appointment schedule resources. To set up procedure codes, see To add and modify procedure codes.
- Press the F12 key when your cursor is in a drop-down box to open a Maintain window and add new items to the drop-down menu selections. For more information on using the F12 key, see To add and maintain list box selections (F12).
This section includes:
- Adding or Modifying Services
- Activating and Inactivating Services
- Adding Additional Information to Services
- Itemizing Service Details
- Maintaining Service Attributes
- Open the Products window. For more information, see Opening the Products Window.
- Select Services from the Product Type drop-down menu.
- Enter additional search criteria and click F2 - Find or press Enter to search for and find an existing service. For more information, see Finding Products and Services.
- Select the Inactive radio button if you want to inactivate the service; deselect the Inactive radio button if you want to activate the service.
Inactivate services and will only appear in service search results when you select the Include Inactive Items check box prior to performing the search.
- Click Save and select one of the following options:
Save to save the information and keep the Products window open.
Save and New to save the information and create a new service.
Save and Exit to close the Products window.
- Open the Products window. For more information, see Opening the Products Window.
- Select Services from the Product Type drop-down menu.
- Complete one of the following tasks:
- Click New Product to add a new service. For more information, see Recording Service Information.
- Enter additional search criteria and click F2 - Find or press Enter to search for and find an existing service. For more information, see Finding Products and Services.
- Click Copy to copy the service details and then make changes to them to record a new service.
- Click Next and Previous to add or modify the previous or next service in your database.
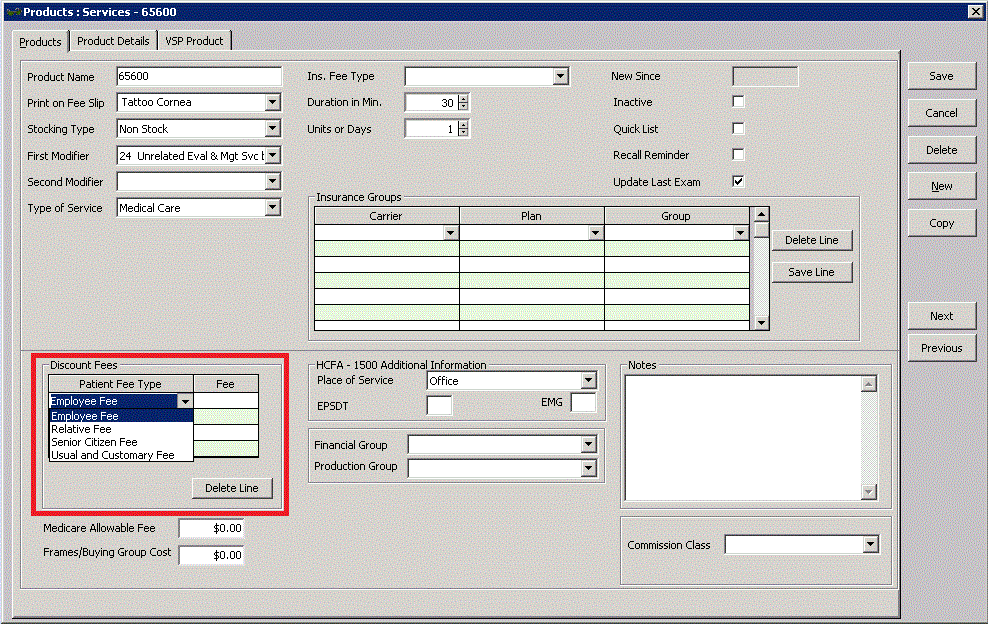
- If you want to assign different patient fees for different types of patients:
- Select a patient fee type from the Patient Fee Type drop-down menu.
- Type a fee in the Fee text box.

- Type the Medicare allowable fee in the Medicare Allowable Fee text box, if applicable.
- Type the buying group cost in the Frame/Buying Group Cost text box if applicable.
- Type Y in the EPSDT text box if the service is part of an early periodic screening and diagnostic test.
The EPSDT is automatically entered on the CMS 1500 form in box 24H.
- Select a place of service from the Place of Service drop-down menu.
- To add and modify places of service to select in this drop-down menu, see To add list box selections and To modify list box selections.
- The place of service is automatically entered on the CMS form in box 24B. If you record a place of service code on the insurance plan, it will override a place of service that you record on a service. For more information on recording a place of service code on an insurance plan, see To add & modify insurance plans.
- Type Y in the EMG text box if the service is related to an emergency or type N in the EMG text box if the service is not related to an emergency.
The EMG is automatically entered on the CMS 1500 form in box 24C.
- Select a financial group from the Financial Group drop-down menu if the CPT code and financial group are not already linked to each other. To modify CPT codes and their associated financial groups, see To add and modify procedure codes.
The financial group you select can significantly effect the general ledger and accounting. You are required to make a selection from the Financial Group drop-down menu if you are using the General Ledger Interface.
- Select a production group from the Production Group drop-down menu, if the CPT code and production group are not already linked to each other. To modify CPT codes and their associated production groups, see To add and modify procedure codes.
- Type notes in the Notes box.
- Select a commission class from the CommissionClass drop-down menu. To add or modify commission classes, see To set up commission classes.
- If you want to itemize service details, see To itemize service details; otherwise, click Save and select one of the following options:
- Save to save the information and keep the Products window open.
- Save and New to save the information and create a new service.
- Save and Exit to close the Products window.
To itemize details for your services, complete the instructions below.
- Open the Products window. For more information, see Opening the Products Window.
- Select Services from the Product Type drop-down menu.
- Complete one of the following tasks:
- Click New Product to add a new service. For more information, see Recording Service Information.
- Enter additional search criteria and click F2 - Find or press Enter to search for and find an existing service. For more information, see Finding Products and Services.
- Click Copy to copy the service details and then make changes to them to record a new service.
- Click Next and Previous to add or modify the previous or next service in your database.
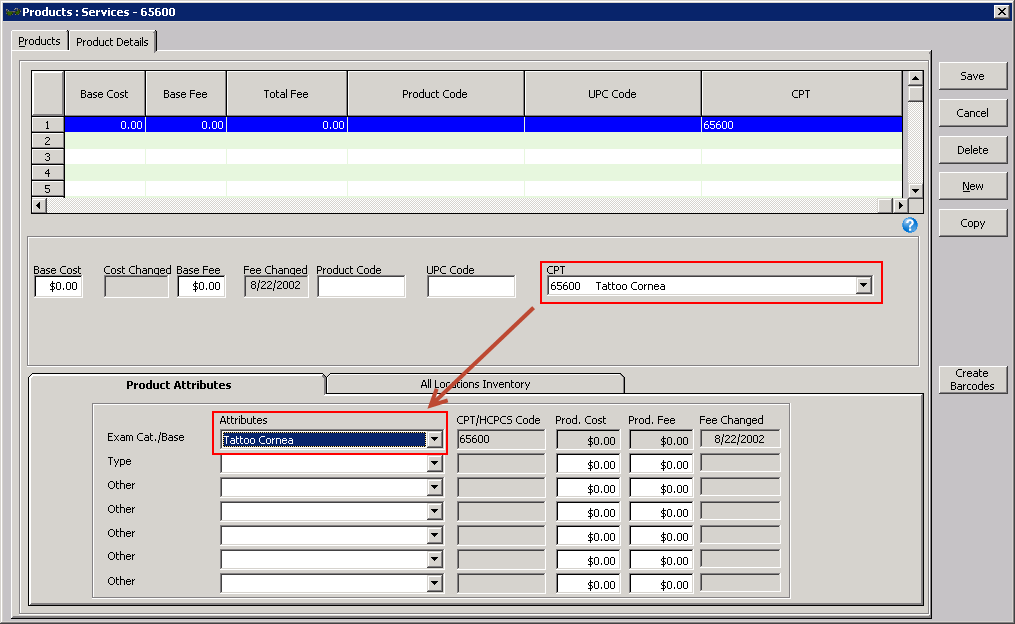
- Click the Product Details tab.
- Click New to add new service details or select in a line in the table to modify service details already recorded.
Select a line and click Delete to delete the line if it is not linked to a fee slip, Rx order, or purchase order.
- If you have OfficeMate Administration access, complete these steps:
- Type the cost of the service in the Prod Cost text box.
- Type the product fee in the Prod Fee text box.
The Prod Cost and Prod Fee entered here automatically populates the attribute product cost and product fee on the Product Attributes tab.
To record product costs and fees by location, perform the following steps:
- Click the All Locations Inventory tab.
- Type the cost and fee information in the Prod Cost and Prod Fee fields for each location, as needed.
If the Prod Cost and Prod Fee information is blank or set to zero on the All Locations Inventory tab, OfficeMate looks to the Product Details tab for product cost and fee information.
The Avg Cost field is a read-only field that displays the average cost of the service throughout its lifetime.
- Adjust the Prod Cost and Prod Fee fields on the Product Attributes tab as needed.
- Adjust the Prod Cost and Prod Fee fields on the All Locations Inventory tab as needed.
- Type an even-numbered product code in the Prod Code text box.
- Type the UPC code in the UPC Code text box.
Due to limitations in barcode printing and scanning systems, ensure your Product Code and UPC Code meet the following requirements:
- Must be 6–12 digits
- Must contain only numbers
- Must be an even number of digits. Enter leading zeros as needed to ensure an even number
- Must be unique among the products in your system
- Select a procedure code from the CPT drop-down menu.
The CPT code is automatically entered on the CMS 1500 form in box 24D.
- Click Save and select one of the following options:
- Save to save the information and keep the Products window open.
- Save and New to save the information and create a new service.
- Save and Exit to close the Products window.
Attributes are characteristics of a service that translate into billable codes on the insurance claim. Set up the service attributes in the Products window. The attribute information in the Products window is later matched against the insurance plan’s allowable benefit when the fee slip is created. Each attribute associated with a service that falls within the plan’s allowable benefits translates into increased revenue for your practice.
- Open the Products window. For more information, see Opening the Products Window.
- Select Services from the Product Type drop-down menu.
- Complete one of the following tasks:
- Click New Product to add a new service. For more information, see Recording Service Information.
- Enter additional search criteria and click F2 - Find or press Enter to search for and find an existing service. For more information, see Finding Products and Services.
- Click Copy to copy the service details and then make changes to them to record a new service.
- Click Next and Previous to add or modify the previous or next service in your database.
- Click the Product Details tab.
- Ensure that the Exam Cat.Base Attribute drop-down menu displays the same description as the CPT drop-down menu.
- Select additional attributes from the Attributes drop-down menus as needed.
The CPT/HCPCS Code, Product Cost, and Product Fee fields automatically populate based on the attribute selected. For information on associating procedure codes, costs, and fees with attributes, see To add & modify attributes.

- Click Save and select one of the following options:
- Save to save the information and keep the Products window open.
- Save and New to save the information and create a new service.
- Save and Exit to close the Products window.
In addition to the procedure above, watch this video.