Eyefinity Practice Management 10.38 Release Notes
Release Date: April 13, 2022
Eyefinity announces the newest version of Eyefinity Practice Management. This updated version improves upon your system's robust attributes and offers new features and expanded functionality.
This section includes:
- Front Office Enhancements
- Administration Enhancements
- Eyefinity EHR Integration Enhancement
- New VSP Interface Enhancement
- Fixed Issues
- Known Issues
- Eyefinity Practice Management 10.38.1
- Eyefinity Practice Management 10.38.2
- Eyefinity Practice Management 10.38.4
Front Office Enhancements
Eyefinity Practice Management 10.38 Front Office includes enhancements to the following areas:
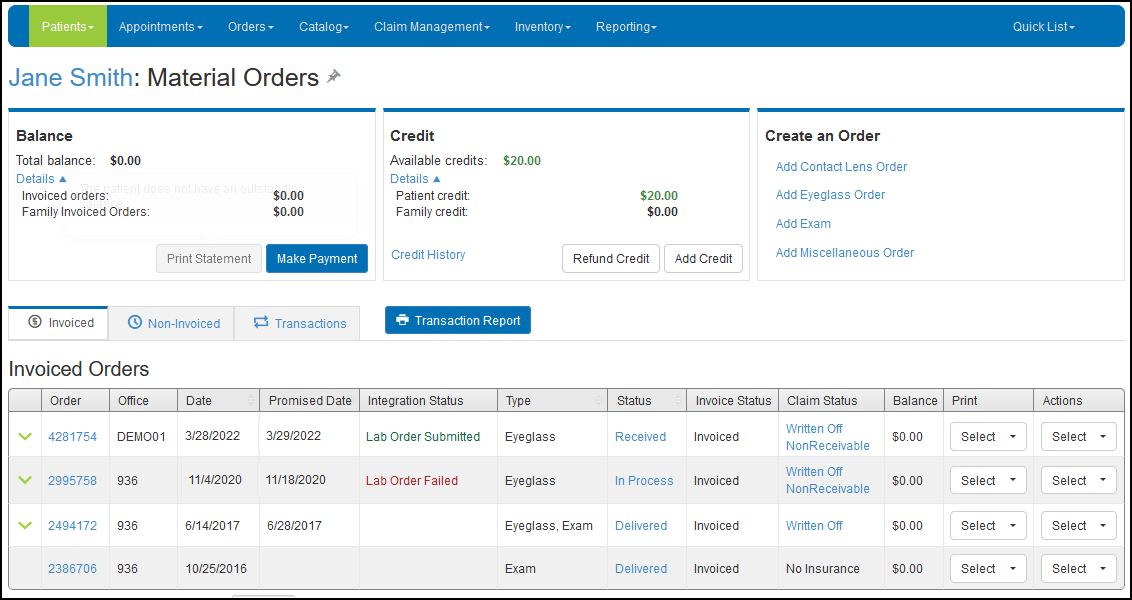
Material Orders Home Screen Redesign
With this release, all users will now have our redesigned Material Orders home screen and workflows. You'll see the improvements we've made to simplify navigation and speed up tasks such as entering payments and credits, processing returns, and reviewing transactions. Material Orders is more intuitive to use, making it quicker to train new staff members. We've also optimized many of the screens for tablet use, allowing you easily check out your patients on an iPad.
Now you can:
-
Easily view patient balances and credits throughout Material Orders. See Viewing a Patient's Balance Details and Viewing a Patient's Credit Details and History for more information.
-
Review past transactions using our simplified navigation. See Managing Transactions.
-
Quickly take patient copays at the time of check-in. See Entering a Patient Credit
-
Access each order's claim directly from the Invoiced Orders list. Clicking the Claim Status link takes you directly to the Claim Details screen. See Viewing an Order's Claim Status and Claim
-
Set the minimum patient payment required to invoice an order. See Minimum Payment Percentage for Checkout.
-
Search transaction information by order number.
-
Use the new Merchandise Drop feature when a patient doesn't pick up their order and you need to change the order's status and adjust off the remaining balance. See Using Merchandise Drop.
Only providers and staff with the Merchandise Drop security permission can perform a Merchandise Drop. This permission is disabled by default for all of your providers and staff members. We recommend reviewing their security settings and adjusting them, as appropriate. For instructions, see Setting Up Provider Security Settings and Setting Up Staff Security Settings. -
Access printable order documents, including invoices, CMS forms, packing slips, ledger, lab orders, and the prescription, all in one place. See Printing Order Documents.
-
Clearly see the status of your invoiced orders in the new Integration Status column. We've replaced the colored "skittle" icons with text to make the status easier to understand. See Viewing an Order's Integration Status and Handling Failed eLab Orders.
To learn more about how to use all areas of Material Orders, see Using Material Orders.
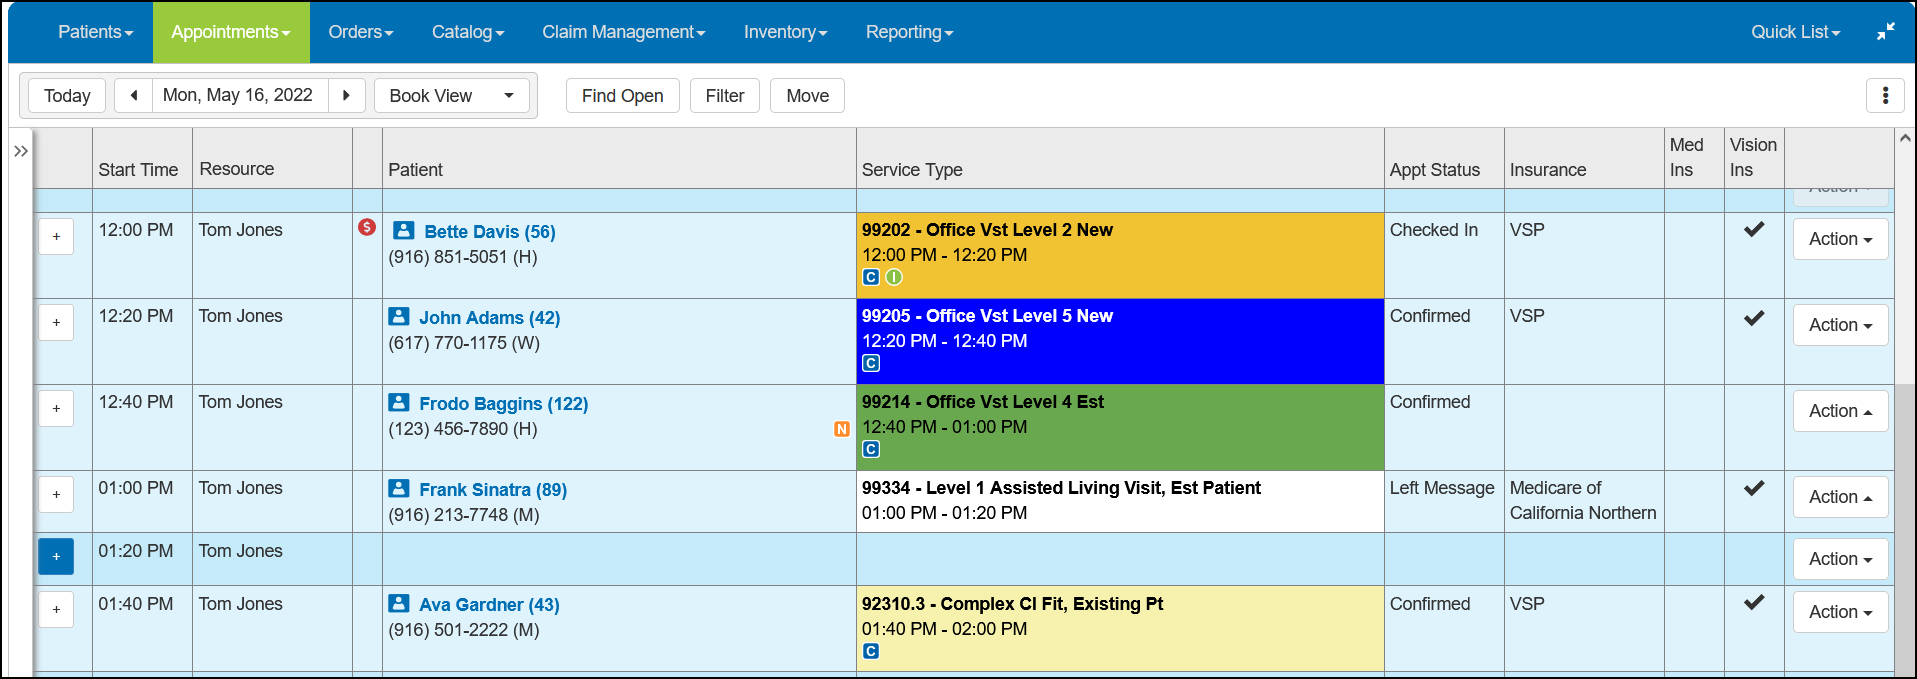
Appointment Calendar Book View
We've created a new Book View setting in the Appointment Calendar, to give you another way to view your appointments. The Book View displays the schedule for the selected day as a list of time slots. Each time slot is indicated with a Start Time and Resource name. Appointment start times are determined by the default exam minutes set for the resource in Administration.
From the Book View, you can add, reschedule, confirm, and delete appointments, change appointment statuses, view and edit patient notes, print patient forms, and add calendar exceptions, just like you can in Day and Week View. For scheduled appointments, the Book View displays the Patient name, Service Type, Appointment Status, and Insurance information. You can filter the Book View to display time slots and appointments for a single Resource, Service Type, and/or Appointment Status.
For more information on Book View, see Using Book View in the Appointment Calendar.
Other Appointment Calendar Improvements
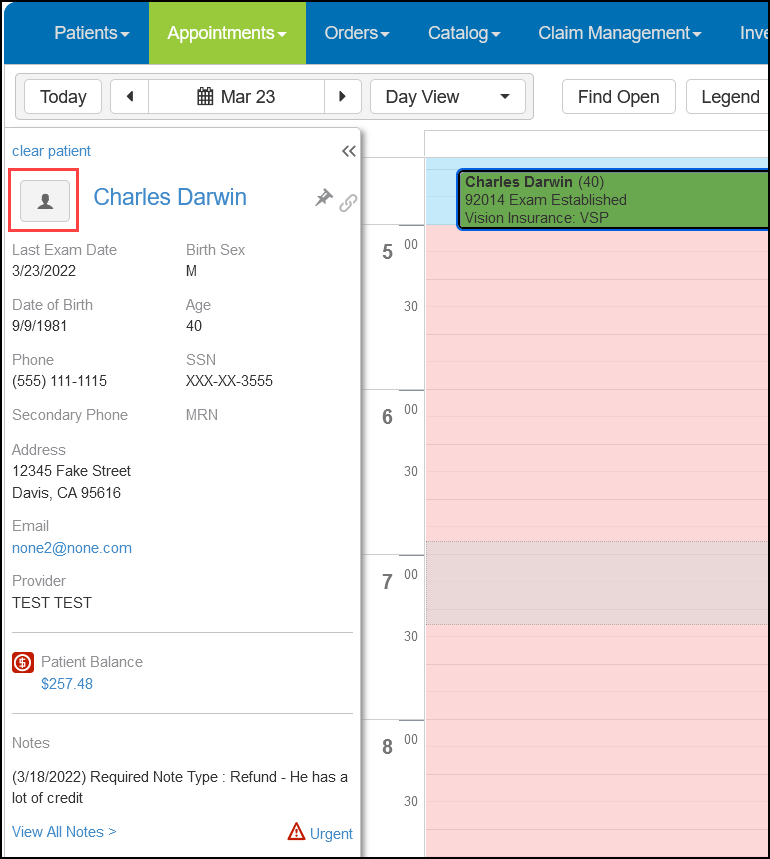
Review and Edit Patient Information from the Appointment Calendar
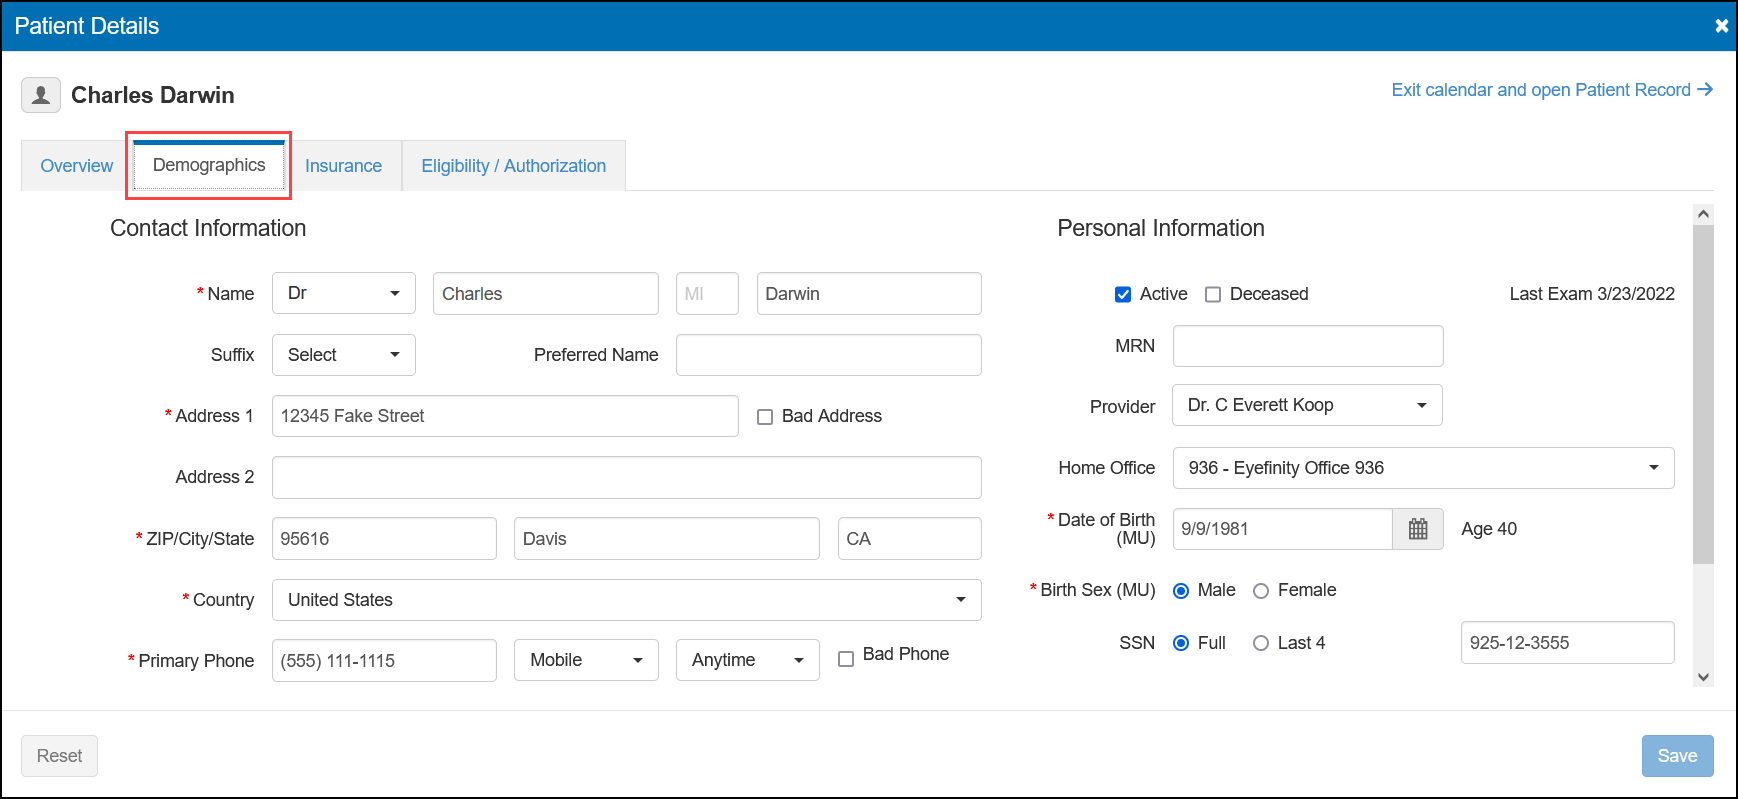
You can now see and edit a patient's demographics, insurance plan, and eligibility/authorization information while adding, editing, or viewing their appointment. The new Patient Details window provides most of the same features as the patient Overview, Demographics, Insurance, and Eligibility/Authorization screens without requiring you to close the Appointment Calendar.
- Open the Appointment Calendar.
- Do one of the following:
- Start a new appointment for a patient.
- Locate an existing appointment and click the appointment (Day or Week View) or click the patient's name (Book View).
- In the panel, click the Patient Details button to the left of the patient's name.
 The patient's name is now a link that will close the Appointment Calendar and open the patient's Demographics screen.
The Patient Details window opens. The Overview tab displays information pulled from the patient's Overview screen.
- To view or edit the patient's Demographics information, click the Demographics tab. The tab includes all the required fields for the patient record, but leaves out some optional information found on the Demographics screen, such as Communication Preferences.
- To view or edit the patient's insurance information, click the Insurance tab.
- To view or edit the patient's eligibilities and authorizations, click the Eligibility/Authorization tab.
- When you're finished viewing or editing the patient's information, click Back to Appointment or the X button to close the Patient Details window.
The patient information panel opens on the left side of the screen.
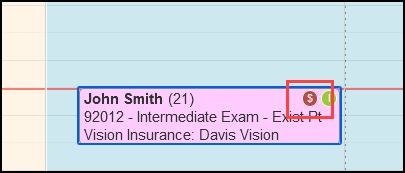
Exam Not Invoiced Icon
A red dollar sign icon now displays on appointments with Walk In, Checked In, or Checked Out status if no exam order has been invoiced. Once you invoice the patient's exam, the icon disappears. The icon is shown on the calendar in Day, Week, and Book View. Use this feature to help you make sure you're collecting payment from patients at the time of service.
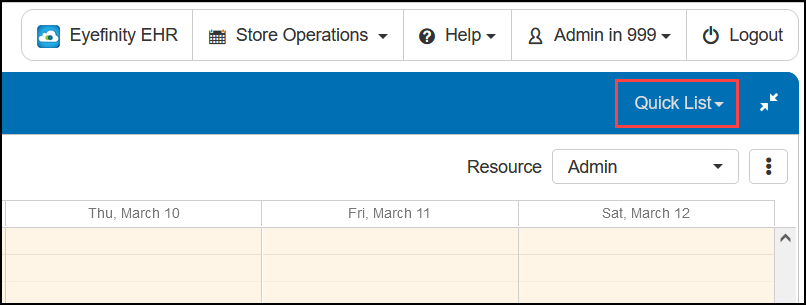
Quick List in Calendar
You can now access the Quick List while in the Appointment Calendar.
Improved Calendar Full Screen
The Full Screen feature now expands the Calendar to fill the entire screen.
Quicker New Patient Entry When Adding Appointments
Adding a new patient when entering an appointment now only requires the patient's Name, Date of Birth, and Primary Phone number. You will need to access the patient's Demographics screen to fill in the rest of their record later.
Calendar Color Legend
Day View and Week View have a new Legend button that displays and hides the color coding key.

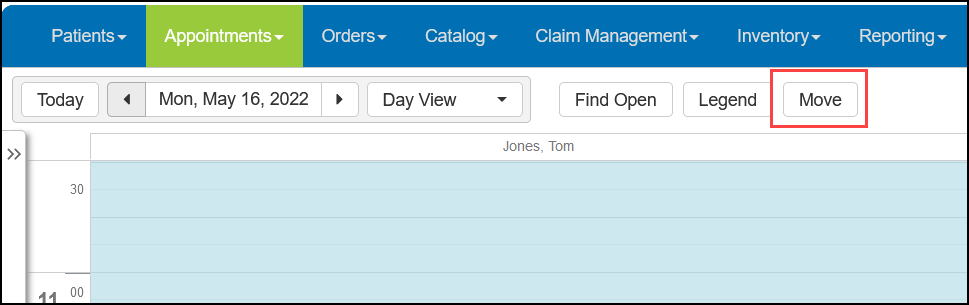
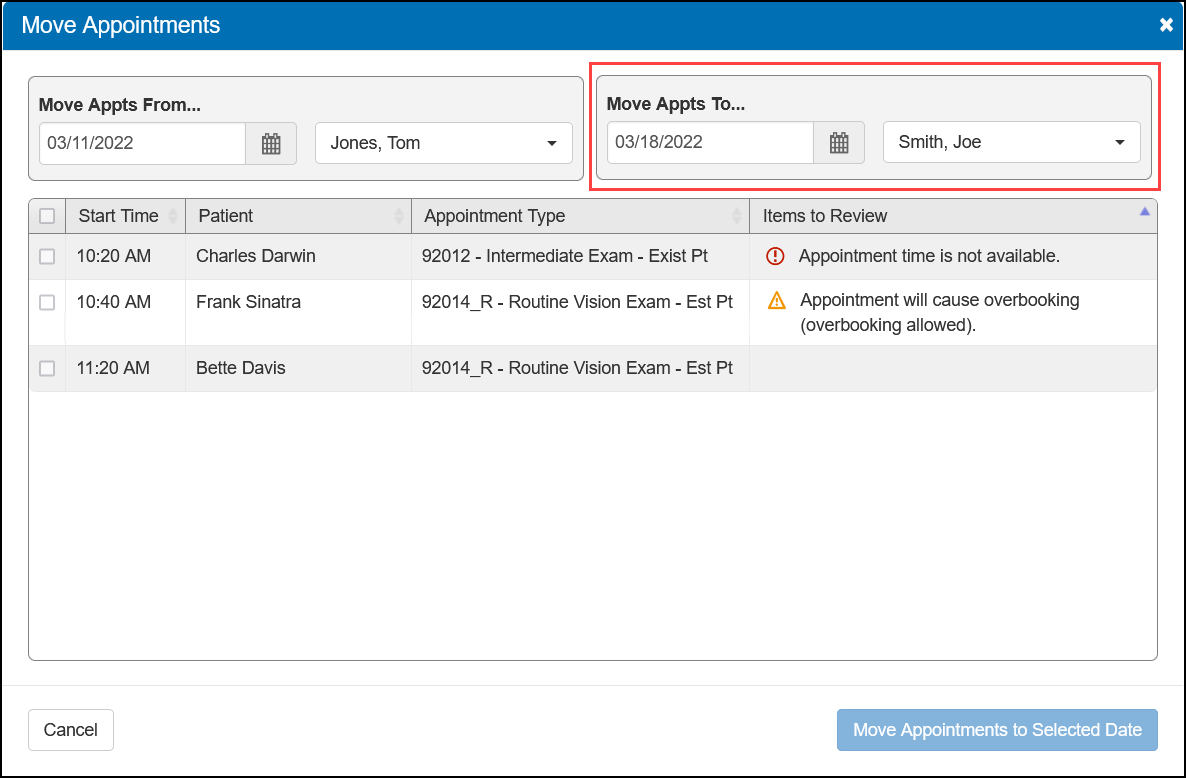
Move Multiple Appointments at the Same Time
You can now select multiple appointments and reschedule or assign them to a different provider all at once. This new feature makes it easier to handle rescheduling on days when a provider calls in sick or is otherwise unavailable.
- Open the Appointment Calendar.
- Click Move.
- In the Move Appointments window, select the date and resource you want to move appointments from.
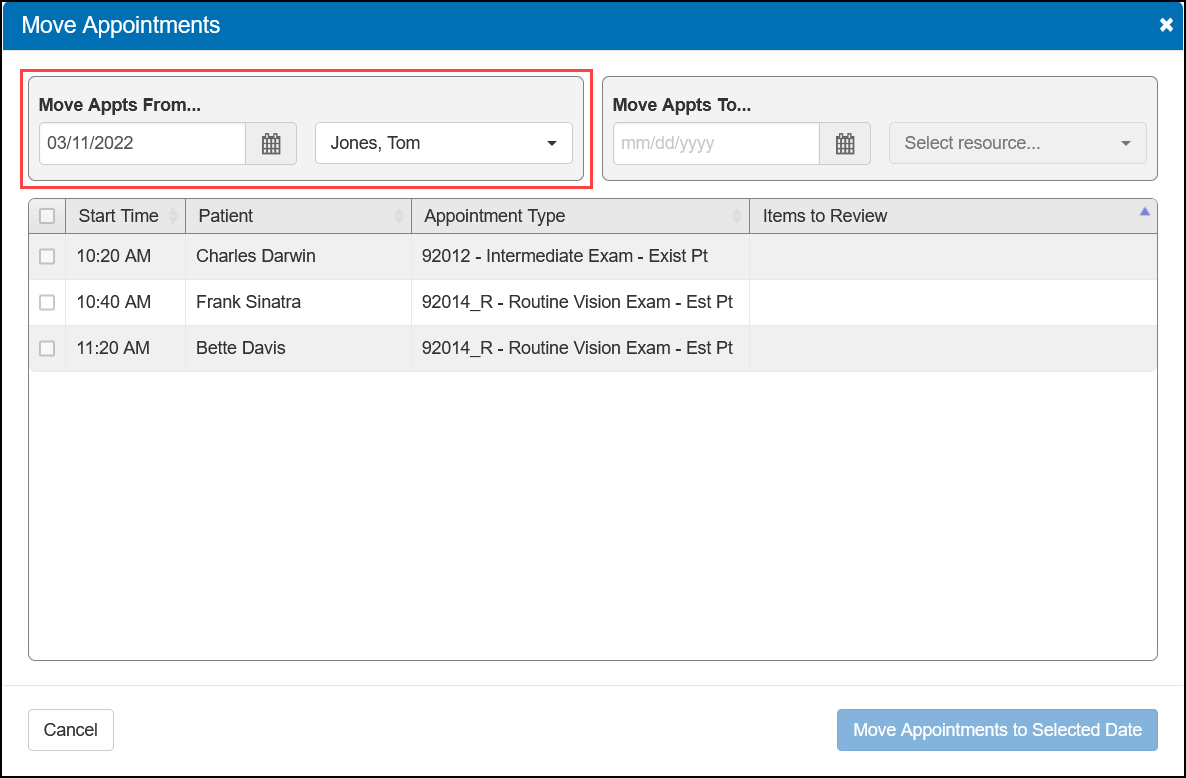
The list updates to show all the appointments currently scheduled for the selected resource on the selected day.
- Select the date and resource you want to move appointments to.
- Select the check boxes next to the appointments you want to move.
- Click Move Appointments to Selected Date.
The appointments are moved to the resource and date you selected.
The system checks to see if there are any scheduling conflicts and if there are, the Items to Review column displays messages describing them. If any appointments have a message with the ![]() icon, you won't be able to move those appointments. Messages with the
icon, you won't be able to move those appointments. Messages with the ![]() icon will not prevent you from moving the appointments, but you should review them and take any needed action to prevent schedule problems.
icon will not prevent you from moving the appointments, but you should review them and take any needed action to prevent schedule problems.
Resource Settings Update for Tablets
If you're a tablet user, the Resource Settings window now includes up and down arrow buttons so you can rearrange the resources for the Day View.
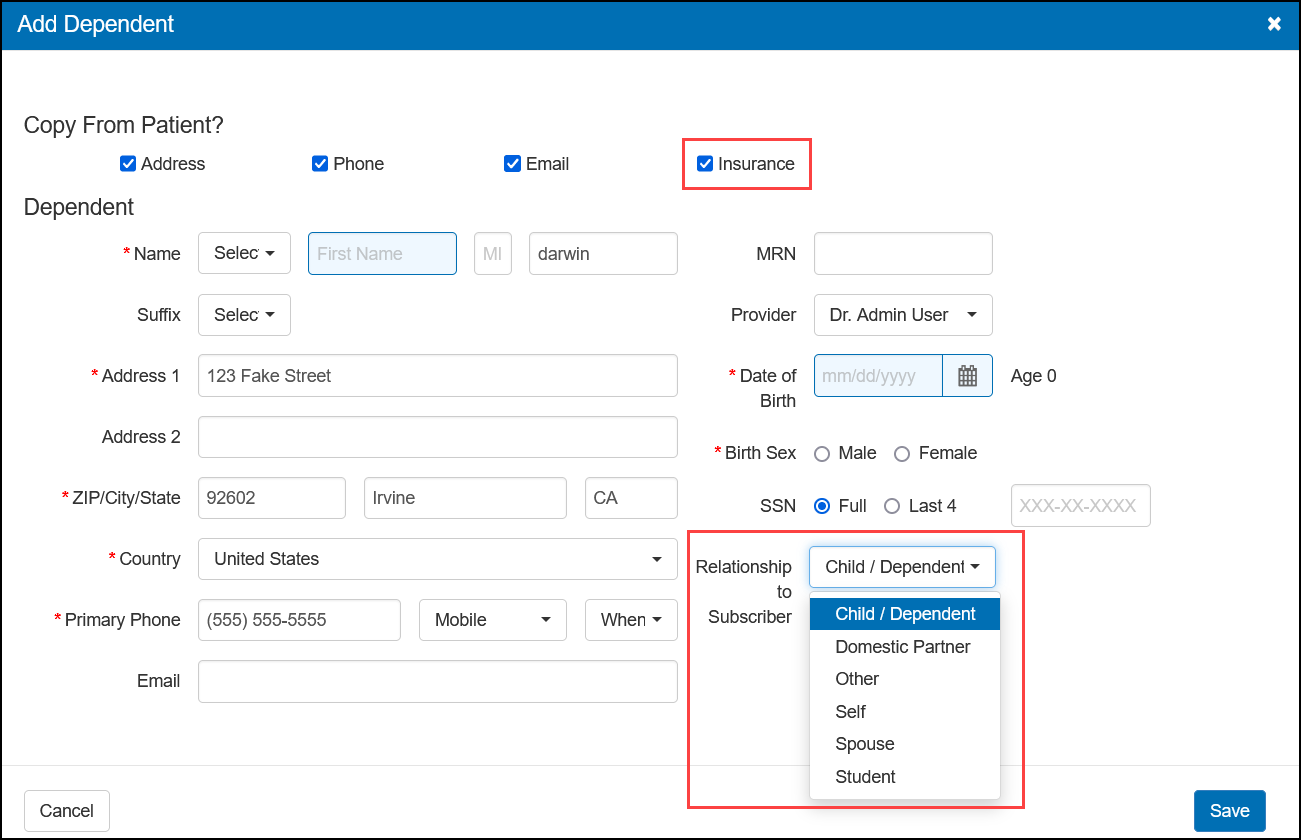
Select Relationship to Subscriber When Copying Insurance to Dependents
The Add Dependent window now allows you to select the Relationship to Subscriber when the Copy From Patient? check box is selected for Insurance. This change helps prevent claim rejections due to incorrect relationship information.
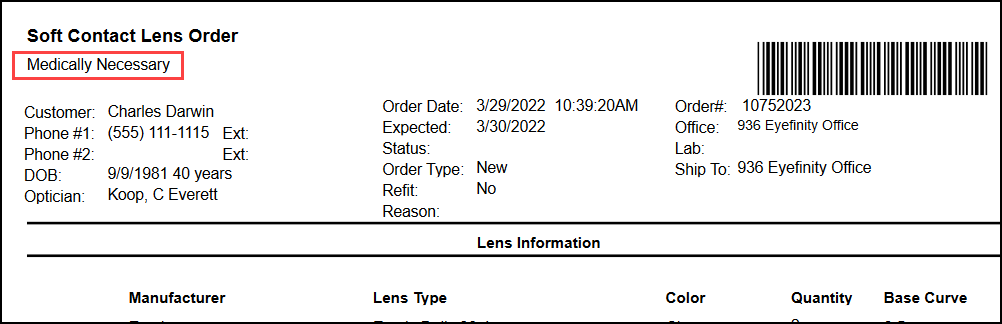
Lab Order Summary for Medically Necessary Contact Lenses
We've updated the printed Lab Order Summary to indicate when an order is for medically necessary contact lenses.
Administration Enhancements
Eyefinity Practice Management 10.38 Administration includes enhancements to the following areas:
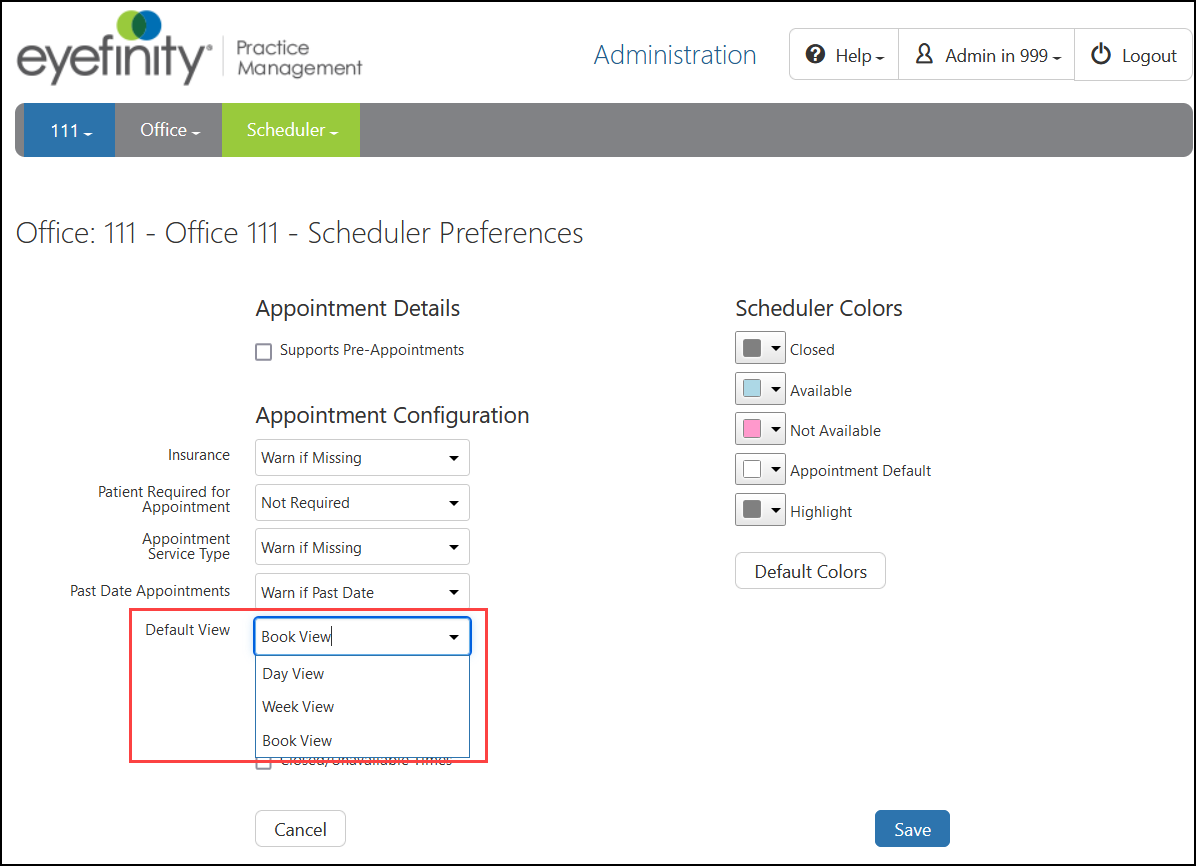
Default View Setting for Book View
You can now select Book View as the Default View in Scheduler Preferences. When this option is selected, the Appointment Calendar will automatically open in Book View.
Required Notes
You can now require staff members to enter a note when performing an adjustment, miscellaneous payment, refund, remake, and/or return. The staff member name, date and time, order number, and action performed are recorded along with the note. Required notes are displayed in the patient Notes screen and are printed on the Required Note Audit Report. Use this feature if you would like your staff to record the reason or other information about transactions they're processing.
If you select Refund along with one or more other transaction types, only one note is required when the transaction results in a refund.
- From the menu, select Preferences and select Material Orders.
- Click Required Notes.
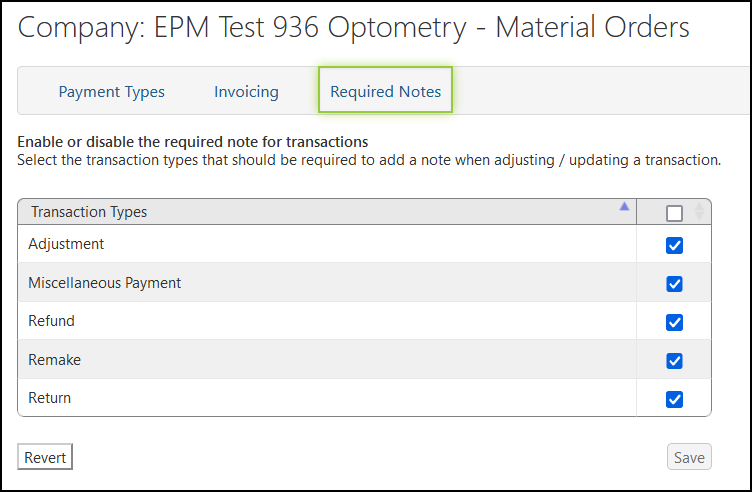
- Select the check box next to each transaction type you want to require notes for.
- Click Save.
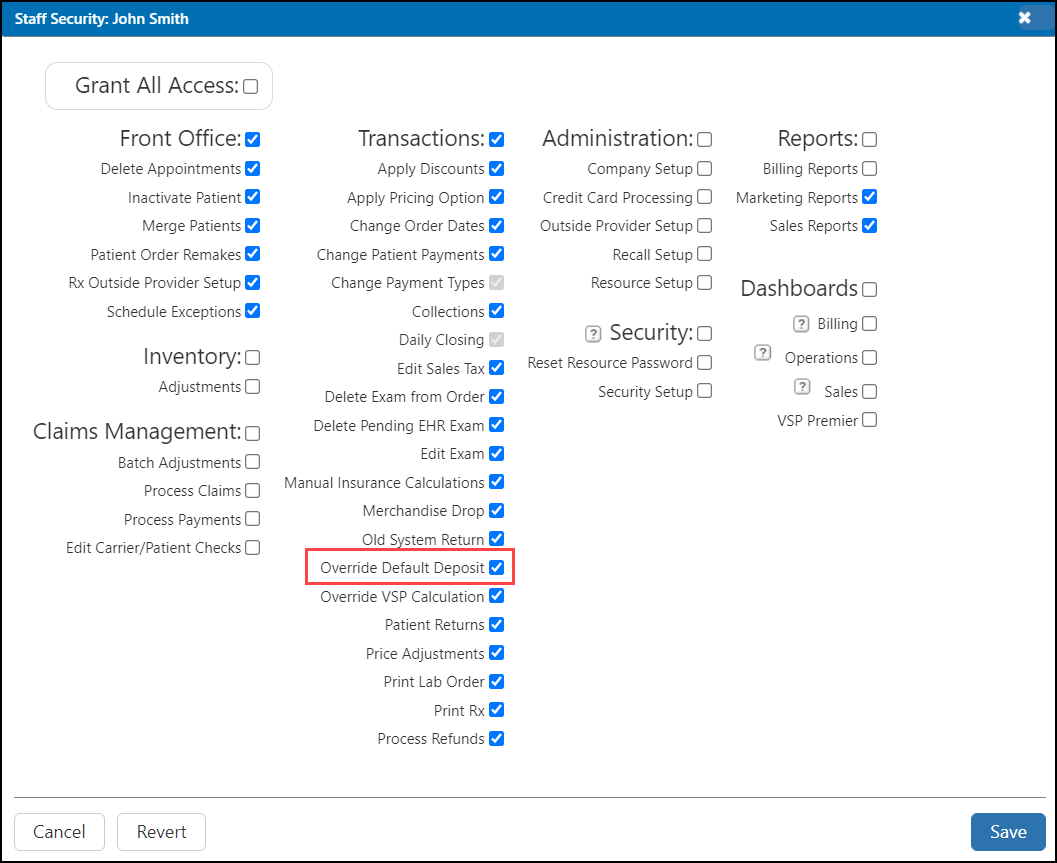
Minimum Payment Percentage for Checkout
We've added the ability to set a default minimum percentage that a patient must pay when an invoice is generated or when you enter a payment for an invoiced order.
- From the menu, select Preferences and select Material Orders.
- Click Invoicing.
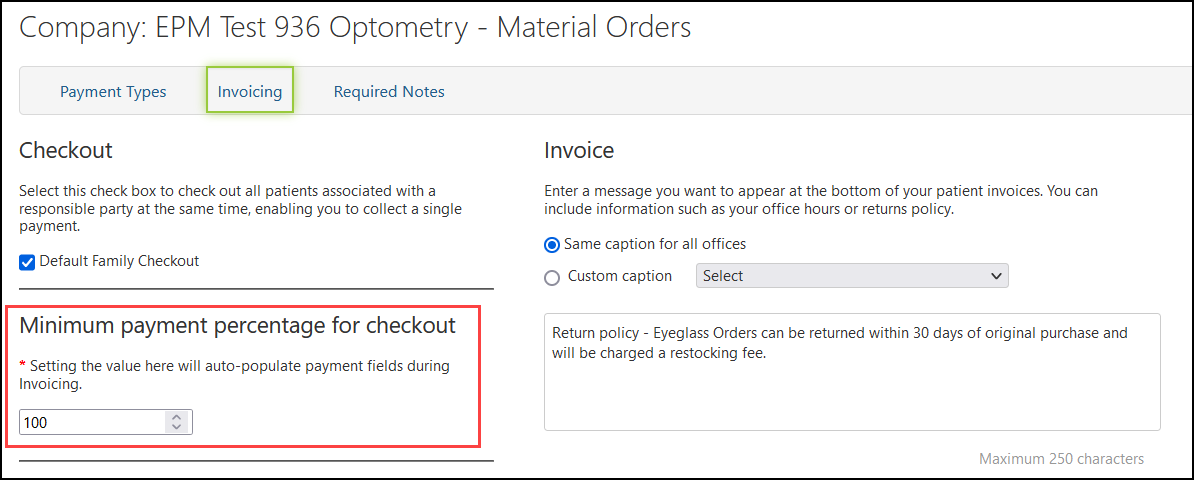
- Enter the value for the minimum payment percentage. If you enter 0, no minimum payment will be required.
- Click Save.
Providers and staff members with the new Override Default Deposit security permission selected in Provider Security and Staff Security can override this setting.
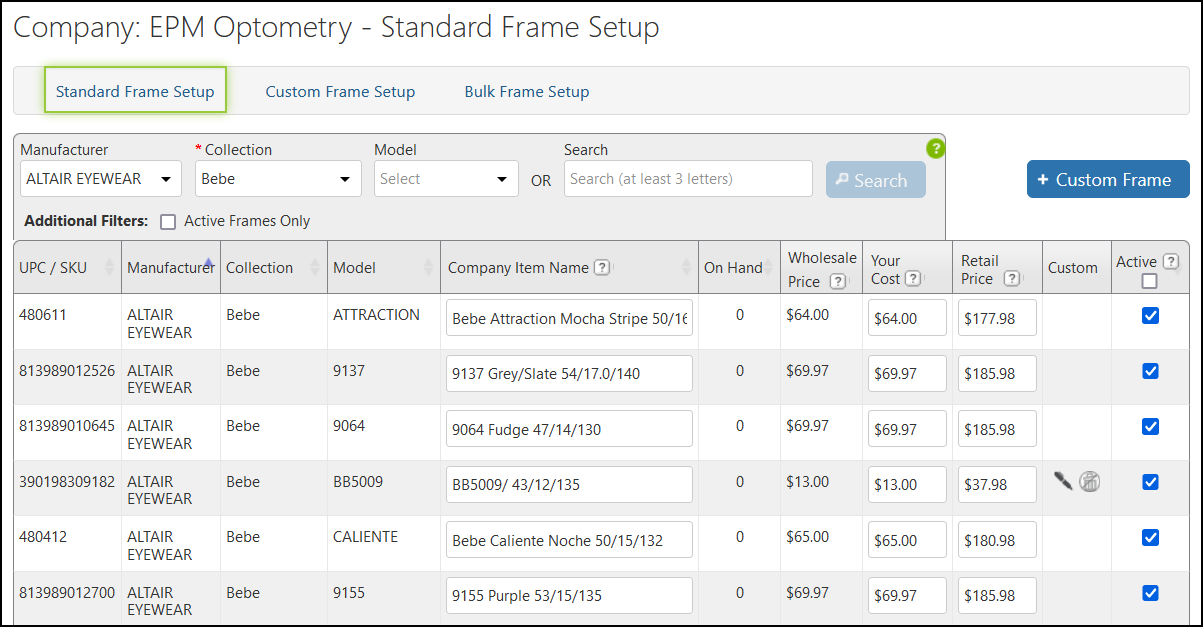
Standard Frame Setup Update
Standard Frame Setup no longer requires you to select a Model when you search for frames. Selecting just the Manufacturer and the Collection enables you to see all the models included in the collection. Use this setting if you need to activate or inactivate multiple models at one time.
Eyefinity EHR Integration Enhancement
If your practice uses Eyefinity EHR with Eyefinity Practice Management, you'll see the following update.
Automatic Check In for Eyefinity EHR
When you set a patient's appointment status in the Eyefinity Practice Management Appointment Calendar to Checked In, this information is now shared with your Eyefinity EHR system. The patient is automatically added to the Eyefinity EHR Office Flow, in a room called "Checked-In"
This feature is disabled by default with this release. To enable it:
-
Log into the Eyefinity EHR web application as an administrator.
-
Locate the Office Flow Management tile and click Manage Automatic Front Desk Check-in.
-
Select the Yes radio button and click Save.
The "Checked-in" room is added to Office Flow. If you're in a multilocation practice, the "Checked-in" room is added to each of the facilities. If you disable automatic check-in, the "Checked-in" room is removed from all facilities.
New VSP Interface Enhancement
The following enhancement is only for practices using the new VSP interface.
If you have questions about the status of your practice, contact Eyefinity Customer Care at epmsupport@eyefinity.com.
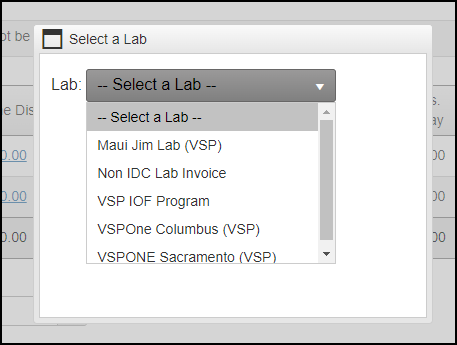
Improved Lab Selection During Pricing
The system now includes any valid labs that are not currently activated for your practice when prompting you to select a VSP lab during VSP Calculation. If you select one of these labs, the system will automatically activate it for you.
Fixed Issues
Eyefinity Practice Management 10.38 includes fixed issues in the following areas:
Front Office
-
When Backside UV coating is automatically added to a non-VSP order, it is now shown in the Additional Coating drop-down list in the Choose Lenses screen. Previously, the screen would not indicate when the coating was added.
-
You're no longer required to enter an Add value when you record an eyeglass prescription and select Occupational for the Eyeglass Rx Type. You can include an Add value, if needed, but it is now an optional field.
-
For practices using the Eyefinity Integrated Online Scheduler, appointments scheduled online are no longer automatically set to Canceled status in the patient's Appointment screen. These appointments will now have the correct Scheduled status.
-
The Patient Open EEHR Exams Report now includes exams received from Eyefinity EHR that have been added to orders but have not been invoiced. Previously, the report would incorrectly list only exams that had not been added to orders, regardless of invoice status.
-
Moving the mouse wheel no longer incorrectly changes the amounts in the Patient Copay, Patient Responsibility, and Insurance Reimbursement fields in the Manual Calculation window.
-
Unknown errors no longer occur when you return exam-only orders.
-
Sales adjustments are now correctly printed on the invoices when multiple orders with insurance are paid together.
-
When you remake a contact lens order, you can now successfully reapply the authorization from the original order in the Pricing screen. Previously, the authorization would be unavailable.
-
The Appointment Status Report now generates correctly when the Deleted and Canceled appointment statuses are not selected.
-
Duplicate items no longer incorrectly display when adding an inventory adjustment.
-
The Add Additional Address window no longer displays duplicate Address Types.
-
Several frames that failed to load into the system from Frames Data have been added.
-
Issues with frames having incorrect wholesale frame prices and edge types have been corrected.
-
For contact lens orders, the Add Shipping Fee window now opens correctly when you select Mail to Patient for the Ship To method in the Order Summary screen and click Continue to Pricing.
Administration
-
Unknown errors no longer occur when you click Preview Calculation in Bulk Frame Setup.
New VSP Interface
-
Private Pay lab orders no longer go on hold due to the "Target URL is missing from the request" error.
-
An issue where lab orders would be transmitted with the wrong material type has been corrected.
-
Exam orders that include only a CL Fit (92310) are now transmitted correctly to VSP.
Known Issues
-
When searching for labs, if you check or clear the Active Only check box and the filter doesn't immediately apply, click Search and the filter is applied to the list.
-
When searching Place of Service under Claims Management, if the list doesn't immediately filter correctly when you check or clear the Active Only check box, click Search and the filter is applied.
Eyefinity Practice Management 10.38.1
Release Date: April 15, 2022
Eyefinity Practice Management 10.38.1 fixes the following issues:
-
When configured in the Invoice Customization settings in Administration, the Promise Date now displays on customer invoices.
-
Lab "On Hold" orders no longer result in failed claims.
-
Patient appointments made in the Appointment Calendar now assign the correct date, without requiring you to clear your browser's cache.
Eyefinity Practice Management 10.38.2
Release Date: April 28, 2022
Eyefinity Practice Management 10.38.2 fixes the following issues:
-
The day of the week now displays in Day and Book View on the Appointment Calendar.
-
The year now displays in all Appointment Calendar views.
-
Variances are now correctly shown in red on the Daily Closing screen.
-
Deleting pending exams no longer causes the system to freeze.
-
Diagnosis codes are now successfully imported from Eyefinity EHR and correctly associated with procedure codes.
-
Errors no longer occur when adding a patient from the Appointment Calendar.
Eyefinity Practice Management 10.38.4
Release Date: June 1, 2022
Enhancements
Eyefinity Practice Management 10.38.4 includes enhancements to the following areas:
Sales by Provider and Staff Dashboard
We've added the option to include UPC information in the Average Provider Sales - Invoice Detail Line Items report located in the Total Services by Provider section of the Sales by Provider and Staff Dashboard. Select the new UPC Code check box to include UPC information in exported CSV and XSL files.
- Click Reporting and select Dashboard.
- In the left-side menu, click Sales by Provider & Staff.
The Sales by Provider & Staff Dashboard opens.
- Click the Total Services by Provider chart.
The Average Provider Sales - Invoice Detail Line items panel opens.
-
Click the
 icon.
icon. -
Select the UPC Code check box.
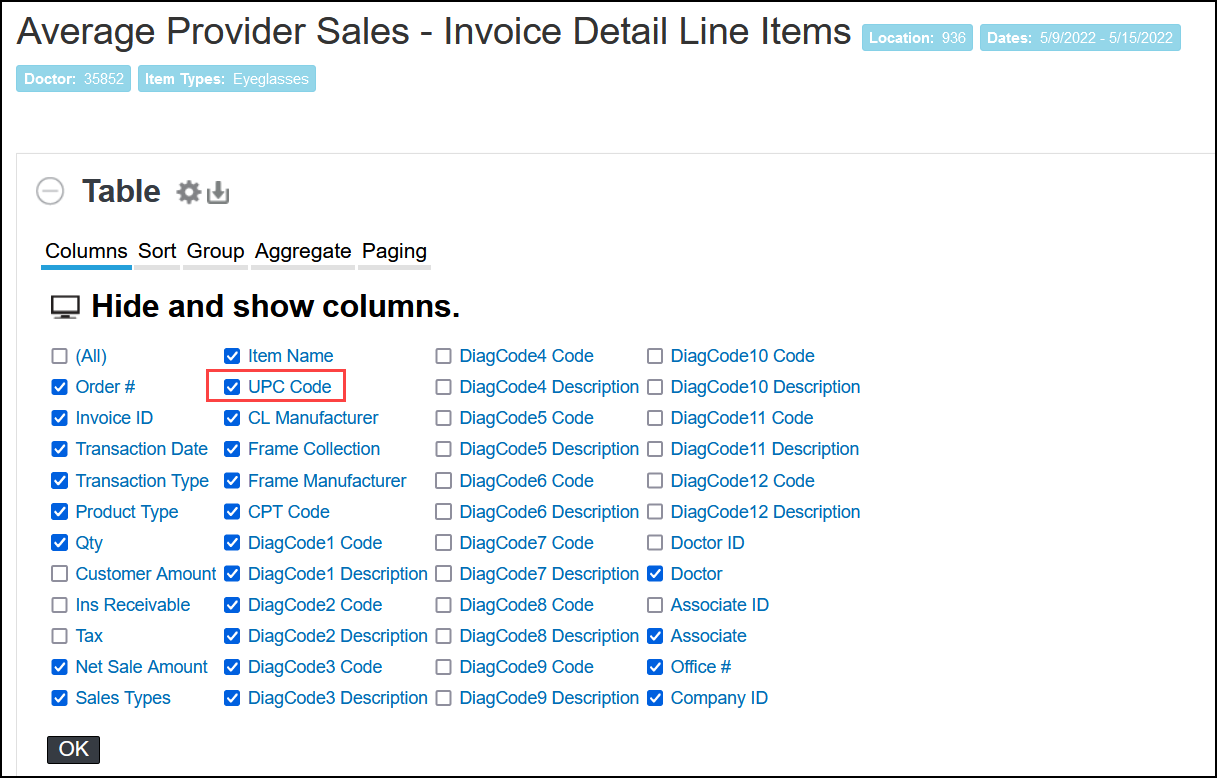
-
To export, click the
 icon and select either Excel or CSV.
VSP Insured ID Information in Edit Insurance
The Edit Insurance window has been updated to make it easier to access the VSP ID information you need to look up patients on eyefinity.com.
When you click + Check for VSP Insurance and enter the patient or subscriber information, the system obtains information from VSP and displays it in the Edit Insurance window. The Last 4 and Full ID fields have been removed from the Edit Insurance window and the Insured ID field has been improved to display ID information available from VSP, as follows:
-
When available, the Full SSN or Member Policy ID will display (depending on which information you entered and what was returned by the VSP search).
-
If the Full SSN or Member Policy ID is not available, the patient's Extended ID is displayed.
-
If neither the Full SSN or Member Policy ID, nor the Extended ID is available, the Last 4 SSN is displayed.
-
If none of the above information is available, the Subscriber Consumer ID is displayed.
Fixed Issues
Eyefinity Practice Management 10.38.4 fixes the following issues:
-
When sending an order with a specialty coating, the lab receives "Other Mirror Coating" and the associated 24 character description.
-
When editing an order with VSP insurance, if you remove the VSP insurance and add it back, the benefits display in green.
-
You can no longer manually add a VSP, VSP Medicaid, or VSP Discount carrier to the Insurance Details screen - this is to prevent duplication of providers.
-
When an estimate is performed on VSP orders (excluding VSP Medicaid), the UNCUT option remains selected.
-
When using +VSP Providers, the system lists only active providers at the location the user is logged into who have not been added.
-
Duplicate sale, payment, refund, remake, and adjustment transactions are no longer created when you double-click the button to submit the transactions.
-
Errors no longer occur due to missing tint color descriptions when submitting VSP eyeglass orders.
-
To prevent VSP claims from going on hold due to invalid prism value errors, the Rx: Glasses screen now prevents you from entering values greater than 15 in the H. Prism and V. Prism fields.
-